
My starting pick for the best deck for Arena 12 is Giant Musketeer Fundamentals if your card levels are similar. It gives you a tank, a ground damage dealer, reliable air defense and two clear swarm answers without requiring a Legendary. If Hog Rider is already your strongest win condition, start with Hog Valkyrie Control instead. A well-upgraded deck you understand is a better next step than eight fashionable cards you cannot yet support.
Spooky Town brings new choices, including Graveyard, Wall Breakers, Firecracker and Earthquake. You do not need to rebuild just because you unlocked them. Below are 30 Arena 12 decks, grouped by how they play, with the cards, average elixir, copy link and the decisions that make each list work.
Arena check: reviewed September 13, 2026. Arena 12 is Spooky Town, starting at 3,800 trophies; Arena 13 starts at 4,200. These lists use standard cards available by Arena 12. They do not require Evolutions, Heroes, Champions or a premium Tower Troop. Availability does not mean every card is already in your collection.
Which Arena 12 deck should you choose?
Start with your best-leveled win condition, then check whether you can field the listed air defense and spells. These are recommendations by play style, not a measured win-rate ranking.
| Your situation | Start here | Main tradeoff |
|---|---|---|
| You want clear roles and no Legendary requirement | Giant Musketeer Fundamentals | A slower rotation than Hog cycle |
| Your Hog is leveled and ground swarms are a problem | Hog Valkyrie Control | Buildings can limit tower access |
| Buildings keep stopping your Hog | Hog Firecracker Earthquake | Earthquake gives little help against air |
| You want to use Graveyard | Knight Graveyard Poison | You need patience and surviving support |
| You prefer quick, small attacks | Miner Wall Breakers Control | Fragile air defenders |
| Heavy ground pushes are beating you | P.E.K.K.A Battle Ram | Expensive defense and no building |
| You already have a leveled Royal Giant | Royal Giant Lightning | Hunter placement needs care |
Each card list below is in image order: left to right across the top row, then the bottom row. Each card has its own line with its elixir cost and job in the deck. Matchup notes explain the defensive response rather than assigning an unsupported win rate. Open the copy link on a device with Clash Royale installed, and check the imported cards before playing.
Start with a deck you can defend with
If you are unsure where to begin, choose the list closest to your upgraded collection. The first six options make the defensive jobs easier to see.
Giant Double Prince
Choose this if both Princes are already leveled and you like turning a stopped push into one dangerous attack.

Average elixir: 3.5
Cards and their roles
- Giant (5 elixir): Tanks tower fire and protects surviving support during the counterattack.
- Prince (5 elixir): Deals focused ground damage, then threatens a charge on the counterattack.
- Dark Prince (4 elixir): Clears ground groups and shields the approach of your damage dealers.
- Mega Minion (3 elixir): Provides concentrated air or ground damage from a flying defender.
- Bats (2 elixir): Adds cheap air-targeting damage once splash and small spells are occupied.
- Fireball (4 elixir): Hits clustered support immediately; seek useful troop damage alongside the tower.
- Zap (2 elixir): Resets an Inferno or other interruptible target and clears fragile distractions.
- Miner (3 elixir): Reaches the tower or an exposed support troop without walking through the lane.
Why this deck works
The two Princes solve different problems. Prince supplies concentrated ground damage; Dark Prince clears small units that would waste Prince's hits. Giant takes tower fire so that surviving defenders can keep attacking. Miner is useful when a ranged defender stands safely behind the opponent's main defense, but he is an extra investment rather than part of every push.
How to play the opening and double elixir
First minute: Start with split Bats or a Mega Minion behind your King Tower. Let Prince handle the opposing tank and Dark Prince clean up ground support.
Double elixir: Put Giant ahead of a surviving Prince. Hold Zap for Inferno ramp-up or a swarm, and send Miner only when you can still defend the other lane.
Defense and tradeoff: The two Princes cover ground well, but Mega Minion and Bats carry most of the air defense. Space them against splash and spells.
Matchups and defensive decisions
- Against Giant with ground support, meet the tank with Prince and let the support cross before committing Dark Prince. Adding both at the same spot lets splash damage hit your entire defense.
- Against Balloon, preserve Mega Minion and spread Bats away from it. If their small spell removes Bats, you need the healthier air defender still attacking; the Princes cannot help with Balloon itself.
A decision to watch: After Prince survives a defense, Giant in front can turn the remaining health into pressure. If they immediately play Inferno Tower, keep Miner in hand until you can afford a reset and defend the opposite lane.
Common mistake
Avoid this: A Giant plus both Princes from an empty board leaves too little elixir to react.
Replacements and upgrade priorities
- No Miner? Use Arrows for extra swarm removal. You lose the second tower-pressure option.
- Mega Minion can become Minions at the same cost, giving you more bodies but a different vulnerability to splash and Arrows.
Upgrade focus: Giant, Prince, then your main spells.
Giant Musketeer Fundamentals
This is my starting recommendation if you want clear card jobs without needing a Legendary. Giant tanks, Mini P.E.K.K.A removes ground threats, and Musketeer covers air.

Average elixir: 3.6
Cards and their roles
- Giant (5 elixir): Tanks tower fire and protects surviving support during the counterattack.
- Mini P.E.K.K.A (4 elixir): Removes high-health ground attackers while a tank or building absorbs pressure.
- Musketeer (4 elixir): Supplies sustained ranged damage, especially against air threats.
- Bomber (2 elixir): Clears ground swarms; cannot help against flying attackers.
- Minions (3 elixir): Provides flying damage against air or ground targets; keep clear of splash.
- Goblin Cage (4 elixir): Pulls building-targeting attackers centrally, then releases a Brawler for cleanup.
- Fireball (4 elixir): Hits clustered support immediately; seek useful troop damage alongside the tower.
- Arrows (3 elixir): Removes vulnerable swarms over a wide area, including flying units.
Why this deck works
Giant is the only card that should be asked to absorb sustained tower fire. Mini P.E.K.K.A handles high-health ground units, while Bomber clears the small troops that distract him. Goblin Cage buys time for Musketeer to work from range. Keeping these jobs separate makes it easier to see whether a loss came from a missing answer or spending that answer too soon.
How to play the opening and double elixir
First minute: Use Goblin Cage to draw a building-targeting attacker into the middle. Place Musketeer away from the tower so one Fireball cannot hit both.
Double elixir: Once your defender survives, put Giant in front. Add Bomber against ground swarms or Minions against a single-target defender, rather than stacking both automatically.
Defense and tradeoff: Cage and Mini P.E.K.K.A give you two different defensive tools. The heavier cycle makes a second quick Hog attack awkward if you spend both on the first.
Matchups and defensive decisions
- Against Hog Rider, use Cage to pull toward the middle and add Mini P.E.K.K.A only if the support or remaining Hog health warrants it. Spending both on an easy defense weakens your next rotation.
- Against Giant and Witch, pull Giant with Cage and approach Witch with a separate defender once she crosses. Bomber helps clear her Skeletons; Musketeer should stay away from the troop cluster.
A decision to watch: If Cage defends and the Goblin Brawler survives, let that survivor lead a modest attack. You do not need to add Giant to every Brawler; save five elixir when the opponent still has a complete defense ready.
Common mistake
Avoid this: Do not open Giant, Musketeer and Bomber in one lane before seeing the opponent's win condition.
Replacements and upgrade priorities
- Mega Minion can replace Minions when you prefer one sturdier air defender. Its slower attacks change swarm defense.
- Knight can replace Mini P.E.K.K.A for a cheaper, sturdier blocker, but you lose burst damage against tanks. That trade needs careful Cage and Musketeer placement.
Upgrade focus: Giant and Musketeer first; keep Fireball and Arrows useful against the defenders you meet.
Hog Firecracker Earthquake
Pick this when buildings keep pulling your Hog and you have Firecracker leveled. Earthquake attacks that problem directly.

Average elixir: 2.8
Cards and their roles
- Hog Rider (4 elixir): Main tower attacker; punish an unavailable building or an expensive commitment.
- Valkyrie (4 elixir): Clears ground support and swarms while giving ranged defenders room to work.
- Firecracker (3 elixir): Provides ranged splash; place her carefully to limit enemy King Tower activations.
- Skeletons (1 elixir): Distracts single-target ground attackers and speeds your rotation at low cost.
- Ice Spirit (1 elixir): Briefly freezes nearby targets after its jump, buying your defenders attack time.
- Tesla (4 elixir): Pulls attackers and supplies building damage against both air and ground.
- Earthquake (3 elixir): Damages buildings and nearby ground targets; offers no damage against air.
- The Log (2 elixir): Clears ground swarms and pushes back eligible ground troops along its path.
Why this deck works
Hog forces a building or a troop response, and Earthquake makes a building response more expensive to repeat. The rest of the deck exists to defend cheaply enough to try again. Firecracker supplies ranged splash, but she should not be your only plan for stopping an air push. Tesla needs to stay available when the opponent's air win condition is in hand.
How to play the opening and double elixir
First minute: Probe with a lone Hog when your defense is ready. Identify the building before spending Earthquake; Skeletons and Ice Spirit let you rotate cheaply.
Double elixir: Cycle back to Hog after a clean defense. Earthquake the building and tower together when placement allows, while saving Tesla for the return push.
Defense and tradeoff: Valkyrie handles ground groups and Tesla covers both air and ground. Firecracker can give the opponent a King Tower activation, so her placement matters.
Matchups and defensive decisions
- Against Cannon or Tesla, first see where it is placed. Earthquake is strongest when its area covers the building and tower together; a high building may force you to choose between damaging it and chipping the tower.
- Against Balloon with a small spell, separate Tesla and Firecracker. Use Ice Spirit to buy attack time after the Balloon commits, rather than cycling it away before you know whether your air defense will survive.
A decision to watch: If their building stops Hog and your Earthquake is out of hand, defend and rotate. Sending another Hog into the same healthy building usually gives away the advantage the cheap cycle was meant to create.
Common mistake
Avoid this: A prediction Earthquake against an unseen building is three elixir you may need on defense.
Replacements and upgrade priorities
- Zap can replace The Log, trading knockback and ground coverage for an air reset. Recheck your answers to Goblin Barrel.
- Musketeer can replace Firecracker if she is stronger in your collection, but adds one elixir and removes the long-range splash pattern.
Upgrade focus: Hog, Firecracker and Earthquake.
Hog Ice Golem Cycle
The familiar 2.6 shell suits players who enjoy precise pulls and quick rotations. It is less forgiving than the Valkyrie options.

Average elixir: 2.6
Cards and their roles
- Hog Rider (4 elixir): Main tower attacker; punish an unavailable building or an expensive commitment.
- Ice Golem (2 elixir): Draws troops away and tanks briefly; its death effect slows nearby enemies.
- Musketeer (4 elixir): Supplies sustained ranged damage, especially against air threats.
- Skeletons (1 elixir): Distracts single-target ground attackers and speeds your rotation at low cost.
- Ice Spirit (1 elixir): Briefly freezes nearby targets after its jump, buying your defenders attack time.
- Cannon (3 elixir): Cheap central pull and ground damage; does not attack air.
- Fireball (4 elixir): Hits clustered support immediately; seek useful troop damage alongside the tower.
- The Log (2 elixir): Clears ground swarms and pushes back eligible ground troops along its path.
Why this deck works
The strength of this shell is the speed at which you can return to Cannon, Musketeer and Hog. That only matters if the cheap cards get useful work done. Ice Golem pulls troops away, Skeletons distract a single-target attacker, and Ice Spirit buys a short extra window. They do not replace a full defender when used late or in the wrong lane.
How to play the opening and double elixir
First minute: Split Skeletons or cycle Ice Spirit first. Keep Musketeer available until you know whether Balloon or another air threat is coming.
Double elixir: Use cheap defenses to reach a second Hog before their building returns. An Ice Golem ahead of Hog helps against small defenders when you can afford it.
Defense and tradeoff: Cannon pulls the main attacker; Ice Golem leads support away while Musketeer shoots. Your air coverage depends heavily on keeping her alive.
Matchups and defensive decisions
- Against a heavy ground push, pull the main attacker with Cannon and use Ice Golem to lead support away from Musketeer. Add Skeletons after splash support is occupied, not directly in front of it.
- Against a building deck, count the cards played after the building. In a normal eight-card rotation it takes four other cards to return to that card, so a second Hog can have a better opening than the first.
A decision to watch: Suppose Musketeer survives with low health and the opponent still has Balloon. Sending Hog is optional; placing Ice Golem to protect her and keeping Cannon ready can be worth more than forcing a small counterattack.
Common mistake
Avoid this: Do not turn every defense into a full Hog push. A surviving Musketeer is also your answer to the next air attack.
Replacements and upgrade priorities
- Giant Snowball replaces The Log if needed, but its timing and knockback coverage differ.
- Knight replaces Ice Golem if your pulls are unreliable, but the deck becomes heavier and Knight fights instead of walking past troops in the same way.
Upgrade focus: Hog and Musketeer, then Fireball. Practice placement before investing in a different cycle deck.
Hog Knight Fireball
A no-Legendary Hog option for a collection built around Knight and Musketeer. Knight is easier to leave fighting on defense than Ice Golem.

Average elixir: 2.8
Cards and their roles
- Hog Rider (4 elixir): Main tower attacker; punish an unavailable building or an expensive commitment.
- Knight (3 elixir): Durable ground blocker that protects fragile defenders and can tank a counterattack.
- Musketeer (4 elixir): Supplies sustained ranged damage, especially against air threats.
- Skeletons (1 elixir): Distracts single-target ground attackers and speeds your rotation at low cost.
- Ice Spirit (1 elixir): Briefly freezes nearby targets after its jump, buying your defenders attack time.
- Cannon (3 elixir): Cheap central pull and ground damage; does not attack air.
- Fireball (4 elixir): Hits clustered support immediately; seek useful troop damage alongside the tower.
- Zap (2 elixir): Resets an Inferno or other interruptible target and clears fragile distractions.
Why this deck works
Knight makes this a more direct defensive Hog deck than the Ice Golem version. He can stay on a ground attacker while Musketeer shoots, which helps when your timing is still developing. The trade is that Zap gives you a reset and air coverage but less ground clearing than The Log. Identify your Goblin Barrel answer before spending Knight and Zap on offense.
How to play the opening and double elixir
First minute: Test with Hog alone or split Skeletons. Knight should meet support troops on your side while Cannon draws the win condition away.
Double elixir: Attack after Musketeer survives, then return to defense. Fireball is most useful when it catches a defender and tower together.
Defense and tradeoff: Knight cannot kite a push in the same way as Ice Golem, and Zap is not a dependable equal-level replacement for The Log against every ground swarm.
Matchups and defensive decisions
- Against Goblin Barrel, inspect your actual Zap level and damage instead of assuming it clears the Goblins. Knight and carefully timed cheap support may be needed when Zap leaves them alive.
- Against P.E.K.K.A, use Cannon to pull, then spread Skeletons and Musketeer so one supporting splash troop cannot remove everything. Knight should occupy the support rather than stand beside Cannon taking the same hits.
A decision to watch: A lone Hog tells you whether their first answer is a building or swarm. If it is Skeleton Army, keeping Zap for the next attack has more value than using it to chip the tower at the end of this one.
Common mistake
Avoid this: Spending Zap for a little tower damage can leave Skeleton Army or Bats unanswered on your Hog.
Replacements and upgrade priorities
- Use The Log over Zap if it is unlocked and leveled; keep Musketeer reserved for air threats.
- Tesla can replace Cannon to add a building that attacks air, at one extra elixir. Do not keep cycling as though the original cheaper defense were unchanged.
Upgrade focus: Hog, Musketeer and Fireball before low-cost cycle cards.
Hog Valkyrie Control
Choose the extra ground splash when Witch support and clustered troops are causing more trouble than buildings.

Average elixir: 2.9
Cards and their roles
- Hog Rider (4 elixir): Main tower attacker; punish an unavailable building or an expensive commitment.
- Valkyrie (4 elixir): Clears ground support and swarms while giving ranged defenders room to work.
- Musketeer (4 elixir): Supplies sustained ranged damage, especially against air threats.
- Skeletons (1 elixir): Distracts single-target ground attackers and speeds your rotation at low cost.
- Ice Spirit (1 elixir): Briefly freezes nearby targets after its jump, buying your defenders attack time.
- Cannon (3 elixir): Cheap central pull and ground damage; does not attack air.
- Fireball (4 elixir): Hits clustered support immediately; seek useful troop damage alongside the tower.
- The Log (2 elixir): Clears ground swarms and pushes back eligible ground troops along its path.
Why this deck works
Valkyrie covers the ground-splash job that the faster Hog lists must handle through several placements. Cannon pulls the win condition away from the tower, giving her time to reach the support instead. Musketeer then supplies steady ranged damage. The deck is comfortable separating a ground push, but it still needs a plan for buildings because it has no Earthquake.
How to play the opening and double elixir
First minute: Let Cannon pull the tank, then drop Valkyrie onto the support once it crosses. Keep Musketeer far enough away to avoid shared spell value.
Double elixir: Hog in front of surviving support is your main pressure. Against a building, wait for a cycle advantage or worthwhile Fireball rather than forcing every attack.
Defense and tradeoff: Valkyrie simplifies swarm defense, but the cycle is slower than the Ice Golem version. Inferno Tower and durable buildings can make tower access difficult.
Matchups and defensive decisions
- Against Giant and Wizard, pull Giant centrally and let Wizard walk within reach of Valkyrie. Placing her on Giant leaves Wizard free to damage your cheap troops and Musketeer.
- Against a fast Hog mirror, avoid using Cannon for a troop you could have handled with Valkyrie. Losing access to Cannon can force a much more expensive defense when their next Hog arrives.
A decision to watch: If Valkyrie finishes a defense near the bridge, Hog can move ahead while she clears a ground swarm. Hold Fireball until a defender appears; the survivor does not make an eight-elixir attack automatically worthwhile.
Common mistake
Avoid this: Do not place Valkyrie on the tank while its support gets a free run at your tower.
Replacements and upgrade priorities
- Knight is a cheaper replacement, but you must use The Log and careful positioning for the lost splash.
- Tesla can replace Cannon if air decks are the recurring problem, but the extra elixir slows the rotation and does not replace protecting Musketeer.
Upgrade focus: Hog, Valkyrie, Musketeer, then Fireball.
Build around Graveyard after a clean defense
Graveyard is an Arena 12 unlock. These six approaches need different support cards, so choose by your collection rather than assuming the newest Legendary is automatically an upgrade.
Knight Graveyard Poison
This is a patient Graveyard starting point: defend, keep one troop alive, then make the tower choose between it and the Skeletons.

Average elixir: 3.4
Cards and their roles
- Graveyard (5 elixir): Main tower-pressure spell; works best while another unit draws tower fire.
- Knight (3 elixir): Blocks ground support on defense, then tanks tower fire for Graveyard if he survives.
- Baby Dragon (4 elixir): Clears groups with flying splash damage against air and ground.
- Ice Wizard (3 elixir): Slows attackers with ranged splash to buy time for the main damage dealers.
- Tombstone (3 elixir): Pulls building-targeting units and supplies Skeleton distractions on the ground.
- Poison (4 elixir): Controls a defender area over time; strongest when the opponent must stay inside it.
- Barbarian Barrel (2 elixir): Clears fragile ground troops along its path and leaves a Barbarian to distract.
- Mega Minion (3 elixir): Provides concentrated air or ground damage from a flying defender.
Why this deck works
Graveyard needs something else to hold the tower's attention. Knight and Baby Dragon can survive a defense and provide that window without buying a new tank from scratch. Poison controls the defender's area, while Tombstone helps keep the original attack away from your tower. Without Tornado, the support must be spaced and placed deliberately to make splash damage useful.
How to play the opening and double elixir
First minute: Tombstone pulls ground attackers while Knight blocks support. Separate Baby Dragon and Ice Wizard so one spell cannot remove the whole defensive line.
Double elixir: Use Graveyard when a surviving Knight or Baby Dragon is drawing tower fire. Add Poison after seeing the defender, especially if it also covers the tower.
Defense and tradeoff: Baby Dragon clears groups and Mega Minion adds single-target air damage. Without Tornado, you must create good splash angles through placement.
Matchups and defensive decisions
- Against ground beatdown, use Tombstone to pull and Knight to keep support away from Ice Wizard. Baby Dragon can clear the small units around the tank while Mega Minion supplies concentrated damage.
- Against Poison or Valkyrie on defense, avoid paying for Graveyard and Poison automatically. Make the opponent use that answer elsewhere, or take a smaller counterattack and keep enough elixir to stop their return push.
A decision to watch: When Knight survives, wait until the tower actually targets him before committing Graveyard. If Knight is almost dead and the opponent has a clean answer ready, keeping five elixir is often the better exchange.
Common mistake
Avoid this: Graveyard into a tower with no tanking support often spends five elixir for very little.
Replacements and upgrade priorities
- Musketeer can replace Ice Wizard for stronger single-target damage, but costs one more and removes the slowing effect.
- Archers can replace Ice Wizard at the same cost if you need two ranged bodies. You lose slowing control and gain another reason to separate support against spells.
Upgrade focus: Graveyard, Poison and Knight.
Giant Graveyard Swarm
Try this if Giant and Witch are much stronger in your collection than the slow-control support cards.
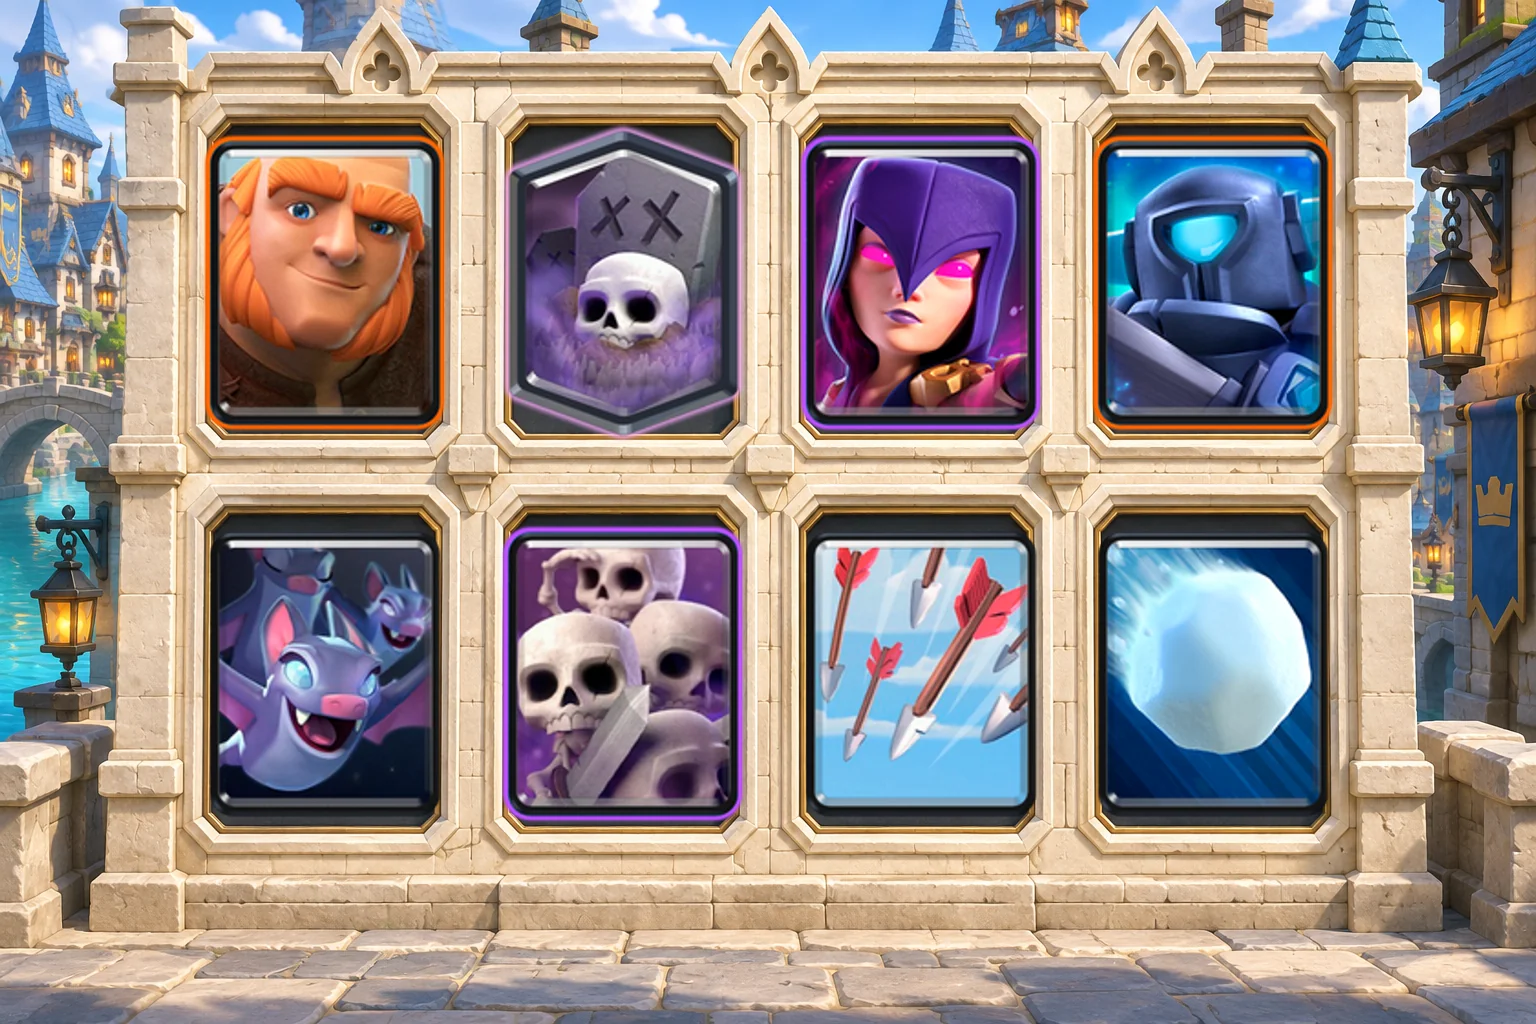
Average elixir: 3.6
Cards and their roles
- Giant (5 elixir): Tanks tower fire and protects surviving support during the counterattack.
- Graveyard (5 elixir): Main tower-pressure spell; works best while another unit draws tower fire.
- Witch (5 elixir): Builds Skeleton support and adds ranged splash; protect the expensive investment.
- Mini P.E.K.K.A (4 elixir): Removes high-health ground attackers while a tank or building absorbs pressure.
- Bats (2 elixir): Adds cheap air-targeting damage once splash and small spells are occupied.
- Skeleton Army (3 elixir): Surrounds ground threats with many bodies; hold it when a clearing spell is ready.
- Arrows (3 elixir): Removes vulnerable swarms over a wide area, including flying units.
- Giant Snowball (2 elixir): Knocks back eligible targets and slows them, buying space for attack or defense.
Why this deck works
This version threatens several groups of small units alongside Giant and Graveyard. That can stretch a single small spell, but only when the groups arrive at different times. Witch is an expensive support investment, and the deck lacks a defensive building. Mini P.E.K.K.A therefore needs to stay available for a ground tank while your swarms are held for a spell opening.
How to play the opening and double elixir
First minute: Use Mini P.E.K.K.A against ground tanks and hold a swarm until the opponent reveals their small spell. Avoid leading with Witch if you cannot cover an opposite-lane attack.
Double elixir: Place Giant ahead of a surviving defender, then Graveyard once Giant takes tower fire. Arrows clears exposed defenders; Snowball buys the Skeletons time.
Defense and tradeoff: Multiple swarms can stretch one small spell, but Wizard, Baby Dragon and Poison punish crowded troops. Air defense is vulnerable after Witch or Bats is removed.
Matchups and defensive decisions
- Against a ground tank with one small spell, defend first with Mini P.E.K.K.A and let the opponent reveal the spell before using Skeleton Army. The Army is much less useful when both are dropped together.
- Against Wizard or Baby Dragon, separate Witch from the swarms and use Arrows only for targets it can meaningfully remove. Repeated splash can erase the bait plan even if the opponent never casts a small spell.
A decision to watch: If the opponent spends their spell on Bats during defense, that may open a Skeleton Army defense later. It does not mean you should immediately commit Giant, Graveyard and Witch into the same lane.
Common mistake
Avoid this: Giant and Graveyard at the bridge with no defensive reserve is an invitation to counterpush.
Replacements and upgrade priorities
- Minions can replace Skeleton Army if you need another air-targeting unit, at the cost of ground distraction density.
- Goblin Cage can replace Skeleton Army for a steadier pull against Hog and Ram Rider. This reduces your swarm pressure but gives the deck a defensive building.
Upgrade focus: Giant and Graveyard, then Arrows and your main surviving support.
Valkyrie Graveyard Archers
Use this when you want Graveyard but lack Ice Wizard or Phoenix. Apart from Graveyard itself, the support avoids Legendaries.

Average elixir: 3.3
Cards and their roles
- Graveyard (5 elixir): Main tower-pressure spell; works best while another unit draws tower fire.
- Valkyrie (4 elixir): Clears ground support and swarms while giving ranged defenders room to work.
- Archers (3 elixir): Provides two ranged air defenders that can split to cover separate lanes.
- Baby Dragon (4 elixir): Clears groups with flying splash damage against air and ground.
- Tombstone (3 elixir): Pulls building-targeting units and supplies Skeleton distractions on the ground.
- Poison (4 elixir): Controls a defender area over time; strongest when the opponent must stay inside it.
- Barbarian Barrel (2 elixir): Clears fragile ground troops along its path and leaves a Barbarian to distract.
- Ice Spirit (1 elixir): Briefly freezes nearby targets after its jump, buying your defenders attack time.
Why this deck works
Archers make the air-defense roles easier to divide: one side of a split can support each lane, or both can focus a threat from a safe distance. Valkyrie clears ground troops that would occupy them, and Baby Dragon covers small groups. The attack still relies on a surviving defender tanking for Graveyard, so the deck rewards keeping troops alive rather than replacing them with a fresh push.
How to play the opening and double elixir
First minute: Split Archers or use Tombstone reactively. Keep Valkyrie for troops walking behind the enemy tank rather than dropping her on everything at once.
Double elixir: Attack with Graveyard after Valkyrie survives a defense. Poison the actual response, and save Baby Dragon when an air counterpush is possible.
Defense and tradeoff: Archers and Baby Dragon share air defense. Space the Archers so a spell cannot also catch your tower and splash unit.
Matchups and defensive decisions
- Against Goblin Barrel or ground swarms, preserve Barbarian Barrel or Valkyrie instead of spending both in an attack. A defensive Valkyrie can become the tank for your next Graveyard.
- Against Balloon, Tombstone can pull the building-targeting unit but cannot shoot it. Archers must supply the damage; Baby Dragon alone may be too slow against a supported Balloon.
A decision to watch: If the opponent uses Poison on your Archers near the bridge, avoid putting Graveyard and Baby Dragon into the same damaged area. Defend with the cards left in hand and look for a later tanking window.
Common mistake
Avoid this: Poison is not mandatory on every Graveyard. Casting both automatically can leave you nine elixir down.
Replacements and upgrade priorities
- Knight replaces Valkyrie for a cheaper cycle, but Baby Dragon must take more responsibility for ground swarms.
- Musketeer replaces Archers for a single ranged defender with more concentrated damage. The extra elixir and lost split option change how you cover two lanes.
Upgrade focus: Graveyard, Poison, Valkyrie and Archers.
Giant Skeleton Graveyard
For players who want a defensive anchor before committing to Graveyard. Giant Skeleton's death bomb discourages tightly packed ground pushes.

Average elixir: 3.6
Cards and their roles
- Graveyard (5 elixir): Main tower-pressure spell; works best while another unit draws tower fire.
- Giant Skeleton (6 elixir): Anchors ground defense and threatens nearby troops with its death bomb.
- Musketeer (4 elixir): Supplies sustained ranged damage, especially against air threats.
- Baby Dragon (4 elixir): Clears groups with flying splash damage against air and ground.
- Tombstone (3 elixir): Pulls building-targeting units and supplies Skeleton distractions on the ground.
- Poison (4 elixir): Controls a defender area over time; strongest when the opponent must stay inside it.
- Barbarian Barrel (2 elixir): Clears fragile ground troops along its path and leaves a Barbarian to distract.
- Ice Spirit (1 elixir): Briefly freezes nearby targets after its jump, buying your defenders attack time.
Why this deck works
Giant Skeleton gives the defense a physical center. Place the fight where his death bomb threatens useful enemy troops, then keep Musketeer and Baby Dragon outside shared spell value. If he survives, Graveyard turns his remaining health into tower pressure. If he dies too far from the enemy support, the bomb does not repay the six-elixir investment, so placement matters more than adding more troops.
How to play the opening and double elixir
First minute: Pull the attacker with Tombstone and place Giant Skeleton where its bomb will threaten the supporting troops. Keep Musketeer out of the same spell area.
Double elixir: If Giant Skeleton survives, let it walk ahead before casting Graveyard. You can also win small exchanges without forcing the expensive counterattack.
Defense and tradeoff: Musketeer provides sustained air damage. Ranged support can stand outside the bomb, and a well-spaced attack will not disappear just because Giant Skeleton dies.
Matchups and defensive decisions
- Against a ground push with ranged support, use Tombstone to draw the tank while Giant Skeleton contests the path the support must take. The goal is to make walking past the bomb difficult, not to drop him anywhere near the fight.
- Against split-lane attacks, avoid committing Giant Skeleton and Graveyard into one lane. Musketeer and Tombstone may need the elixir in the other lane immediately.
A decision to watch: If Giant Skeleton is about to die before reaching tower range, hold Graveyard. His bomb may still help defend or deny space, but it will not make him a reliable tank for the Skeletons.
Common mistake
Avoid this: Putting Giant Skeleton too far forward can leave its bomb in an empty lane while the real threat reaches your tower.
Replacements and upgrade priorities
- Knight is a cheaper replacement, but this becomes a different defensive plan without the death bomb.
- Archers can replace Musketeer for a cheaper split defense. You gain flexibility across lanes while losing some concentrated ranged damage.
Upgrade focus: Graveyard, Giant Skeleton and Musketeer, then Poison.
Phoenix Graveyard Control
Choose this if your Phoenix is ready for ladder and you prefer durable air support over Ice Wizard's slowing effect.

Average elixir: 3.3
Cards and their roles
- Graveyard (5 elixir): Main tower-pressure spell; works best while another unit draws tower fire.
- Knight (3 elixir): Blocks ground support on defense, then tanks tower fire for Graveyard if he survives.
- Phoenix (4 elixir): Flying damage dealer whose egg needs protection to produce a rebirth.
- Baby Dragon (4 elixir): Clears groups with flying splash damage against air and ground.
- Tombstone (3 elixir): Pulls building-targeting units and supplies Skeleton distractions on the ground.
- Poison (4 elixir): Controls a defender area over time; strongest when the opponent must stay inside it.
- Barbarian Barrel (2 elixir): Clears fragile ground troops along its path and leaves a Barbarian to distract.
- Ice Spirit (1 elixir): Briefly freezes nearby targets after its jump, buying your defenders attack time.
Why this deck works
Phoenix supplies a durable flying defender that can threaten another life through its egg. Knight and Tombstone help keep enemy ground troops occupied while it fights, and Baby Dragon covers swarms. The egg is a bonus when your positioning supports it. Spending the last of your elixir to save it can be worse than letting it go and preserving the next defensive answer.
How to play the opening and double elixir
First minute: Use Tombstone and Knight to control ground movement. Phoenix should fight on your side where the tower can help protect its egg if it falls.
Double elixir: A surviving Phoenix or Knight can tank for Graveyard. Add Baby Dragon only when splash is needed, keeping Poison available for the defender.
Defense and tradeoff: Two air troops help against ground-only defenders, but they can still feed a strong anti-air defense. Egg protection is an opportunity, not a guaranteed rebirth.
Matchups and defensive decisions
- Against a ground tank, use Tombstone for the pull and Phoenix for damage while Knight handles support. This keeps the tank from deciding where the air fight happens.
- Against air defense plus Poison, separate Phoenix and Baby Dragon and avoid dropping Graveyard into a Poison already covering the tower. A patient defense can cost less than forcing all three threats through one area.
A decision to watch: If Phoenix falls on your side and Knight can protect the egg cheaply, support it. If protecting it means leaving an incoming Hog unanswered, defend the Hog and accept that the Phoenix investment is finished.
Common mistake
Avoid this: Do not spend your last elixir protecting an egg when the opponent's win condition is already attacking your tower.
Replacements and upgrade priorities
- Mega Minion can replace Phoenix at a lower cost; you lose the egg and some counterpush pressure.
- Archers can replace Baby Dragon if your air damage is weak, but you lose a splash unit and must manage ground swarms with the barrel and positioning.
Upgrade focus: Graveyard and Poison before spreading upgrades across both air supports.
Graveyard Freeze Counterpush
This is the riskier Graveyard alternative for players comfortable saving a surprise spell until it can decide a push.

Average elixir: 3.5
Cards and their roles
- Graveyard (5 elixir): Main tower-pressure spell; works best while another unit draws tower fire.
- Giant Skeleton (6 elixir): Anchors ground defense and threatens nearby troops with its death bomb.
- Baby Dragon (4 elixir): Clears groups with flying splash damage against air and ground.
- Mega Minion (3 elixir): Provides concentrated air or ground damage from a flying defender.
- Tombstone (3 elixir): Pulls building-targeting units and supplies Skeleton distractions on the ground.
- Freeze (4 elixir): Temporarily stops affected defenders; does not remove them for the counterpush.
- Barbarian Barrel (2 elixir): Clears fragile ground troops along its path and leaves a Barbarian to distract.
- Ice Spirit (1 elixir): Briefly freezes nearby targets after its jump, buying your defenders attack time.
Why this deck works
Freeze buys a short attacking window; it does not clear the board for the next push. That makes the health of the surviving tank and the number of Graveyard Skeletons already attacking especially important. Giant Skeleton gives you a defensive fallback after a failed attempt, but the deck becomes vulnerable if you spend Freeze to rescue every small attack.
How to play the opening and double elixir
First minute: Defend without showing Freeze unless it prevents serious damage. Giant Skeleton and Tombstone manage ground pressure while your air troops stay separated.
Double elixir: Use Graveyard behind a surviving tank. Freeze only after defenders are committed and your Skeletons are already threatening the tower.
Defense and tradeoff: Freeze gives a short opening but does not remove defenders. After the September 8 change its duration is 3.5 seconds, so old four-second timings are outdated.
Matchups and defensive decisions
- Against clustered defenders, wait until they commit into an area that also includes the tower before considering Freeze. An early Freeze lets them place a fresh answer outside the spell.
- Against a patient Poison defense, do not treat Freeze as a counter to Poison's area damage. Keep Graveyard for another window, or pressure with surviving troops while holding defensive elixir.
A decision to watch: If Graveyard produces only a few Skeletons before your tank dies, four more elixir on Freeze may not fix the attack. Save it unless the actual board offers a clear tower-damage window.
Common mistake
Avoid this: Freezing a tower with few Skeletons alive usually gives the opponent a healthy counterpush after the spell ends.
Replacements and upgrade priorities
- Poison replaces Freeze for steadier defender removal, sacrificing the sudden stop.
- Musketeer can replace Mega Minion when you need ranged air defense. The extra elixir makes it even more important to save Freeze for a decisive moment.
Upgrade focus: Graveyard, Giant Skeleton and your air defenders; do not choose this just because Freeze is newly unlocked.
Win through small attacks and careful spell tracking
Miner, Wall Breakers, Mortar and Barrel decks reward knowing which answer is in the opponent's hand. Keep your air defense in mind before spending the cheap troops on offense.
Miner Wall Breakers Control
Pick this if you enjoy repeated small attacks and tracking spells rather than building one large push.
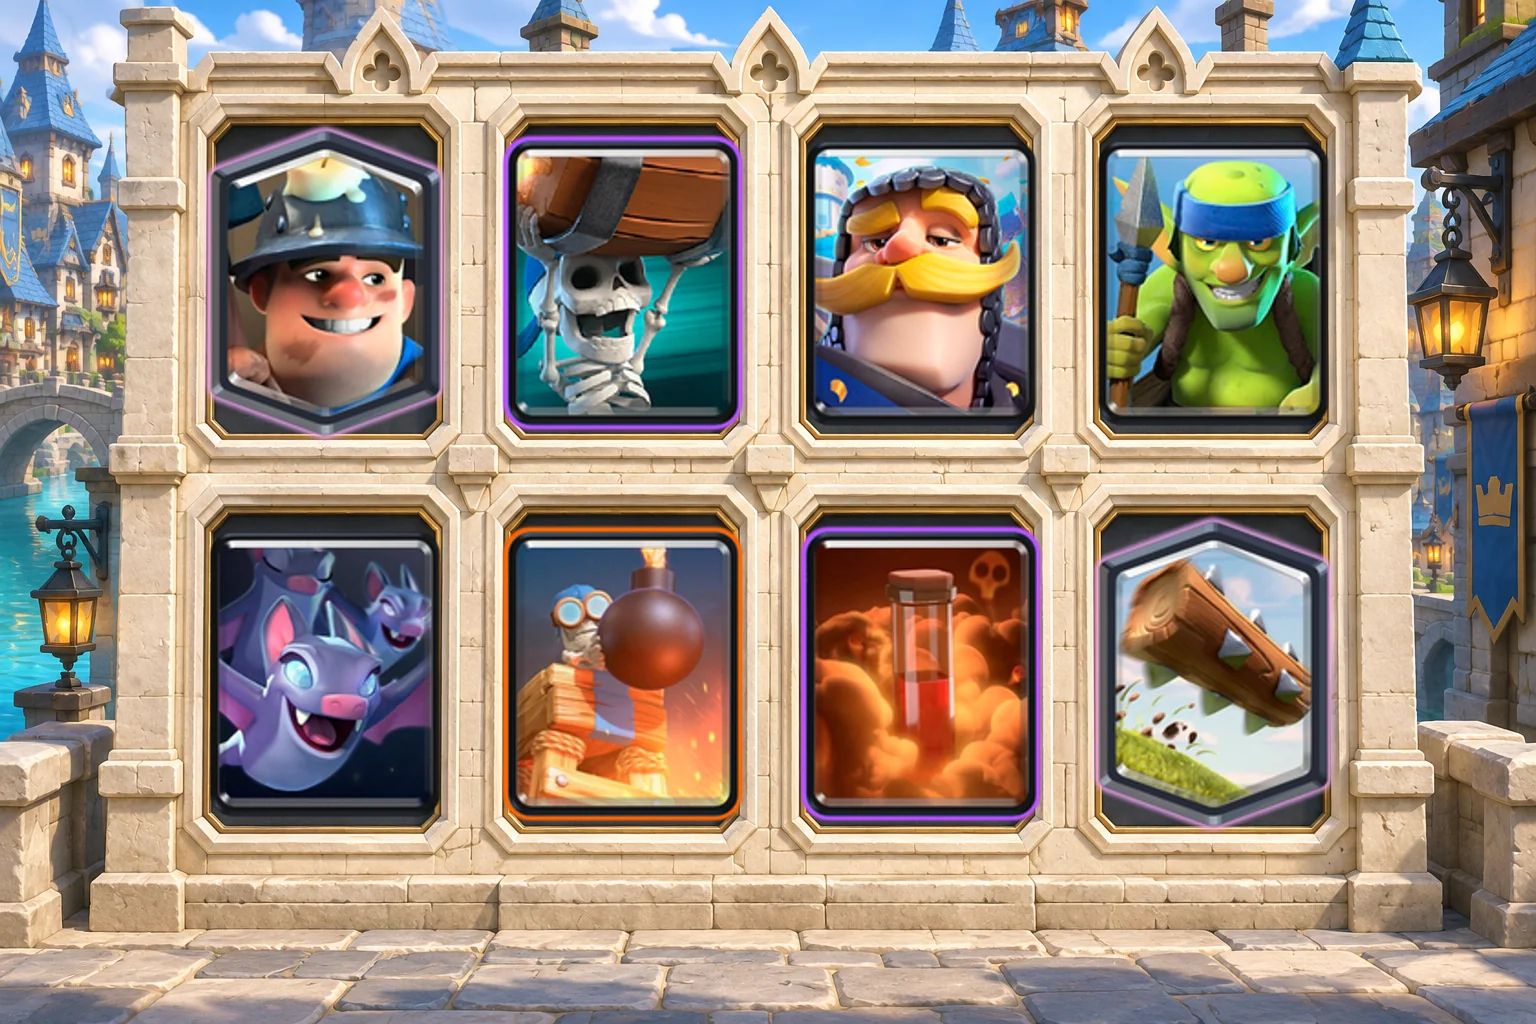
Average elixir: 2.8
Cards and their roles
- Miner (3 elixir): Tanks tower fire for Wall Breakers or attacks an exposed ranged defender.
- Wall Breakers (2 elixir): Cheap building-targeting pressure that needs a route past distractions and damage.
- Knight (3 elixir): Durable ground blocker that protects fragile defenders and can tank a counterattack.
- Spear Goblins (2 elixir): Cheap ranged air coverage and cycle; separate them from other fragile defenders.
- Bats (2 elixir): Adds cheap air-targeting damage once splash and small spells are occupied.
- Bomb Tower (4 elixir): Pulls attackers and damages ground groups; needs troops to deal with air.
- Poison (4 elixir): Controls a defender area over time; strongest when the opponent must stay inside it.
- The Log (2 elixir): Clears ground swarms and pushes back eligible ground troops along its path.
Why this deck works
Miner and Wall Breakers ask different questions of the defense. Miner can take tower fire or attack a fragile support troop, while Wall Breakers punish a weak ground response. Bomb Tower and Knight keep your side stable between those attempts. The cheap air troops give you speed, but their fragility is the price of that speed, especially when the opponent has more than one small spell.
How to play the opening and double elixir
First minute: Split Wall Breakers or Spear Goblins to test reactions. Defend with Bomb Tower and Knight before adding Miner to a surviving lane.
Double elixir: Send Miner to tank for Wall Breakers when their cheap answer is out of hand. Change Miner placement and keep enough elixir for the next defense.
Defense and tradeoff: Bomb Tower handles ground groups, but Spear Goblins and Bats are fragile air cover. Balloon plus a small spell demands careful spacing and timing.
Matchups and defensive decisions
- Against a defensive building, use Miner for controlled chip or to attack a nearby ranged defender. Do not throw Wall Breakers into a healthy building simply because both attacking cards are back in hand.
- Against Balloon with Arrows or Zap, spread Spear Goblins and Bats and keep Bomb Tower available to pull. Do not let one spell remove every troop capable of attacking the Balloon.
A decision to watch: After their small spell clears Spear Goblins, Bats may have a better defensive window. Preserve that advantage before committing Miner and Wall Breakers; an exposed tower costs more than a little extra chip.
Common mistake
Avoid this: Miner, Wall Breakers and Poison together are not a cheap attack. Poison needs meaningful defender value.
Replacements and upgrade priorities
- Fireball can replace Poison for immediate damage and knockback, but it will not control an area for as long.
- Musketeer can replace Spear Goblins when repeated air attacks are the problem, but this is a two-elixir increase and slows the entire pressure cycle.
Upgrade focus: Wall Breakers, Miner and the main spell, then Bomb Tower.
Miner Poison Mortar
A slower chip deck for players who want a second route to damage when Miner is consistently caught.

Average elixir: 2.6
Cards and their roles
- Miner (3 elixir): Reaches the tower or an exposed support troop without walking through the lane.
- Mortar (4 elixir): Ground siege threat that can also defend; respect its close-range blind spot.
- Knight (3 elixir): Durable ground blocker that protects fragile defenders and can tank a counterattack.
- Archers (3 elixir): Provides two ranged air defenders that can split to cover separate lanes.
- Skeletons (1 elixir): Distracts single-target ground attackers and speeds your rotation at low cost.
- Ice Spirit (1 elixir): Briefly freezes nearby targets after its jump, buying your defenders attack time.
- Poison (4 elixir): Controls a defender area over time; strongest when the opponent must stay inside it.
- The Log (2 elixir): Clears ground swarms and pushes back eligible ground troops along its path.
Why this deck works
Mortar is both a defensive building and a second route to tower damage. That gives Miner a useful choice: tank for an offensive Mortar, remove a defender or take a small chip opportunity while you remain defensive. Knight and Archers keep the structure alive, while Poison punishes defenders that stay near the tower. The deck cannot afford to protect every Mortar regardless of the board.
How to play the opening and double elixir
First minute: Use a defensive Mortar if it saves tower health. Knight blocks troops approaching it, while split Archers limit spell value.
Double elixir: Place an offensive Mortar only with enough elixir to protect it. Miner can pressure the tower or remove a ranged defender; Poison should solve a specific problem.
Defense and tradeoff: Mortar can defend and attack, but its close-range blind spot matters. Archers are your main sustained air answer, so do not cycle both into a doomed lane.
Matchups and defensive decisions
- Against a heavy ground tank, defensive Mortar placement can be more valuable than a bridge attack. Knight handles the support while Archers shoot from a separate position.
- Against air pressure, preserve Archers and use Mortar only as a pull where it can affect the building-targeting attacker. Mortar does not shoot air, and a Poison is not a fast replacement for ranged defense.
A decision to watch: If the opponent drops a large tank directly into an offensive Mortar's blind area, assess the defense before adding cards. Miner on the tower may be less important than saving Knight and Archers for the tank.
Common mistake
Avoid this: An offensive Mortar every time it enters your hand makes your attacks predictable and your defense expensive.
Replacements and upgrade priorities
- Fireball replaces Poison for a faster response; Minions can replace Archers if levels demand, changing the spell matchups.
- Tesla can replace Mortar only if you accept losing the siege win condition. That becomes a Miner control deck and needs a more patient damage plan.
Upgrade focus: Mortar, Miner and Archers before the one-elixir cards.
Miner Balloon
Use Miner to distract the tower or pressure an anti-air defender while Balloon carries the main damage threat.

Average elixir: 3.0
Cards and their roles
- Balloon (5 elixir): Main air win condition; needs enough protection to reach a building or tower.
- Miner (3 elixir): Tanks for Balloon or contests a vulnerable anti-air defender near the tower.
- Ice Golem (2 elixir): Draws troops away and tanks briefly; its death effect slows nearby enemies.
- Musketeer (4 elixir): Supplies sustained ranged damage, especially against air threats.
- Bats (2 elixir): Adds cheap air-targeting damage once splash and small spells are occupied.
- Bomb Tower (4 elixir): Pulls attackers and damages ground groups; needs troops to deal with air.
- Giant Snowball (2 elixir): Knocks back eligible targets and slows them, buying space for attack or defense.
- Barbarian Barrel (2 elixir): Clears fragile ground troops along its path and leaves a Barbarian to distract.
Why this deck works
Balloon supplies the threat that forces a serious air response. Miner helps by taking tower attention or attacking a vulnerable ranged defender, while Ice Golem can draw ground troops out of the way. Bomb Tower is a ground defense and a pull, not an anti-air damage source. That leaves Musketeer's survival central to both sides of the matchup.
How to play the opening and double elixir
First minute: Defend with Bomb Tower and Musketeer. A small Miner probe is safer than spending Balloon before you know their building and air answers.
Double elixir: Place Balloon behind a surviving Ice Golem when possible. Send Miner at a useful defender or tanking spot, then Snowball only when its displacement buys Balloon time.
Defense and tradeoff: Musketeer and Bats cover air. A building plus durable anti-air can stop your push without needing to chase Miner, so track both answers.
Matchups and defensive decisions
- Against a single exposed Musketeer, Miner can force her to fight away from Balloon. Check whether a building is still available before adding Balloon; removing one defender does not remove the entire defense.
- Against Inferno Tower plus air support, avoid spending Balloon, Miner and Snowball blindly. Defend first and look for a rotation where one of the two answers is missing.
A decision to watch: If Miner is already tanking and Balloon still cannot approach because a building is untouched, save Snowball unless its displacement changes that outcome. A spell used out of habit makes the counterpush harder to defend.
Common mistake
Avoid this: Do not assume Miner must accompany every Balloon. Sometimes the extra three elixir belongs in defense.
Replacements and upgrade priorities
- Knight replaces Ice Golem for sturdier defense, but increases cost and changes how you pull troops.
- Mega Minion can replace Bats for a sturdier air defender. It costs one more and provides fewer separate distractions.
Upgrade focus: Balloon, Musketeer and Miner.
Mortar Miner Bait
For a collection with leveled Goblins and Bats, this uses several low-cost threats to test the opponent's spell discipline.
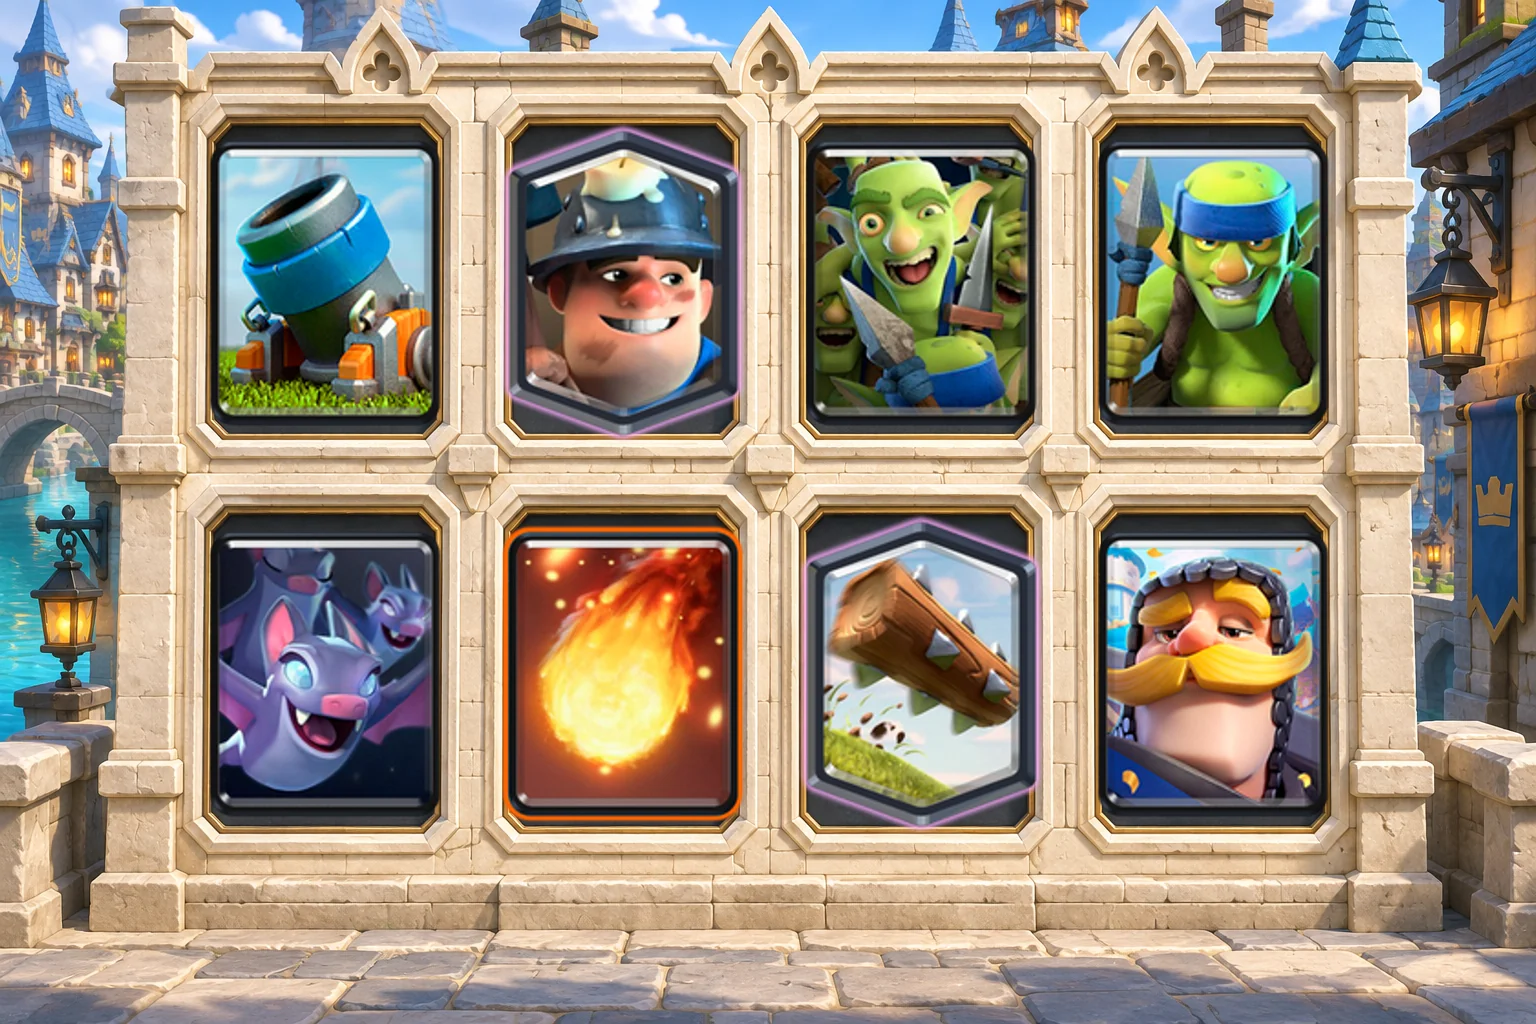
Average elixir: 2.9
Cards and their roles
- Mortar (4 elixir): Ground siege threat that can also defend; respect its close-range blind spot.
- Miner (3 elixir): Reaches the tower or an exposed support troop without walking through the lane.
- Goblin Gang (3 elixir): Combines ground distractions with Spear Goblins that can help against air.
- Spear Goblins (2 elixir): Cheap ranged air coverage and cycle; separate them from other fragile defenders.
- Bats (2 elixir): Adds cheap air-targeting damage once splash and small spells are occupied.
- Fireball (4 elixir): Hits clustered support immediately; seek useful troop damage alongside the tower.
- The Log (2 elixir): Clears ground swarms and pushes back eligible ground troops along its path.
- Knight (3 elixir): Durable ground blocker that protects fragile defenders and can tank a counterattack.
Why this deck works
This list makes the opponent choose how to use a small spell. Goblin Gang, Spear Goblins and Bats can each be important, but sending them together wastes the choice you are trying to create. Mortar gives the opponent a building to address while Miner can pressure elsewhere. Knight is the durable ground piece that stops the whole plan from relying on fragile troops.
How to play the opening and double elixir
First minute: Split Goblin Gang or play a defensive Mortar. Wait until their small spell is used before committing the swarm that matters most.
Double elixir: Protect Mortar with Knight and send Miner when the opponent spends on a ranged defender. Alternate pressure instead of dropping all the bait together.
Defense and tradeoff: The cheap units give flexible distractions but are vulnerable to splash. Bats and Spear Goblins must survive long enough to stop air pushes.
Matchups and defensive decisions
- Against a single small spell, stagger the bait units. Use one group to reveal the answer and preserve a different group for the job that matters, especially air defense.
- Against Wizard or Baby Dragon, do not assume baiting a spell solves the matchup. Those troops provide repeatable splash; Knight needs to occupy them while the ranged or air units approach from another angle.
A decision to watch: If Mortar is defending a Giant, Miner does not have to attack immediately. Saving three elixir can keep Spear Goblins or Bats alive through the support troops and leave a stronger counterattack afterward.
Common mistake
Avoid this: Feeding Goblin Gang and Spear Goblins into the same spell does the opponent's job for them.
Replacements and upgrade priorities
- Archers replace Spear Goblins if you need sturdier air defense, but make the cycle heavier.
- Tesla can replace Mortar if you want stronger direct air defense, but you then depend on Miner for tower access and lose the siege threat.
Upgrade focus: Mortar, Miner and Fireball, then the bait card most affected by levels.
Valkyrie Goblin Barrel Bait
A recognizable bait shell for players who like tracking The Log and winning through repeated Barrel damage.
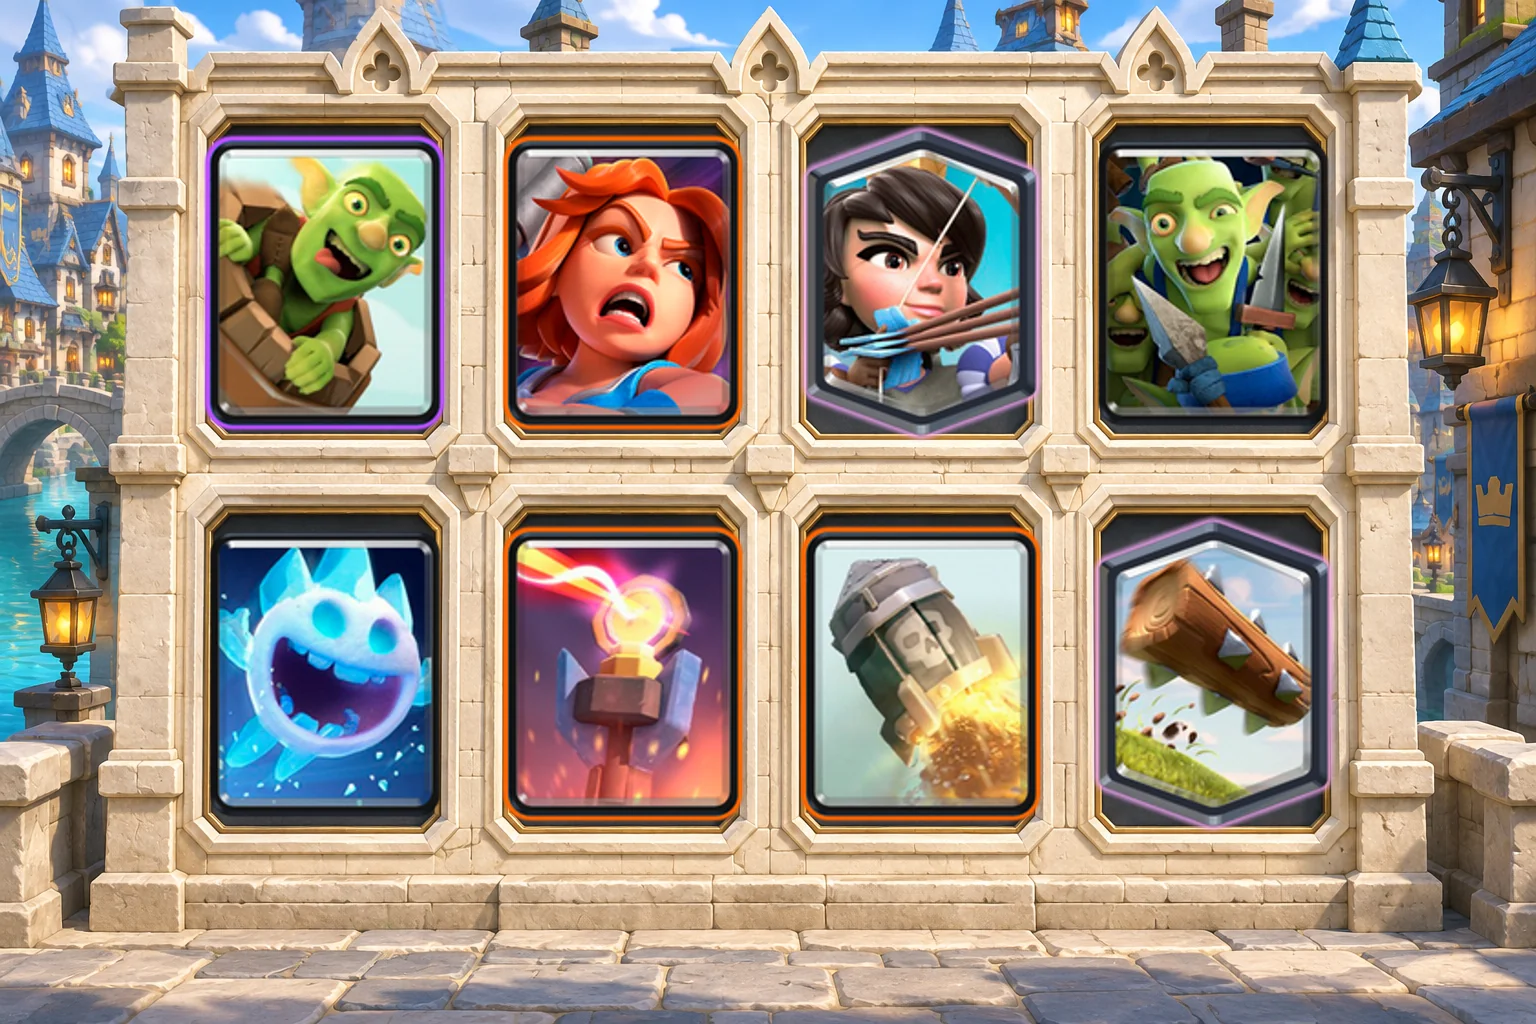
Average elixir: 3.4
Cards and their roles
- Goblin Barrel (3 elixir): Direct tower pressure; track the opponent's reliable Barrel response.
- Valkyrie (4 elixir): Clears ground support and swarms while giving ranged defenders room to work.
- Princess (3 elixir): Long-range splash and spell bait; protect her when air coverage is important.
- Goblin Gang (3 elixir): Combines ground distractions with Spear Goblins that can help against air.
- Ice Spirit (1 elixir): Briefly freezes nearby targets after its jump, buying your defenders attack time.
- Inferno Tower (5 elixir): Pulls and ramps damage against high-health targets; watch for resets and distractions.
- Rocket (6 elixir): Heavy burst damage and a possible finish; verify damage before committing six elixir.
- The Log (2 elixir): Clears ground swarms and pushes back eligible ground troops along its path.
Why this deck works
Goblin Barrel supplies direct tower access, while Princess and Goblin Gang encourage the opponent to spend a small spell elsewhere. Inferno Tower covers the high-health target that the bait troops cannot safely fight alone. Valkyrie deals with ground support threatening the Inferno. Rocket is expensive finishing power, so its actual damage and the remaining defensive hand should decide when it is used.
How to play the opening and double elixir
First minute: Use Princess from safety or split Goblin Gang. Inferno Tower should meet the tank while Valkyrie handles the support threatening it.
Double elixir: Barrel after their reliable answer leaves hand. Rocket is a late-game option only when its actual damage finishes the job or you can still defend afterward.
Defense and tradeoff: Inferno Tower helps against high-health units, but reset cards and repeated cheap pressure can overwhelm it. Princess supplies the air splash you cannot afford to waste.
Matchups and defensive decisions
- Against Giant with a reset card, place Inferno Tower where support must advance to reach it. Valkyrie should engage the reset troop or other ground support while the Inferno deals with Giant.
- Against two reliable Barrel answers, play more patiently with Princess and defensive trades. Repeating the same Barrel placement into both answers does not create a rotation advantage.
A decision to watch: If the opponent uses The Log on Princess, check whether they also have Arrows or Barbarian Barrel before committing a major Barrel attack. Tracking one spell is not enough when they carry two.
Common mistake
Avoid this: A blind offensive Rocket can hand over a tower even when it clips a troop.
Replacements and upgrade priorities
- Dart Goblin replaces Princess for faster single-target pressure, but loses her splash and very long range.
- Knight can replace Valkyrie for a cheaper cycle, but you lose the reliable ground splash that protects Inferno Tower from groups.
Upgrade focus: Goblin Barrel, Rocket and Princess or her replacement.
Double Barrel Pressure
Choose two different Barrel threats when one small spell keeps shutting down your normal bait attack.
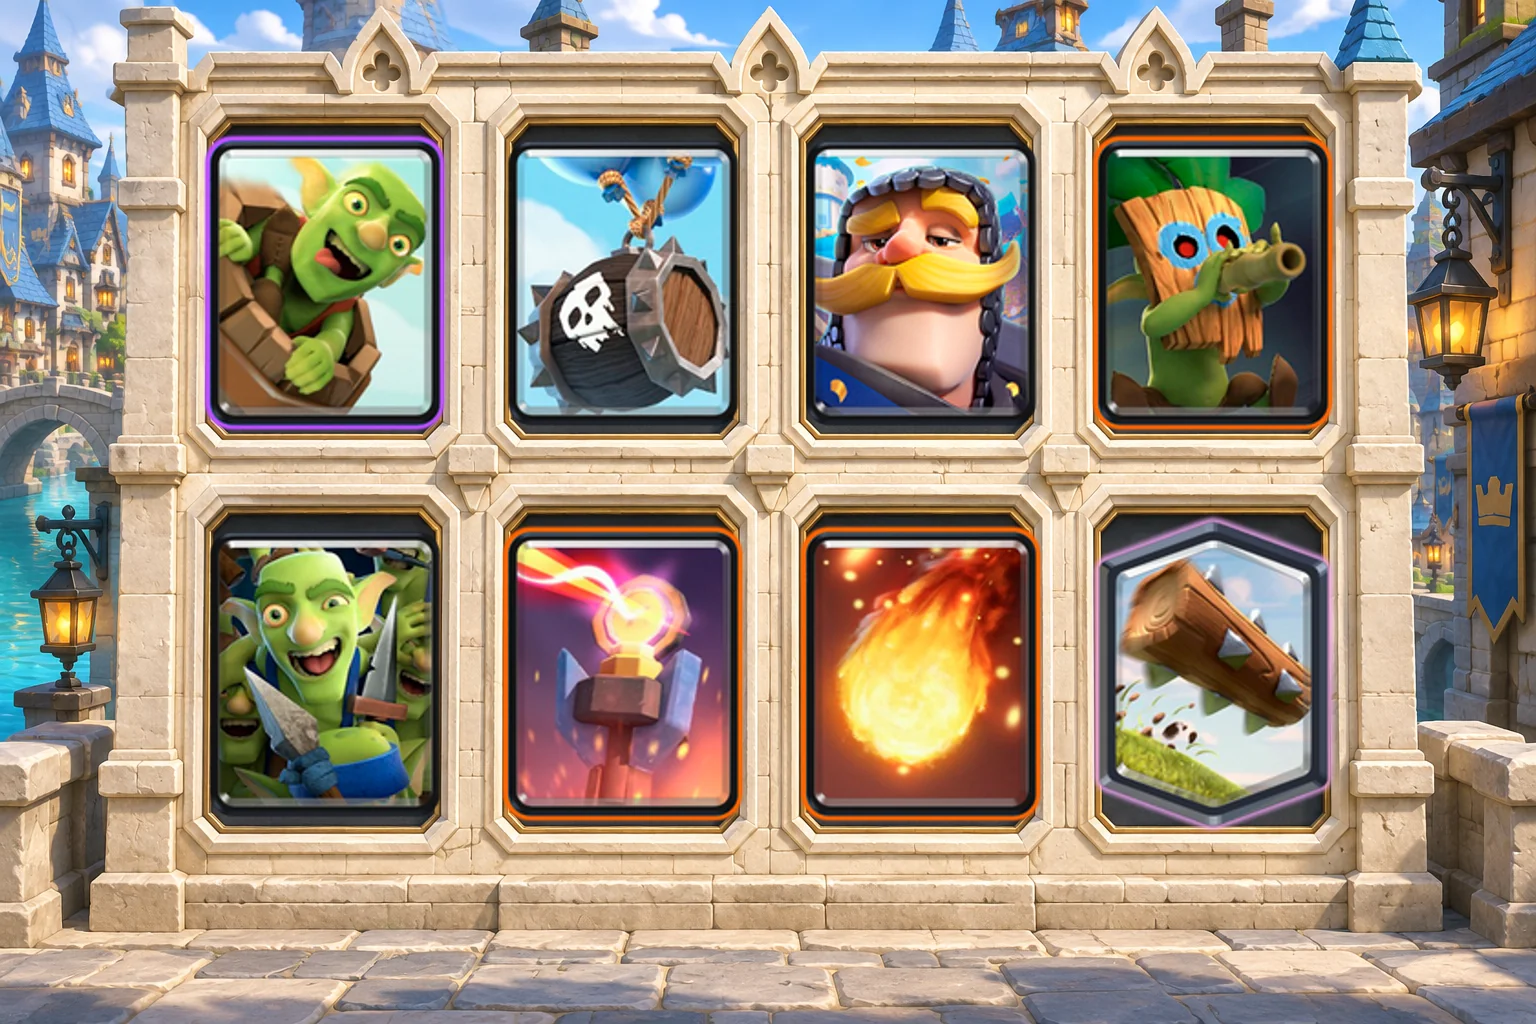
Average elixir: 3.3
Cards and their roles
- Goblin Barrel (3 elixir): Direct tower pressure; track the opponent's reliable Barrel response.
- Skeleton Barrel (3 elixir): Forces an air response, then releases a ground swarm when the barrel breaks.
- Knight (3 elixir): Durable ground blocker that protects fragile defenders and can tank a counterattack.
- Dart Goblin (3 elixir): Fast ranged damage and pressure; an important air defender in bait-heavy hands.
- Goblin Gang (3 elixir): Combines ground distractions with Spear Goblins that can help against air.
- Inferno Tower (5 elixir): Pulls and ramps damage against high-health targets; watch for resets and distractions.
- Fireball (4 elixir): Hits clustered support immediately; seek useful troop damage alongside the tower.
- The Log (2 elixir): Clears ground swarms and pushes back eligible ground troops along its path.
Why this deck works
Skeleton Barrel and Goblin Barrel arrive differently, so one answer may not cover both with the same timing. The aim is to make the opponent commit that answer, then use the other threat when your defense is still ready. Dart Goblin adds pressure from range and is also important against air. Treat him as a defensive resource, not a disposable bridge play in every rotation.
How to play the opening and double elixir
First minute: Probe with Skeleton Barrel and keep Knight for defense. Dart Goblin should stay out of easy spell value beside the tower.
Double elixir: Alternate the Barrels or send them into separate lanes after a positive trade. Force a choice without spending both into a defense you have already seen.
Defense and tradeoff: Inferno Tower takes the main tank, while Dart Goblin and Spear Goblins inside the Gang help with air. Losing Dart Goblin makes air defense thin.
Matchups and defensive decisions
- Against a deck with one small spell, watch which Barrel they use it on. The other Barrel may gain a better opening, but an available splash troop can still cover that gap.
- Against air attacks, keep Dart Goblin on your side and preserve the Gang's Spear Goblins. Inferno Tower can help, but resets and spells can leave the Barrel-heavy hand with few defensive options.
A decision to watch: If Skeleton Barrel is stopped without drawing a spell, do not assume Goblin Barrel will now connect. The first attack must reveal or remove an answer before the second one gains value.
Common mistake
Avoid this: Stacking both Barrels into one splash defender can erase the supposed bait advantage.
Replacements and upgrade priorities
- Princess can replace Dart Goblin for splash and range, trading away his faster concentrated damage.
- Goblin Cage can replace Inferno Tower for a cheaper defensive pull, but it sacrifices the ramping damage you rely on against large tanks.
Upgrade focus: Goblin Barrel, Skeleton Barrel and Dart Goblin.
Turn a stopped push into bridge pressure
These lists can produce threatening counterattacks, but their expensive defenders need a useful job first. Mega Knight and P.E.K.K.A are not substitutes for a plan to reach the tower.
P.E.K.K.A Battle Ram
Pick this when heavy ground attackers are the problem and you own the support cards to turn P.E.K.K.A defense into pressure.
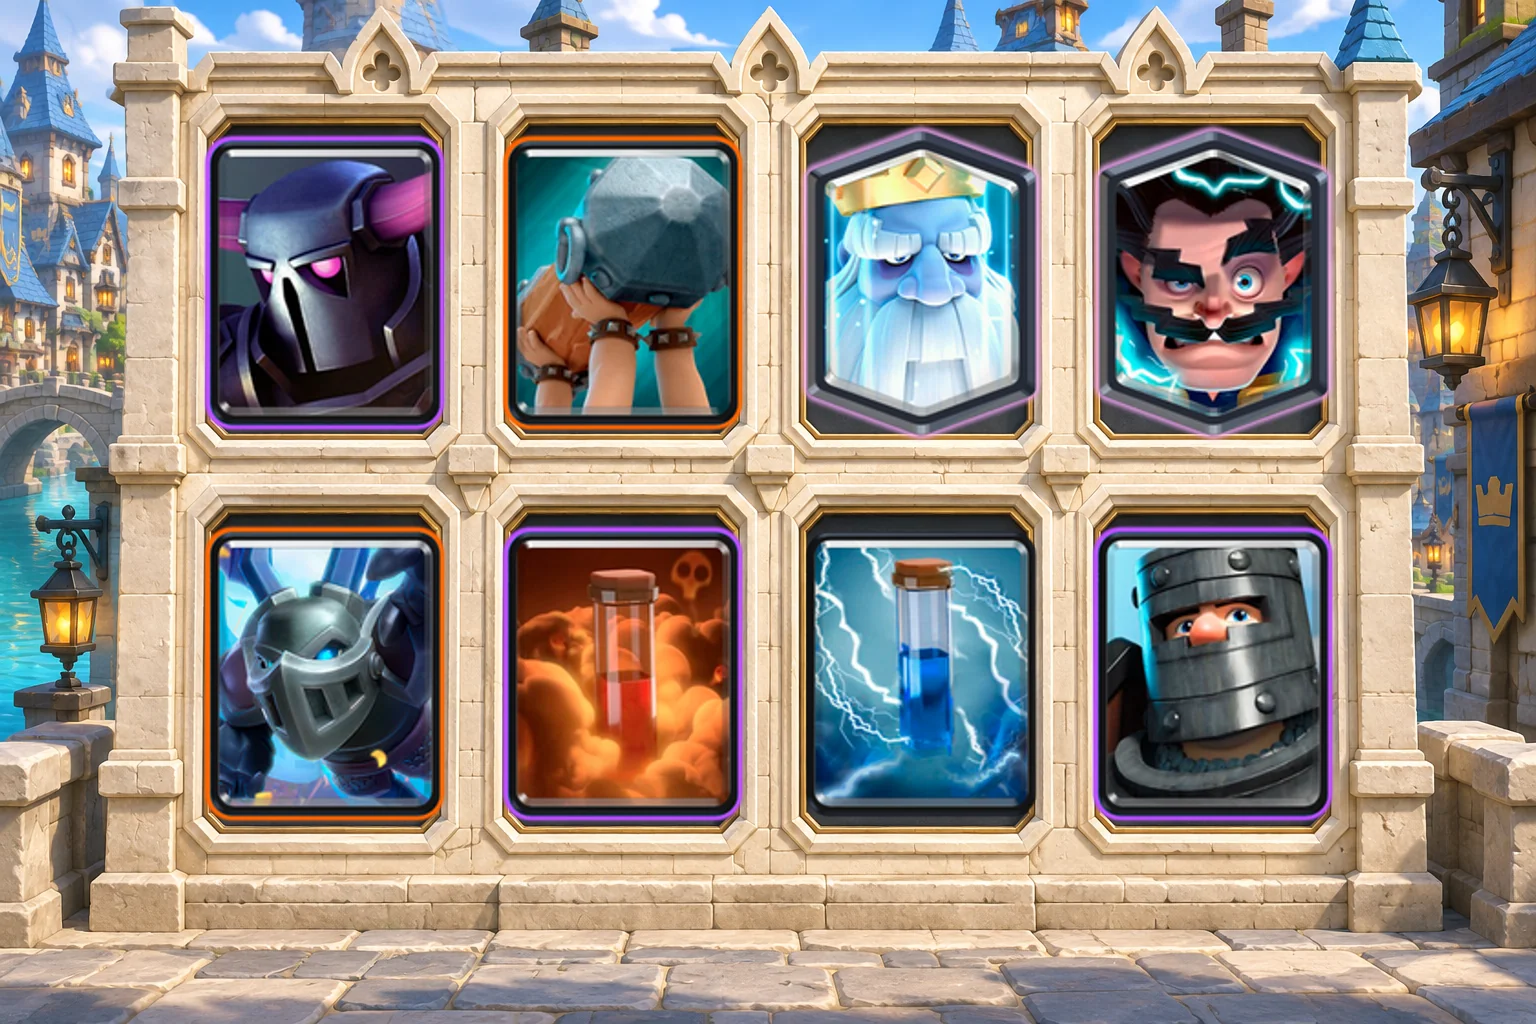
Average elixir: 3.9
Cards and their roles
- P.E.K.K.A (7 elixir): High-damage ground defender that can survive to lead a counterattack.
- Battle Ram (4 elixir): Building-targeting bridge pressure that releases two Barbarians after the ram breaks.
- Royal Ghost (3 elixir): Ground splash pressure with invisibility between engagements.
- Electro Wizard (4 elixir): Interrupts targets and supplies ranged air defense; protect the reset function.
- Mega Minion (3 elixir): Provides concentrated air or ground damage from a flying defender.
- Poison (4 elixir): Controls a defender area over time; strongest when the opponent must stay inside it.
- Zap (2 elixir): Resets an Inferno or other interruptible target and clears fragile distractions.
- Dark Prince (4 elixir): Clears ground groups and shields the approach of your damage dealers.
Why this deck works
P.E.K.K.A is the defensive investment that can create a counterpush. Battle Ram then demands attention at the bridge, while Royal Ghost and Dark Prince deal with ground distractions through different attack patterns. Electro Wizard supplies a reset and Mega Minion supplies air damage. The lack of a building means you must plan how troops will intercept a fast win condition instead of relying on a central pull.
How to play the opening and double elixir
First minute: Keep P.E.K.K.A for a real defensive job. Royal Ghost or a lone Battle Ram can test a lane without committing your entire hand.
Double elixir: Support a surviving P.E.K.K.A, or use Battle Ram in the other lane if the opponent overcommits to stopping her. Poison removes value from clustered defenders.
Defense and tradeoff: Electro Wizard provides resets and Mega Minion covers air. There is no defensive building, so fast win conditions can force awkward troop placements.
Matchups and defensive decisions
- Against Mega Knight, let P.E.K.K.A meet him on your side and place support separately. Do not give Mega Knight a landing or splash target containing every supporting troop.
- Against Hog cycle, avoid spending P.E.K.K.A just because she is in hand. Cheaper combined defenses may be necessary, and a seven-elixir commitment can let the next Hog arrive before you recover.
A decision to watch: If the opponent puts their main tank killer into the P.E.K.K.A lane, Battle Ram opposite can split their spending. Do that only when your remaining cards can answer the return attack.
Common mistake
Avoid this: P.E.K.K.A at the back in single elixir can expose the opposite lane before you can afford support.
Replacements and upgrade priorities
- Musketeer can replace Electro Wizard for ranged damage, but you lose the reset and must protect Zap.
- Minions can replace Mega Minion at the same cost for more bodies, with greater exposure to splash and Arrows.
Upgrade focus: P.E.K.K.A, Battle Ram and your air defense.
Mega Knight Miner Wall Breakers
Use this if Mega Knight is already upgraded and you want cheap pressure after defending clustered ground troops.
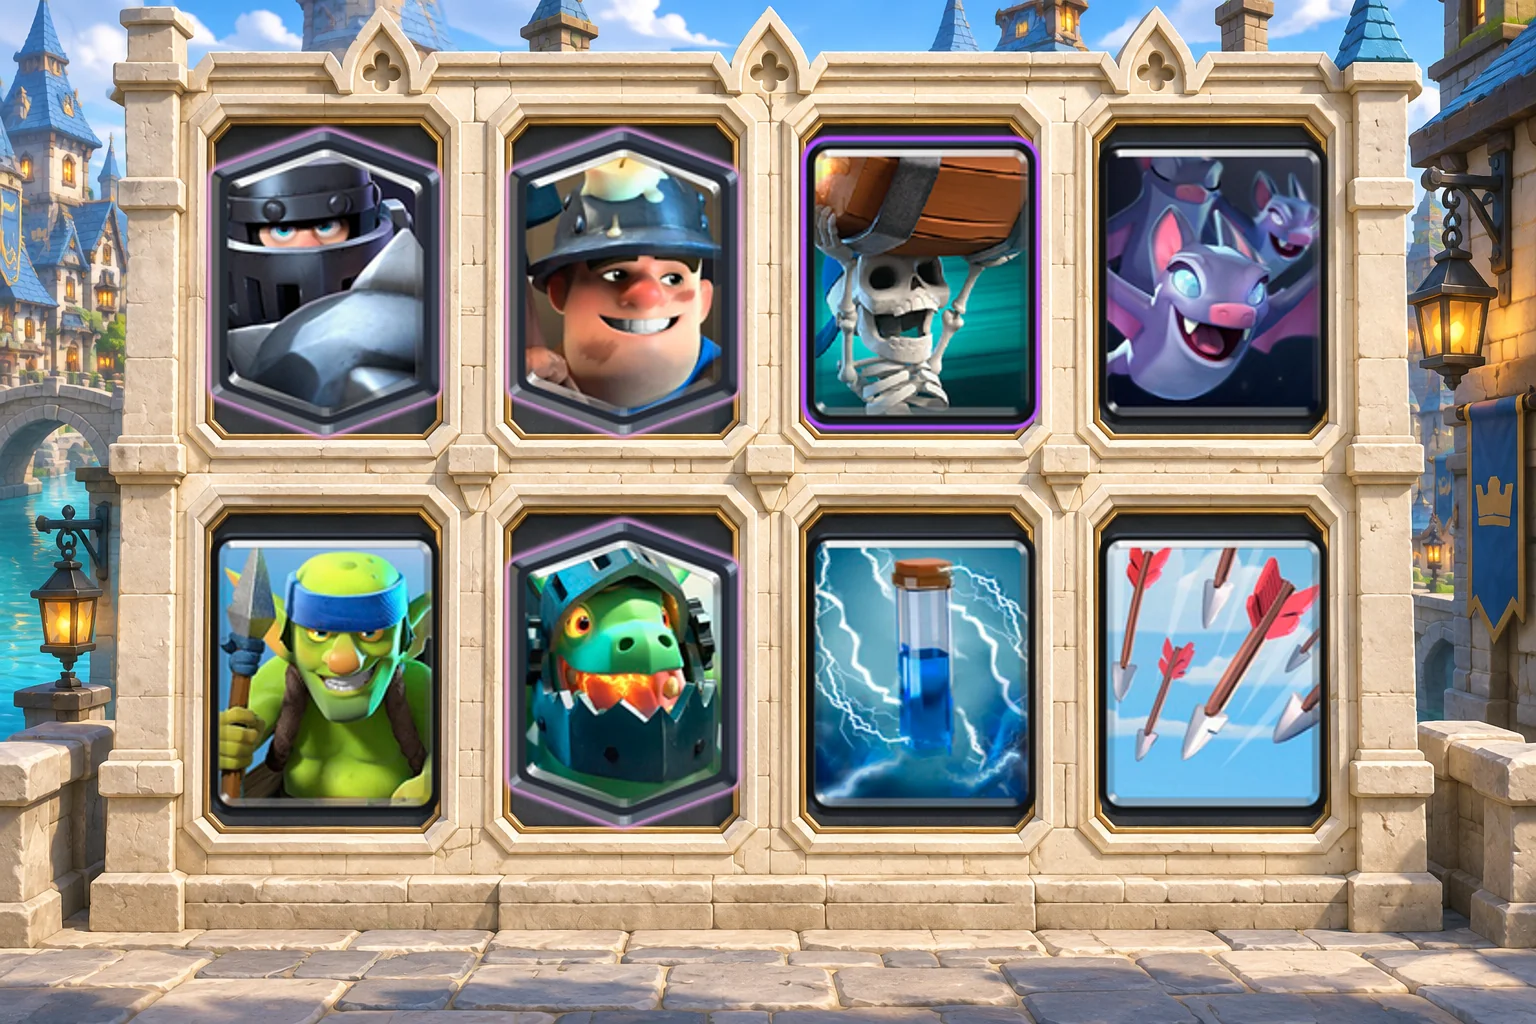
Average elixir: 3.1
Cards and their roles
- Mega Knight (7 elixir): Punishes clustered ground troops on defense; cannot damage air units.
- Miner (3 elixir): Tanks tower fire for Wall Breakers or attacks an exposed ranged defender.
- Wall Breakers (2 elixir): Cheap building-targeting pressure that needs a route past distractions and damage.
- Bats (2 elixir): Adds cheap air-targeting damage once splash and small spells are occupied.
- Spear Goblins (2 elixir): Cheap ranged air coverage and cycle; separate them from other fragile defenders.
- Inferno Dragon (4 elixir): Ramps focused damage against tanks in the air or on the ground.
- Zap (2 elixir): Resets an Inferno or other interruptible target and clears fragile distractions.
- Arrows (3 elixir): Removes vulnerable swarms over a wide area, including flying units.
Why this deck works
Mega Knight punishes a useful cluster of ground troops on defense, but Miner and Wall Breakers are the more direct ways to reach the tower. Inferno Dragon supplies the focused damage Mega Knight lacks against large tanks. Keeping those roles separate prevents seven-elixir bridge plays from becoming the default attack. The deck's air answers are all vulnerable to different spells or resets.
How to play the opening and double elixir
First minute: Save Mega Knight for a landing that actually hits multiple useful targets. Inferno Dragon handles the high-health enemy unit that Mega Knight cannot remove quickly.
Double elixir: Miner and Wall Breakers punish an overspend. A surviving Mega Knight can lead, but he does not need every cheap card placed behind him.
Defense and tradeoff: Inferno Dragon and Bats can be reset or cleared, leaving difficult air defense. Mega Knight is not a universal answer to tanks or airborne pushes.
Matchups and defensive decisions
- Against ground swarms with support, wait until Mega Knight's landing can hit meaningful targets on your side. Inferno Dragon should then lock onto the tank rather than be placed where cheap units distract it.
- Against P.E.K.K.A, spread your cheap defenders and avoid giving her a convenient Mega Knight target. Pressure with Miner and Wall Breakers when her lane absorbs a large investment, while preserving the defense needed when she arrives.
A decision to watch: If the opponent resets Inferno Dragon, do not spend Zap elsewhere automatically. You may need to interrupt a supporting attacker or buy the Dragon time to start dealing damage again.
Common mistake
Avoid this: Playing Mega Knight as your main tower-damage plan makes the seven-elixir investment easy to distract.
Replacements and upgrade priorities
- Minions can replace Bats for sturdier air bodies at one extra elixir; keep Inferno Dragon for tank damage.
- Goblin Cage can replace Spear Goblins to add a reliable pull, but this increases cost and removes one of the cards that attacks air.
Upgrade focus: Wall Breakers and Miner, then Mega Knight and Inferno Dragon as levels require.
P.E.K.K.A Ram Rider
A heavier bridge-pressure option when Ram Rider and P.E.K.K.A are your strongest cards.

Average elixir: 4.0
Cards and their roles
- P.E.K.K.A (7 elixir): High-damage ground defender that can survive to lead a counterattack.
- Ram Rider (5 elixir): Building-targeting pressure with a snare that can help slow enemy troops.
- Electro Wizard (4 elixir): Interrupts targets and supplies ranged air defense; protect the reset function.
- Royal Ghost (3 elixir): Ground splash pressure with invisibility between engagements.
- Baby Dragon (4 elixir): Clears groups with flying splash damage against air and ground.
- Lightning (6 elixir): Heavy spell for valuable targets, especially a defensive building plus nearby support.
- Barbarian Barrel (2 elixir): Clears fragile ground troops along its path and leaves a Barbarian to distract.
- Ice Spirit (1 elixir): Briefly freezes nearby targets after its jump, buying your defenders attack time.
Why this deck works
Ram Rider offers bridge pressure and a slowing effect, while P.E.K.K.A stops heavy ground threats. Lightning is the expensive tool for a building or valuable support group that would otherwise halt the attack. Baby Dragon and Electro Wizard keep swarms and resets from dictating every exchange. Because several cards cost five or more, the hand can become awkward if the cheap cards are spent casually.
How to play the opening and double elixir
First minute: Use Royal Ghost or Ice Spirit to avoid committing the heavy cards blindly. Defend with P.E.K.K.A and use Ram Rider's snare when it meaningfully slows a threat.
Double elixir: Send Ram Rider after a favorable defense. Lightning should hit important support or a building, ideally alongside the tower, rather than accompany every attack.
Defense and tradeoff: Baby Dragon covers swarms and Electro Wizard interrupts attackers. The high cost makes split-lane pressure dangerous if you spend Lightning too freely.
Matchups and defensive decisions
- Against a building and ranged defender near the tower, wait for Lightning value that removes an actual obstacle. Spending six elixir for the tower alone leaves Ram Rider much easier to defend.
- Against fast split-lane pressure, use the cheaper support and Ram Rider's snare where it helps before committing P.E.K.K.A. She can hold one ground lane but cannot be in both lanes at once.
A decision to watch: After P.E.K.K.A survives, check your elixir before adding Ram Rider. If you then also need Lightning, you may be planning a push that the opponent can punish with a much cheaper attack elsewhere.
Common mistake
Avoid this: Lightning plus Ram Rider is eleven elixir. Planning that attack without a defensive reserve loses the other lane.
Replacements and upgrade priorities
- Battle Ram can replace Ram Rider for cheaper pressure, but offers no snare and cannot fill the same defensive role.
- Poison can replace Lightning for a cheaper support-control spell, but it does not provide the same immediate reset or burst against a defensive building.
Upgrade focus: Ram Rider, P.E.K.K.A and Lightning, with air-defense levels kept usable.
Royal Ghost Battle Ram Control
Try this if you like bridge pressure but do not want to commit seven elixir to P.E.K.K.A.
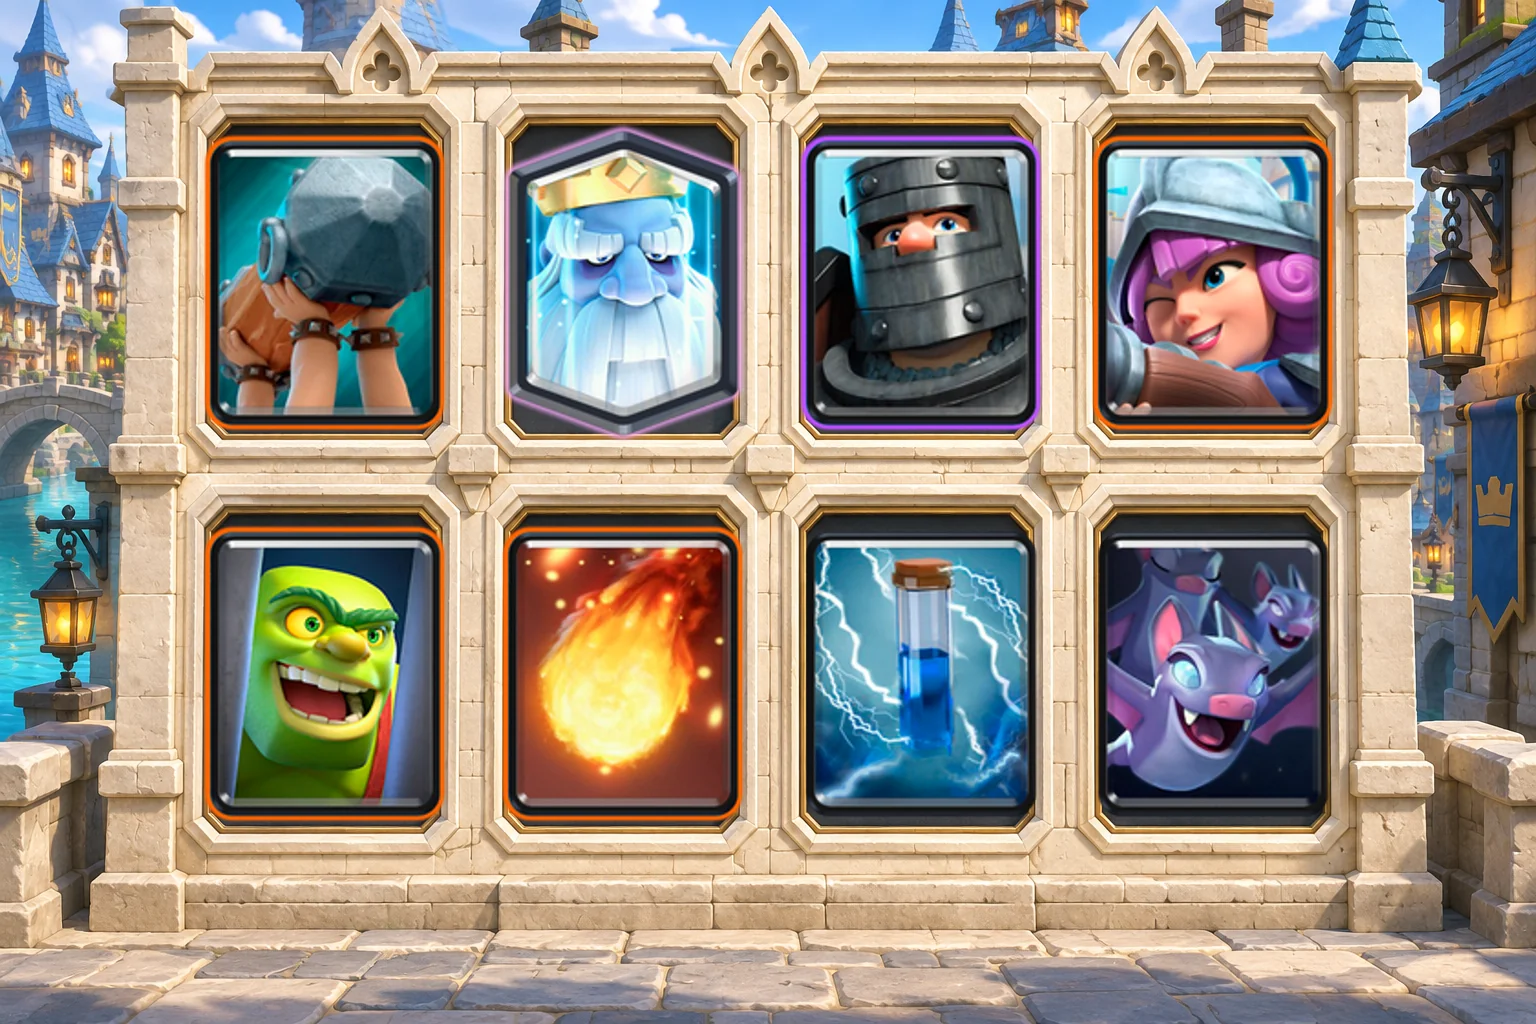
Average elixir: 3.4
Cards and their roles
- Battle Ram (4 elixir): Building-targeting bridge pressure that releases two Barbarians after the ram breaks.
- Royal Ghost (3 elixir): Ground splash pressure with invisibility between engagements.
- Dark Prince (4 elixir): Clears ground groups and shields the approach of your damage dealers.
- Musketeer (4 elixir): Supplies sustained ranged damage, especially against air threats.
- Goblin Cage (4 elixir): Pulls building-targeting attackers centrally, then releases a Brawler for cleanup.
- Fireball (4 elixir): Hits clustered support immediately; seek useful troop damage alongside the tower.
- Zap (2 elixir): Resets an Inferno or other interruptible target and clears fragile distractions.
- Bats (2 elixir): Adds cheap air-targeting damage once splash and small spells are occupied.
Why this deck works
This deck uses Goblin Cage as the stable defensive center instead of buying a P.E.K.K.A. Musketeer supplies ranged damage while Ghost and Dark Prince help clear the ground. The Brawler and surviving troops can then support Battle Ram. You gain a more manageable cost, but the missing high-damage tank killer means a large enemy tank needs a coordinated defense rather than one card dropped in front.
How to play the opening and double elixir
First minute: Goblin Cage draws the win condition while Musketeer shoots from safety. Let Ghost or Dark Prince finish the ground support.
Double elixir: Put Battle Ram ahead of surviving troops, or send Ghost into the other lane when a large defensive spend creates an opening.
Defense and tradeoff: You have several ground splash tools and a building, but no dedicated high-damage tank killer. Use Cage placement and sustained Musketeer fire carefully.
Matchups and defensive decisions
- Against Hog or Battle Ram, preserve Cage for the central pull and let Musketeer work from a separate position. Keep Ghost or Dark Prince for any ground support that follows.
- Against Golem or Giant, use Cage to control the route and protect Musketeer for sustained damage. Bats help after the opponent's small spell is committed; they are not a safe first answer into splash support.
A decision to watch: If Cage leaves a Brawler walking forward, Battle Ram can ask the opponent to handle another threat. If Musketeer is still needed for an incoming air unit, keep her on defense instead of attaching the whole hand to the push.
Common mistake
Avoid this: Using both Ghost and Dark Prince on a small attack can leave you short against a bigger push.
Replacements and upgrade priorities
- Valkyrie replaces Royal Ghost when needed. You lose invisibility and pressure timing, but keep ground splash.
- Mini P.E.K.K.A can replace Dark Prince if high-health tanks are the recurring problem. You trade ground splash for focused damage.
Upgrade focus: Battle Ram, Musketeer and Dark Prince, then Fireball.
Goblin Giant Sparky
This is a build-up deck for players with leveled Sparky and Goblin Giant, not a reason to spend upgrades across two new win conditions.
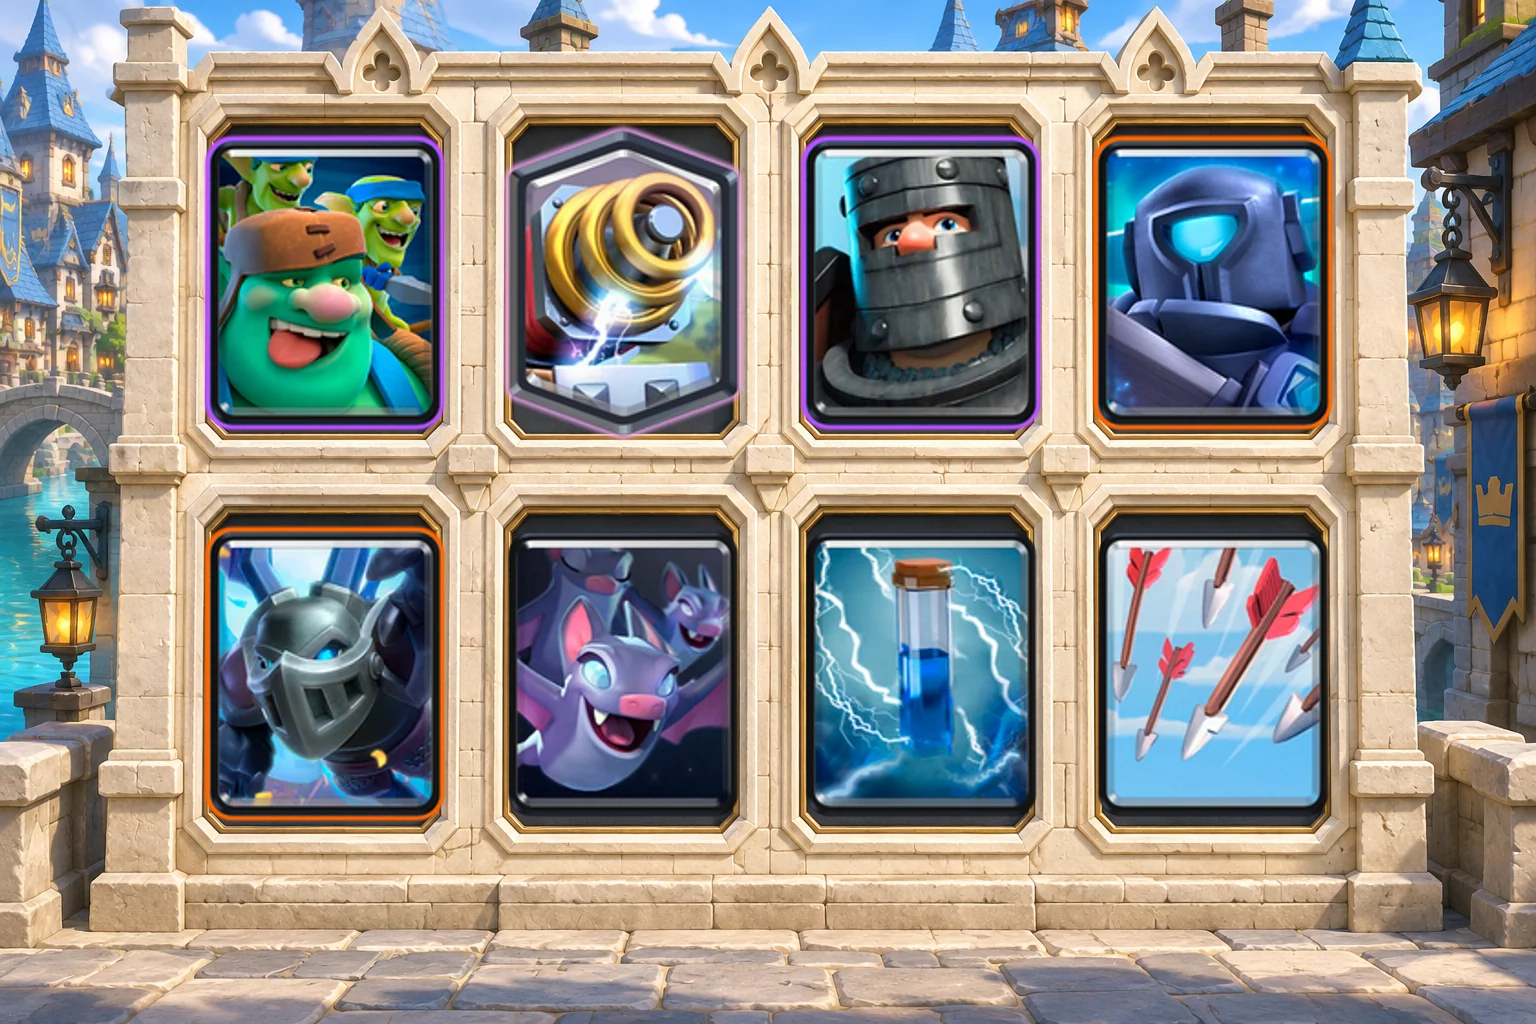
Average elixir: 3.8
Cards and their roles
- Goblin Giant (6 elixir): Ground tank with carried Spear Goblins that add ranged support.
- Sparky (6 elixir): Charged ground damage; needs protection from resets and cheap distractions.
- Dark Prince (4 elixir): Clears ground groups and shields the approach of your damage dealers.
- Mini P.E.K.K.A (4 elixir): Removes high-health ground attackers while a tank or building absorbs pressure.
- Mega Minion (3 elixir): Provides concentrated air or ground damage from a flying defender.
- Bats (2 elixir): Adds cheap air-targeting damage once splash and small spells are occupied.
- Zap (2 elixir): Resets an Inferno or other interruptible target and clears fragile distractions.
- Arrows (3 elixir): Removes vulnerable swarms over a wide area, including flying units.
Why this deck works
Goblin Giant gives Sparky something to stand behind, and the Spear Goblins riding with him add support during the approach. Dark Prince clears ground distractions while Mini P.E.K.K.A keeps your defense from depending entirely on Sparky's charge. The attack needs spacing: a reset troop that can reach Sparky easily can undermine a large investment, even when the tank is healthy.
How to play the opening and double elixir
First minute: Use Mini P.E.K.K.A or Mega Minion defensively. Wait for an elixir advantage before starting Sparky behind the tower.
Double elixir: Put Goblin Giant in front of Sparky and keep Zap ready for a reset-sensitive defender or swarm. Dark Prince clears ground distractions when needed.
Defense and tradeoff: Mini P.E.K.K.A handles tanks while Sparky threatens groups on the ground. Air pressure and repeated resets demand support; Sparky cannot solve them alone.
Matchups and defensive decisions
- Against Electro Wizard, avoid stacking Sparky close to every support troop. Make the Wizard enter a position where Dark Prince or another defender can remove him, instead of relying on Sparky to shoot through repeated resets.
- Against Balloon, Mega Minion and Bats must be held for defense. Sparky cannot target it, and a six-elixir Goblin Giant commitment can make the air response difficult to fund.
A decision to watch: When Sparky has just defended, put Goblin Giant ahead only if you can still clear the next distraction. A charged Sparky behind a tank is a threat; an unsupported chain of expensive cards is a liability.
Common mistake
Avoid this: Dropping every support troop behind Sparky gives spells too much value and leaves no response to the opposite lane.
Replacements and upgrade priorities
- Minions can replace Bats for more durable air support at a higher cost.
- Goblin Cage can replace Bats for a steadier ground pull, but it removes cheap air damage and makes Mega Minion even more important.
Upgrade focus: Goblin Giant and Sparky, followed by the spells needed to clear their counters.
Giant Sparky Reset Support
Choose this Sparky shell if Giant is stronger than Goblin Giant and Electro Wizard gives you a useful extra reset.
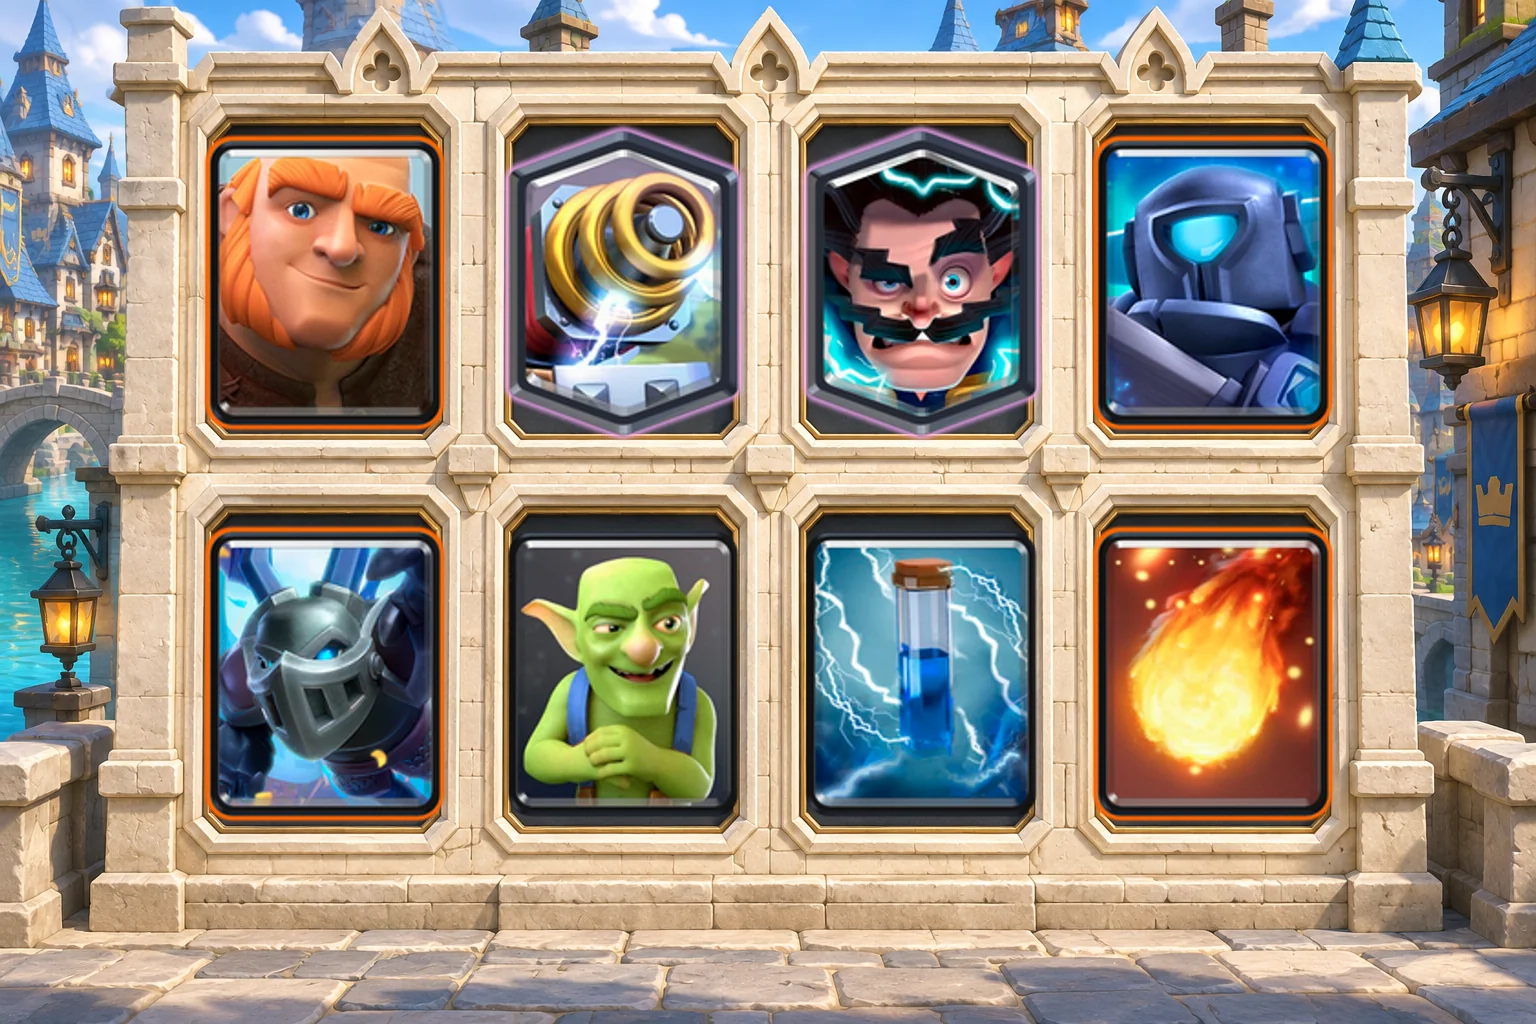
Average elixir: 3.8
Cards and their roles
- Giant (5 elixir): Absorbs fire ahead of Sparky, giving the charged shot time to connect.
- Sparky (6 elixir): Charged ground damage; needs protection from resets and cheap distractions.
- Electro Wizard (4 elixir): Interrupts targets and supplies ranged air defense; protect the reset function.
- Mini P.E.K.K.A (4 elixir): Removes high-health ground attackers while a tank or building absorbs pressure.
- Mega Minion (3 elixir): Provides concentrated air or ground damage from a flying defender.
- Goblins (2 elixir): Cheap focused ground damage and distraction against an occupied attacker.
- Zap (2 elixir): Resets an Inferno or other interruptible target and clears fragile distractions.
- Fireball (4 elixir): Hits clustered support immediately; seek useful troop damage alongside the tower.
Why this deck works
Giant is a simple tank for Sparky, while Electro Wizard helps interrupt threats that interfere with the charge. Mini P.E.K.K.A and Goblins give you cheaper ways to defend before Sparky becomes affordable. Fireball can weaken an important ranged defender, but the deck lacks a cheap, repeatable splash troop, so small distractions must be handled without wasting Sparky's shot.
How to play the opening and double elixir
First minute: Start with a small defensive commitment. Keep Giant out of the way until Sparky or another defender survives and you can form a supported attack.
Double elixir: Giant tanks while Sparky charges. Fireball should remove or weaken an important ranged defender; Electro Wizard stays spaced away from Sparky.
Defense and tradeoff: Goblins provide cheap distraction and Mini P.E.K.K.A supplies ground damage. This deck has less ground splash outside Sparky, so missed shots are expensive.
Matchups and defensive decisions
- Against reset-heavy defense, identify the reset troop before building the push. Use your support to contest it and keep Sparky far enough back that one placement does not disable the whole attack.
- Against Skeleton Army or Goblin Gang, preserve Zap or use a suitable support troop to clear the distraction. Firing Sparky's charged shot into one small unit can leave the rest of the push unanswered.
A decision to watch: If Electro Wizard is your only available air defender, do not place him behind Giant just to make the push look complete. Keep him ready until you know the opponent cannot counterattack through the air.
Common mistake
Avoid this: Do not rely on Sparky to fire through an endless chain of resets while ignoring the troops applying them.
Replacements and upgrade priorities
- Musketeer replaces Electro Wizard if needed, with Zap becoming your only reset.
- Dark Prince can replace Goblins if ground swarms repeatedly stop Sparky, but the two-elixir increase makes defensive recovery slower.
Upgrade focus: Giant, Sparky, Fireball and the ranged support you keep.
Choose a specialist when its cards are already ready
Royal Giant, Royal Hogs, Golem, Balloon, X-Bow and Prince bait each ask for different habits. Treat them as collection-based alternatives, not a reason to upgrade six decks at once.
Royal Giant Lightning
An Arena 12 Royal Giant option that does not require Fisherman. Cage positioning does the pulling instead.

Average elixir: 3.6
Cards and their roles
- Royal Giant (6 elixir): Ranged building attacker that turns a surviving defense into tower pressure.
- Hunter (4 elixir): Close-range burst against air or ground; shot placement strongly affects damage.
- Mega Minion (3 elixir): Provides concentrated air or ground damage from a flying defender.
- Goblin Cage (4 elixir): Pulls building-targeting attackers centrally, then releases a Brawler for cleanup.
- Guards (3 elixir): Shielded ground distractions that buy time for ranged or building damage.
- Lightning (6 elixir): Heavy spell for valuable targets, especially a defensive building plus nearby support.
- The Log (2 elixir): Clears ground swarms and pushes back eligible ground troops along its path.
- Electro Spirit (1 elixir): Chains a brief stun across nearby targets and helps cycle to a key card.
Why this deck works
This Royal Giant list uses Cage placement to control enemy movement because Fisherman is not part of the deck. Hunter supplies close-range damage, Mega Minion provides air support, and Guards buy time against single-target ground attackers. Royal Giant can then attack ahead of surviving troops. Lightning should clear a real obstacle rather than become the automatic second card of every push.
How to play the opening and double elixir
First minute: Defend with Cage and put Hunter where several pellets can hit the attacker. Keep Mega Minion separated against spells.
Double elixir: Royal Giant goes ahead of surviving support. Lightning earns its cost when it catches a defensive building and valuable support near the tower.
Defense and tradeoff: Hunter can produce strong close-range defense but is much weaker at distance. Without Fisherman, you must place him carefully rather than expect a pull into range.
Matchups and defensive decisions
- Against Inferno Tower, consider whether Lightning can catch the building and another useful target. If you spend it only to restart an unsupported Royal Giant attack, the opponent may still defend cheaply with troops.
- Against Balloon, place Hunter where his shot pattern can actually connect and use Cage for a pull if the angle helps. Dropping Hunter too far away reduces the damage you were relying on.
A decision to watch: After a successful Cage defense, Royal Giant can go ahead of the Brawler while Hunter stays available. If the opponent still has a major tank in hand, keeping that defender back may matter more than extra tower pressure.
Common mistake
Avoid this: A prediction Lightning before the building appears can leave Royal Giant unsupported and your tower exposed.
Replacements and upgrade priorities
- Musketeer replaces Hunter for safer range, but reduces the close-range burst against tanks.
- Mini P.E.K.K.A can replace Guards for stronger ground damage, but costs one more and loses their shielded distractions.
Upgrade focus: Royal Giant, Hunter and Lightning.
Royal Hogs Recruits
Pick this when you prefer defending both lanes and making the opponent split their answers.

Average elixir: 4.1
Cards and their roles
- Royal Hogs (5 elixir): Four building-targeting attackers that can divide pressure between the lanes.
- Royal Recruits (7 elixir): Shielded ground defense that can cover and counterattack in both lanes.
- Flying Machine (4 elixir): Long-range flying support; keep it away from shared spell value.
- Zappies (4 elixir): Repeated stuns and ranged support that can be split across lanes.
- Goblin Cage (4 elixir): Pulls building-targeting attackers centrally, then releases a Brawler for cleanup.
- Fireball (4 elixir): Hits clustered support immediately; seek useful troop damage alongside the tower.
- Arrows (3 elixir): Removes vulnerable swarms over a wide area, including flying units.
- Barbarian Barrel (2 elixir): Clears fragile ground troops along its path and leaves a Barbarian to distract.
Why this deck works
Recruits and Royal Hogs make the opponent divide attention across lanes. Flying Machine and Zappies support that plan, but both can invite spell value when placed too close together. Cage gives the deck a central answer without committing all seven elixir to Recruits. A split attack is useful when it separates counters; it is not useful when both sides are too weak to require a real response.
How to play the opening and double elixir
First minute: Use Cage first when possible. Recruits should answer pressure in both lanes rather than become a seven-elixir opening habit.
Double elixir: Split Royal Hogs when one lane has a strong counter. Flying Machine supports from range; keep it and Zappies far enough apart to resist one spell.
Defense and tradeoff: Several Fireball-sensitive troops can stretch that spell, but a shared placement gives away the advantage. Splash defenders still handle grouped Hogs efficiently.
Matchups and defensive decisions
- Against a single ground-splash defender, splitting Hogs can keep that troop from covering every Hog. Check the other lane for a second splash answer before assuming the split will produce damage.
- Against Fireball, separate Flying Machine from Zappies and the tower. Giving the spell multiple valuable targets removes the pressure that several spell-sensitive units are supposed to create.
A decision to watch: If Recruits finish defending both lanes, add Hogs where the surviving shields create a worthwhile attack. You do not have to split evenly when one lane already has the opponent's strongest counter waiting.
Common mistake
Avoid this: Adding Flying Machine and all Zappies behind the same Recruit group gives the opponent an easy target.
Replacements and upgrade priorities
- Musketeer can replace Flying Machine, though she cannot float across the river and costs the same.
- Hunter can replace Zappies for stronger close-range damage, but you lose the repeated stuns and three-way split flexibility.
Upgrade focus: Royal Hogs and Flying Machine, then Fireball and the defenders that need levels.
Golem Electro Dragon
A slow build-up choice for an established Golem collection. Expect to defend patiently until you can afford the tank and support.

Average elixir: 4.4
Cards and their roles
- Golem (8 elixir): Expensive primary tank that needs a funded support and defensive plan.
- Electro Dragon (5 elixir): Chained stuns and air support against nearby clustered targets.
- Baby Dragon (4 elixir): Clears groups with flying splash damage against air and ground.
- Mini P.E.K.K.A (4 elixir): Removes high-health ground attackers while a tank or building absorbs pressure.
- Tombstone (3 elixir): Pulls building-targeting units and supplies Skeleton distractions on the ground.
- Lightning (6 elixir): Heavy spell for valuable targets, especially a defensive building plus nearby support.
- Barbarian Barrel (2 elixir): Clears fragile ground troops along its path and leaves a Barbarian to distract.
- Mega Minion (3 elixir): Provides concentrated air or ground damage from a flying defender.
Why this deck works
Golem needs time and support, so Tombstone and Mini P.E.K.K.A carry the early defensive workload. Baby Dragon clears groups, Electro Dragon interrupts nearby targets, and Mega Minion adds focused air damage. The support works best when the opponent has to approach through separate angles. Packing all three flying troops behind one Golem gives spells and ranged defenders too much value.
How to play the opening and double elixir
First minute: Use Tombstone to pull and Mini P.E.K.K.A to remove the attacker. Starting Golem while low on elixir invites opposite-lane pressure.
Double elixir: Build behind Golem after a positive defense or a clear commitment from the opponent. Electro Dragon interrupts grouped defenders while Baby Dragon clears swarms.
Defense and tradeoff: The air support is powerful but expensive. Space the Dragons against spells and do not assume chain attacks will connect when defenders spread out.
Matchups and defensive decisions
- Against an opposite-lane Hog or Ram Rider, defend with the cheapest combination that actually stops it before extending the Golem push. Ignoring the lane is a deliberate tower race, not a free way to build elixir.
- Against Inferno defense, keep Lightning for an obstacle it can meaningfully affect and protect Electro Dragon if its stun is useful. Neither tool makes poor support spacing safe.
A decision to watch: If Golem is already walking up one lane and you cannot afford both support and Tombstone, check the opponent's next win condition first. Keeping the building ready can preserve the time the push needs.
Common mistake
Avoid this: Treating every point of tower damage as a reason to abandon defense for Golem leads to expensive races you may not win.
Replacements and upgrade priorities
- Musketeer can replace Electro Dragon, reducing cost but removing chained stuns.
- Goblin Cage can replace Tombstone for a sturdier pull and a surviving Brawler, at one extra elixir and without Tombstone's repeated Skeleton distractions.
Upgrade focus: Golem, the support you rely on most, then Lightning.
Giant Skeleton Balloon
For Balloon players who want Giant Skeleton to slow ground counterpushes and create a surviving tank.

Average elixir: 3.4
Cards and their roles
- Balloon (5 elixir): Main air win condition; needs enough protection to reach a building or tower.
- Giant Skeleton (6 elixir): Anchors ground defense and threatens nearby troops with its death bomb.
- Musketeer (4 elixir): Supplies sustained ranged damage, especially against air threats.
- Ice Golem (2 elixir): Draws troops away and tanks briefly; its death effect slows nearby enemies.
- Bats (2 elixir): Adds cheap air-targeting damage once splash and small spells are occupied.
- Bomb Tower (4 elixir): Pulls attackers and damages ground groups; needs troops to deal with air.
- Giant Snowball (2 elixir): Knocks back eligible targets and slows them, buying space for attack or defense.
- Barbarian Barrel (2 elixir): Clears fragile ground troops along its path and leaves a Barbarian to distract.
Why this deck works
Giant Skeleton creates a ground-defense anchor that can survive long enough to tank for Balloon. Bomb Tower covers ground groups and gives you a separate pull, while Musketeer and Bats handle air damage. Ice Golem provides a cheaper way to draw troops away when Giant Skeleton would be excessive. The two large threats work together best after defense, because buying them both from an empty board costs eleven elixir.
How to play the opening and double elixir
First minute: Defend with Bomb Tower or Giant Skeleton according to the push. Use Musketeer from range and save Bats until the small spell is committed.
Double elixir: Send Balloon behind a healthy surviving Giant Skeleton, with Snowball available to displace a defender. An unsupported Balloon is a probe, not an automatic all-in.
Defense and tradeoff: Ground defense is sturdy, but buildings and protected anti-air can stop Balloon. Preserve Musketeer when the opponent has an air win condition.
Matchups and defensive decisions
- Against a ground push with support, draw the tank with Bomb Tower and place Giant Skeleton where the bomb threatens the support's route. Musketeer should shoot from outside the same spell area.
- Against a building plus Musketeer, do not assume Giant Skeleton's presence guarantees a Balloon connection. Watch whether the building pulls Balloon away from the tank and preserve Snowball for a displacement that actually helps.
A decision to watch: If Giant Skeleton dies on your side, take the defensive value and reset. Balloon behind a disappearing tank often reaches the bridge with no protection and leaves your own air defense short of elixir.
Common mistake
Avoid this: Giant Skeleton plus Balloon from an empty board spends eleven elixir before any spell support.
Replacements and upgrade priorities
- Knight replaces Ice Golem if levels demand, adding a fighting defender but increasing the cycle cost.
- Minions can replace Bats for more durable air support, but that one-elixir increase makes the already-heavy counterpush harder to fund.
Upgrade focus: Balloon and Musketeer, then Giant Skeleton.
X-Bow Archers Cycle
An advanced positioning deck for players willing to learn when a defensive X-Bow is better than forcing tower damage.

Average elixir: 3.0
Cards and their roles
- X-Bow (6 elixir): Long-range ground siege win condition; also useful as a defensive structure.
- Knight (3 elixir): Durable ground blocker that protects fragile defenders and can tank a counterattack.
- Archers (3 elixir): Provides two ranged air defenders that can split to cover separate lanes.
- Skeletons (1 elixir): Distracts single-target ground attackers and speeds your rotation at low cost.
- Electro Spirit (1 elixir): Chains a brief stun across nearby targets and helps cycle to a key card.
- Tesla (4 elixir): Pulls attackers and supplies building damage against both air and ground.
- Fireball (4 elixir): Hits clustered support immediately; seek useful troop damage alongside the tower.
- The Log (2 elixir): Clears ground swarms and pushes back eligible ground troops along its path.
Why this deck works
X-Bow needs a protected firing window, and the rest of this deck is built to create or preserve one. Tesla handles the building role, Knight blocks ground attackers, and Archers provide sustained damage from range. The cheap cards help you rotate back to those answers. Your skill is deciding which X-Bow is worth protecting; defending every placement to the last elixir is not the objective.
How to play the opening and double elixir
First minute: Split Archers and watch the opponent's tank cycle. Keep Knight and Tesla ready before committing six elixir at the bridge.
Double elixir: Place an offensive X-Bow when their expensive counter is out of hand or you have a clear elixir advantage. Protect only while the exchange remains worthwhile.
Defense and tradeoff: Tesla and Archers cover air; Knight blocks ground attackers. Heavy tanks and multiple building-targeting threats can make a bridge X-Bow hard to defend.
Matchups and defensive decisions
- Against Royal Giant, avoid an automatic offensive X-Bow while his answer is in hand. Use defensive structures and cheap support to make the exchange manageable, then reconsider offense after his rotation is known.
- Against Balloon, preserve Tesla and Archers. X-Bow can distract building-targeting attackers in some placements, but cannot shoot air, so spending all your support at the bridge is dangerous.
A decision to watch: If their tank reaches your X-Bow and you cannot keep a connection, stop adding cards just to preserve the structure. Save Knight or Archers to clean up the remaining push on your side.
Common mistake
Avoid this: Feeding every card into a doomed X-Bow turns a six-elixir loss into a lost tower.
Replacements and upgrade priorities
- Ice Spirit replaces Electro Spirit for a focused freeze, but loses the chain stun across several targets.
- Musketeer can replace Archers for concentrated ranged damage, but increases cost and removes the option to split two defenders across lanes.
Upgrade focus: X-Bow, Archers and Tesla, then Fireball. This list uses standard Archers, not their Evolution.
Prince Goblin Barrel Pressure
Use Prince to turn ground defense into pressure while Goblin Barrel attacks the tower directly.

Average elixir: 3.5
Cards and their roles
- Goblin Barrel (3 elixir): Direct tower pressure; track the opponent's reliable Barrel response.
- Prince (5 elixir): Deals focused ground damage, then threatens a charge on the counterattack.
- Dart Goblin (3 elixir): Fast ranged damage and pressure; an important air defender in bait-heavy hands.
- Goblin Gang (3 elixir): Combines ground distractions with Spear Goblins that can help against air.
- Guards (3 elixir): Shielded ground distractions that buy time for ranged or building damage.
- Inferno Tower (5 elixir): Pulls and ramps damage against high-health targets; watch for resets and distractions.
- Fireball (4 elixir): Hits clustered support immediately; seek useful troop damage alongside the tower.
- The Log (2 elixir): Clears ground swarms and pushes back eligible ground troops along its path.
Why this deck works
Prince gives the bait deck a ground defender that can become a threatening counterattack. Goblin Barrel supplies direct tower access, while Dart Goblin and Goblin Gang encourage the opponent to spend a small spell. Guards offer shielded distractions when that spell is dangerous. Inferno Tower remains the reliable pull against a high-health attacker; Prince should not be expected to cover every ground threat by himself.
How to play the opening and double elixir
First minute: Defend with Prince against single ground threats and keep Inferno Tower for the tank it needs to pull. Split Goblin Gang when you need a small opening play.
Double elixir: Barrel while the tower is occupied by a surviving Prince, or pressure the other lane if the opponent piles counters into one side.
Defense and tradeoff: Dart Goblin is the main sustained air defender, supported by the Gang's Spear Goblins. Protect them carefully against air decks with spells.
Matchups and defensive decisions
- Against a ground tank, use Inferno Tower for the main target and Prince to contest support that approaches it. Guards can buy time against single-target troops after splash threats are occupied.
- Against air pressure with spells, keep Dart Goblin at a safe distance and preserve the Gang's Spear Goblins. Spending both for bait at the bridge leaves the deck with limited ways to damage a supported Balloon.
A decision to watch: When Prince survives and draws tower attention, Barrel may gain a useful window. If the opponent still has a dependable Barrel spell ready, use the surviving Prince to force a response before adding three more elixir.
Common mistake
Avoid this: Prince, Goblin Gang and Guards together can all feed one splash defender while leaving the air unprotected.
Replacements and upgrade priorities
- Minions can replace Guards to strengthen air coverage, trading away shielded ground defense.
- Valkyrie can replace Guards if ground splash is the missing job, but costs one more and replaces shielded distractions with a single troop.
Upgrade focus: Goblin Barrel, Prince and Dart Goblin before investing in every bait card.
Keep your deck working as opponents change
Before replacing a card after a loss, identify what actually failed. Did you have no answer, use the answer too early, or place it where the opponent could remove it alongside your tower? Those are different problems.
- Against Mega Knight: bring the fight to your side, separate him from support and use your tank killer or central pull. Do not feed several fragile ground troops into the landing area.
- Against Balloon: know which building pulls it and which troop supplies the damage. Save the second air answer if the opponent can remove the first with a spell.
- Against Witch or Wizard behind a tank: pull the tank toward the middle and attack the support separately. Stacking defenders in front of splash damage is the expensive option.
- Against Inferno defenses: preserve a reset if your deck has one, or attack when the Inferno is out of cycle. Sending another unsupported Giant into the same answer does not change the exchange.
- Against Goblin Barrel: keep a dependable response in hand. If you spend it elsewhere, know the backup placement before the Barrel lands.
What to upgrade, and what to leave alone
Choose one win condition and a small core of defenders. Upgrade your win condition, then the spell and ranged defender whose level is costing you important interactions. The priority inside each deck is a starting point; a badly underleveled air defender can need attention before an already-strong tank.
A replacement should fill the same job. Swapping Musketeer for a ground-only troop leaves an air-defense hole even if the average elixir looks good. Changing Freeze to Poison changes the attack timing. Replacing Ice Golem with Knight changes both cost and movement. Try one replacement at a time. The suggested alternatives are separate options, not instructions to make both swaps together. After any swap, recalculate the average and check your answers to tanks, air, swarms and buildings.
If you have a useful Evolution unlocked, consider it within a familiar deck, but do not assume a standard-card list has the same performance as an evolved version from a leaderboard. The copy links here deliberately specify standard slots.
Questions before you commit your upgrades
What is the best Arena 12 deck without Legendaries?
Giant Musketeer Fundamentals is the straightforward starting choice in this guide. Hog Knight Fireball is the faster alternative. Both give every card a clear defensive or attacking job and avoid a Legendary requirement. Choose between them by the levels of your Giant, Hog and Musketeer.
Should I switch to Graveyard as soon as I unlock it?
Only if you can support it. Graveyard usually needs a surviving troop to draw tower fire and a plan for the defender. A newly unlocked Graveyard with weak support is not automatically better than the Hog or Giant deck that brought you here.
Why is my copied deck losing to a different-looking version?
Card levels, Tower Troops, Evolutions, Hero versions and player decisions can change the matchup. First compare the actual eight cards and special slots. Then look at the replay for the first avoidable elixir loss or the defensive card spent too early.
Do I need a different deck for Arena 13?
No. Keep a functioning deck and consider new cards when they solve a specific weakness. If you are still choosing a core, compare the Arena 11 deck options. When you reach the next arena, use the Arena 13 guide to review the extra choices rather than starting your upgrades from scratch.
Card availability and review notes
Reviewed September 13, 2026 using the RoyaleAPI arena reference, its card availability data and Supercell’s September 8 balance notes. Arena 12 is Spooky Town at 3,800 trophies. Unlock routes and balance can change, so your in-game collection remains the final check for what you own.
One recent change worth remembering: Fireball’s Crown Tower damage was reduced in that update. Check the damage shown on your own card before trying to finish a tower with spells. Freeze’s shorter duration also makes older timing advice unreliable.
These are editorial deck recommendations based on card roles, availability and practical tradeoffs. They are not a published battle-test dataset, and no win rate or guaranteed trophy gain is claimed. Browse the full arena guide library for the other published guides.
This is an unofficial fan guide. Clash Royale and its game assets belong to Supercell. This content is not affiliated with, endorsed, sponsored or specifically approved by Supercell. See the Supercell Fan Content Policy.