
Reviewed September 4, 2026 by Mohit Thakur.
The best Arena 6 decks fit the cards you have upgraded and give every defensive job a clear answer. If you want one starting point, build Giant Valkyrie Fundamentals. It is the easiest list here to read and improve. Choose Hog Electro Spirit Cycle for a faster rotation, or P.E.K.K.A Witch Air Support when heavy ground pushes are the problem. This page contains 30 different Arena 6 decks, and every section shows all eight cards before asking you to copy anything.
Every list uses cards available by Arena 6 as of September 4, 2026. They are editorial starting points, not promises about match results. Card levels, tower level, timing, and the opponents you meet can change which one works best for your account. Pick one list that matches your upgraded cards and learn its defensive order before spending gold on several decks.
Why some pages call this Arena 4: P.E.K.K.A’s Playhouse was Arena 4 in the original Clash Royale order, so older guides and some legacy screens still use that number. The September 2026 Trophy Road data lists Spell Valley as Arena 4, Builder’s Workshop as Arena 5, and P.E.K.K.A’s Playhouse as Arena 6 at 1,600 trophies. This guide follows that current order.
Start here: choose a deck by the cards you have
Arena 6 rewards a simple plan more than a clever-looking collection of eight cards. Start with the win condition you already understand, then check whether the rest of the deck can defend tanks, air troops, and swarms without relying on one card for every job.
| Your situation | Start with | Why |
|---|---|---|
| First structured deck | Giant Valkyrie Fundamentals | Clear roles, two spells, and no complicated combo. |
| Fast Hog rotation | Hog Electro Spirit Cycle | 2.9 average with Cannon, Mini P.E.K.K.A, and Musketeer intact. |
| Heavy ground defense | P.E.K.K.A Witch Air Support | P.E.K.K.A anchors the defense, with three different air-support options. |
| Direct Hog control | Hog Valkyrie Control | One building and a balanced defensive core make the plan easy to repeat. |
| Learn siege | Mortar Fireball Cycle | A conventional Fireball list with a fast Mortar cycle. |
Before you copy a deck, check these three things
First, confirm that the win condition is one of your better-leveled cards. Hog Rider, Giant, Battle Ram, Mortar, and Goblin Barrel create very different games. Second, find the main air defender. If that card is far below your tower level, use the listed replacement or choose another deck. Third, identify the defensive anchor, usually a building, Mini P.E.K.K.A, P.E.K.K.A, Valkyrie, or Goblin Cage. If all three pieces are usable, the deck is worth practicing.
Do not copy a list and upgrade every card immediately. Play ten battles, note which card is repeatedly stuck in your hand, and decide whether the problem is level, placement, or role. A role-for-role change is safer than replacing a defensive card with another attacker.
Hog Rider decks for quick pressure
These six lists all use Hog Rider, but their second pressure tool and defensive rhythm differ. Start with the lower-cost lists if you want repeated attacks; use the heavier splash list only when those support cards are among your best levels.
Hog Valkyrie Control

3.1 average elixir | Hog control | Medium difficulty
Choose it if: You want one reliable building, two useful spells, and a Hog plan that does not require a large push. Cannon and Valkyrie handle most ground pressure while Musketeer and Mega Minion cover the air, so the Hog Rider can be played after a cheap defense.
The eight cards
- Hog Rider (4 elixir): fast tower pressure
- Valkyrie (4 elixir): ground splash mini tank
- Musketeer (4 elixir): long-range air defense
- Fireball (4 elixir): medium spell
- Zap (2 elixir): cheap stun and swarm reset
- Skeletons (1 elixir): one-elixir cycle and distraction
- Cannon (3 elixir): low-cost building pull
- Mega Minion (3 elixir): durable air damage
Your first minute: Wait for ten elixir if the opponent also waits. A split Skeletons cycle or Mega Minion behind the king tower is safer than exposing Cannon or Musketeer without a reason. Use Hog Rider alone first and learn which card stops it. Defend the reply with Cannon in the center, then send the next Hog while that answer is still out of hand.
When elixir speeds up: Keep Cannon available for their win condition and use Skeletons plus Zap to return to Hog faster. Fireball becomes valuable when it can hit a ranged defender and the tower together.
Defend in this order: Pull building-targeting troops with Cannon, place Valkyrie on clustered ground support, and keep Musketeer away from Valkyrie so one spell cannot hit both. Mega Minion finishes tanks after the pull.
The mistake to avoid: A blind Hog plus Fireball leaves too little elixir for defense. Do not spend Zap on harmless cycle troops if the opponent still has Skeleton Army or Bats available.
If a card is missing or underleveled: Mega Minion can become Minions for more damage but less spell resistance. Arrows can replace Zap when swarms are the bigger problem, although the deck becomes one elixir heavier.
Upgrade first: Hog Rider first, then Fireball, Musketeer, Valkyrie, and Cannon.
A useful battle script: A clean sequence is Cannon pull, Valkyrie on support, Musketeer at range, then Hog Rider in front of the surviving Musketeer. Stop adding cards once the opponent has enough elixir to defend.
Hog Barrel Dual Pressure
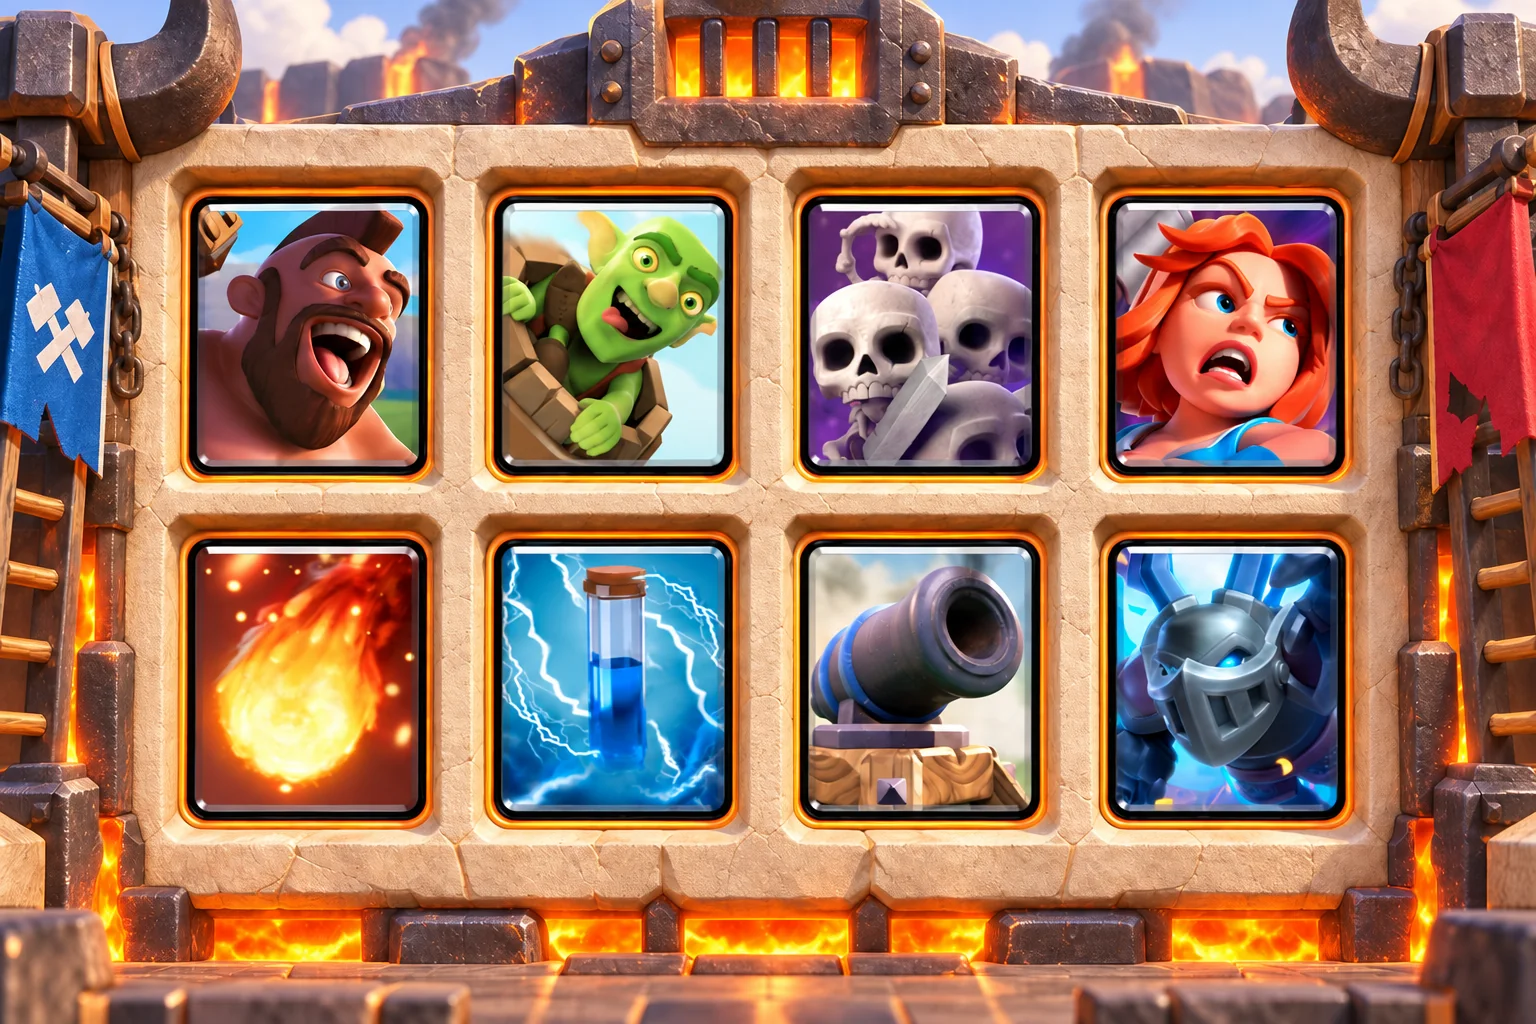
3.3 average elixir | Hog and Barrel pressure | Medium difficulty
Choose it if: You enjoy tracking one small spell and attacking with two different tower threats. Hog Rider asks for a building or tank killer, while Goblin Barrel asks for a spell. The deck wins by learning which answer the opponent is missing on the next rotation.
The eight cards
- Hog Rider (4 elixir): fast tower pressure
- Goblin Barrel (3 elixir): tower pressure
- Skeleton Army (3 elixir): high-damage swarm defense
- Valkyrie (4 elixir): ground splash mini tank
- Fireball (4 elixir): medium spell
- Zap (2 elixir): cheap stun and swarm reset
- Cannon (3 elixir): low-cost building pull
- Mega Minion (3 elixir): durable air damage
Your first minute: Send either a lone Hog Rider or a normal Goblin Barrel once you reach ten elixir. Do not combine them before you know the opponent’s counters. Alternate the two threats and write down the response in your head. If Zap, Arrows, or another swarm answer hits Skeleton Army, the next Goblin Barrel has a better chance to connect.
When elixir speeds up: Pressure the lane opposite a slow tank, but keep enough elixir for Cannon and Valkyrie. Fireball should clear a valuable defender, not serve as routine tower chip.
Defend in this order: Cannon handles pulls, Valkyrie clears ground groups, and Mega Minion supports against tougher units. Skeleton Army is strongest after the opponent has already spent its small spell.
The mistake to avoid: Skeleton Army is your only cheap high-damage ground swarm. Playing it into a ready spell can open the tower for the opponent’s next push.
If a card is missing or underleveled: Guards can replace Skeleton Army for shields and steadier defense. Minions can replace Mega Minion when you need more immediate air damage.
Upgrade first: Hog Rider and Goblin Barrel first, followed by Fireball, Valkyrie, and Cannon.
Hog Archers and Bats Control
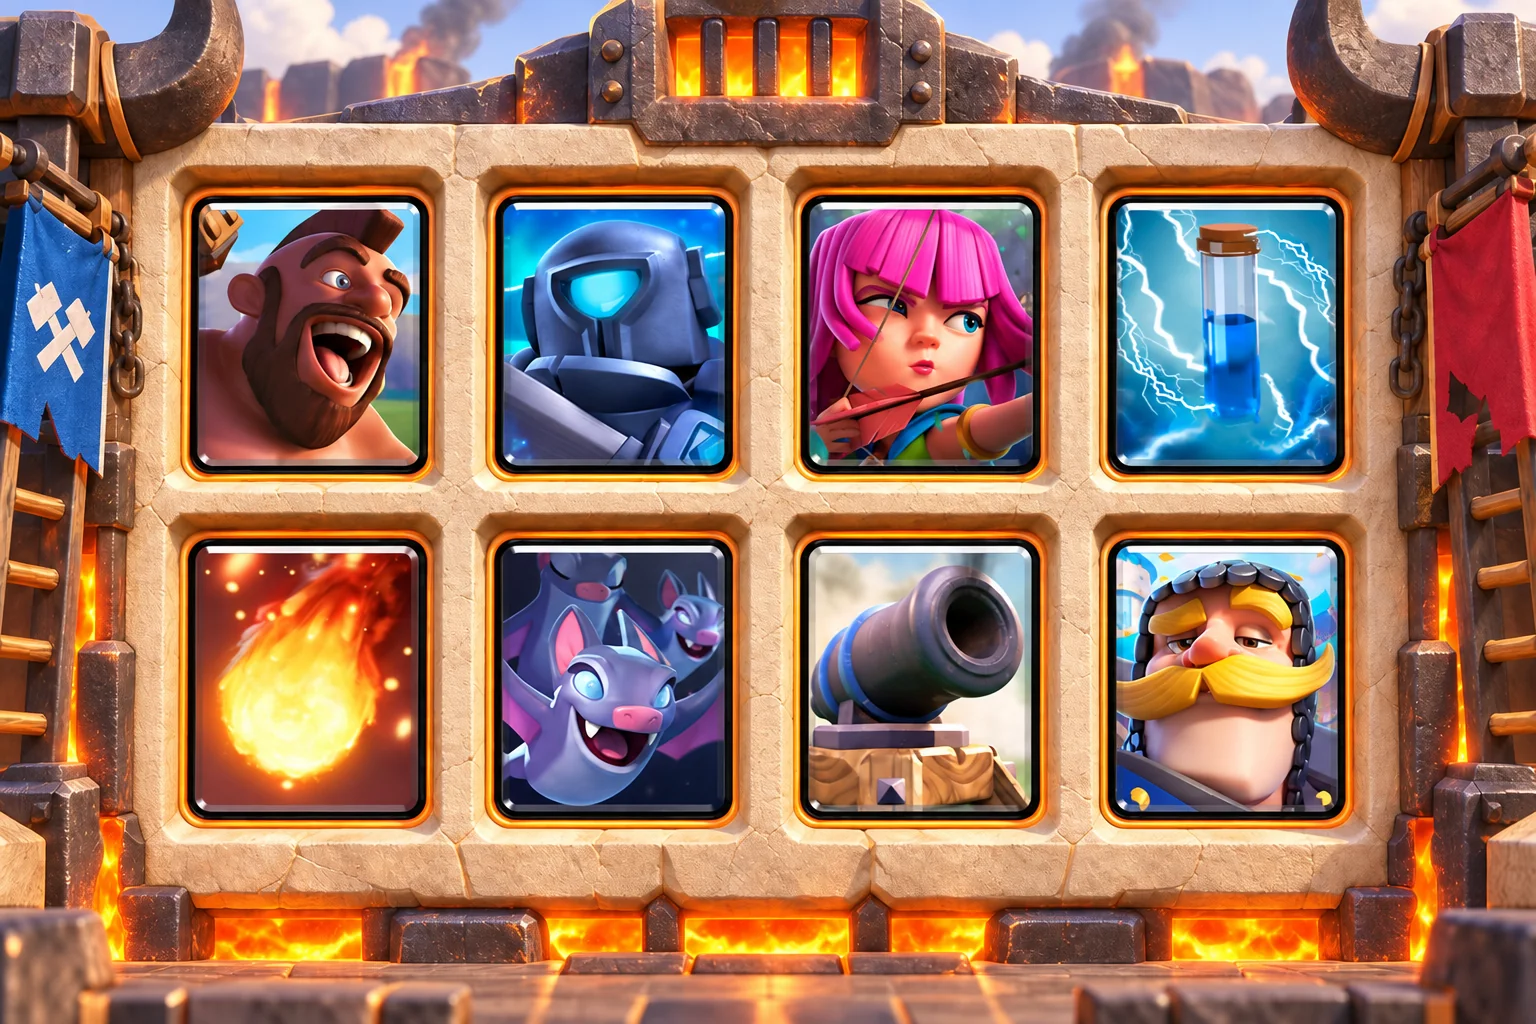
3.1 average elixir | Hog cycle control | Medium difficulty
Choose it if: You prefer cheap rotations and are comfortable protecting fragile Archers and Bats from spells. Knight and Cannon buy time, Mini P.E.K.K.A removes the main tank, and the two air groups let you defend without paying four elixir for Musketeer.
The eight cards
- Hog Rider (4 elixir): fast tower pressure
- Mini P.E.K.K.A (4 elixir): single-target tank killer
- Archers (3 elixir): split ranged defense
- Zap (2 elixir): cheap stun and swarm reset
- Fireball (4 elixir): medium spell
- Bats (2 elixir): cheap air damage
- Cannon (3 elixir): low-cost building pull
- Knight (3 elixir): low-cost mini tank
Your first minute: Split Archers behind the king tower or play Knight in the back at full elixir. Keep Bats hidden until you see the opponent’s Zap or Arrows. Hog Rider usually goes alone. Defend for less than the opponent spends, then place Hog ahead of a surviving Knight or a single Archer when the lane is clear.
When elixir speeds up: Use Knight, Bats or Archers to cycle only when they have a useful job, and keep them apart to limit spell value. Fireball the defender only when the hit also protects a meaningful Hog connection.
Defend in this order: Cannon pulls, Mini P.E.K.K.A cuts down tanks, Knight absorbs support damage, and Archers split their fire. Bats punish any push that has already used its splash card.
The mistake to avoid: Arrows can remove Bats and Archers together if you crowd them. Separate the air defenders and avoid turning one spell into a six-elixir trade.
If a card is missing or underleveled: Valkyrie can replace Knight when ground swarms keep breaking through. Minions can replace Bats for a sturdier but slower rotation.
Upgrade first: Hog Rider first, then Fireball, Mini P.E.K.K.A, Archers, and Cannon.
Hog Inferno Bait
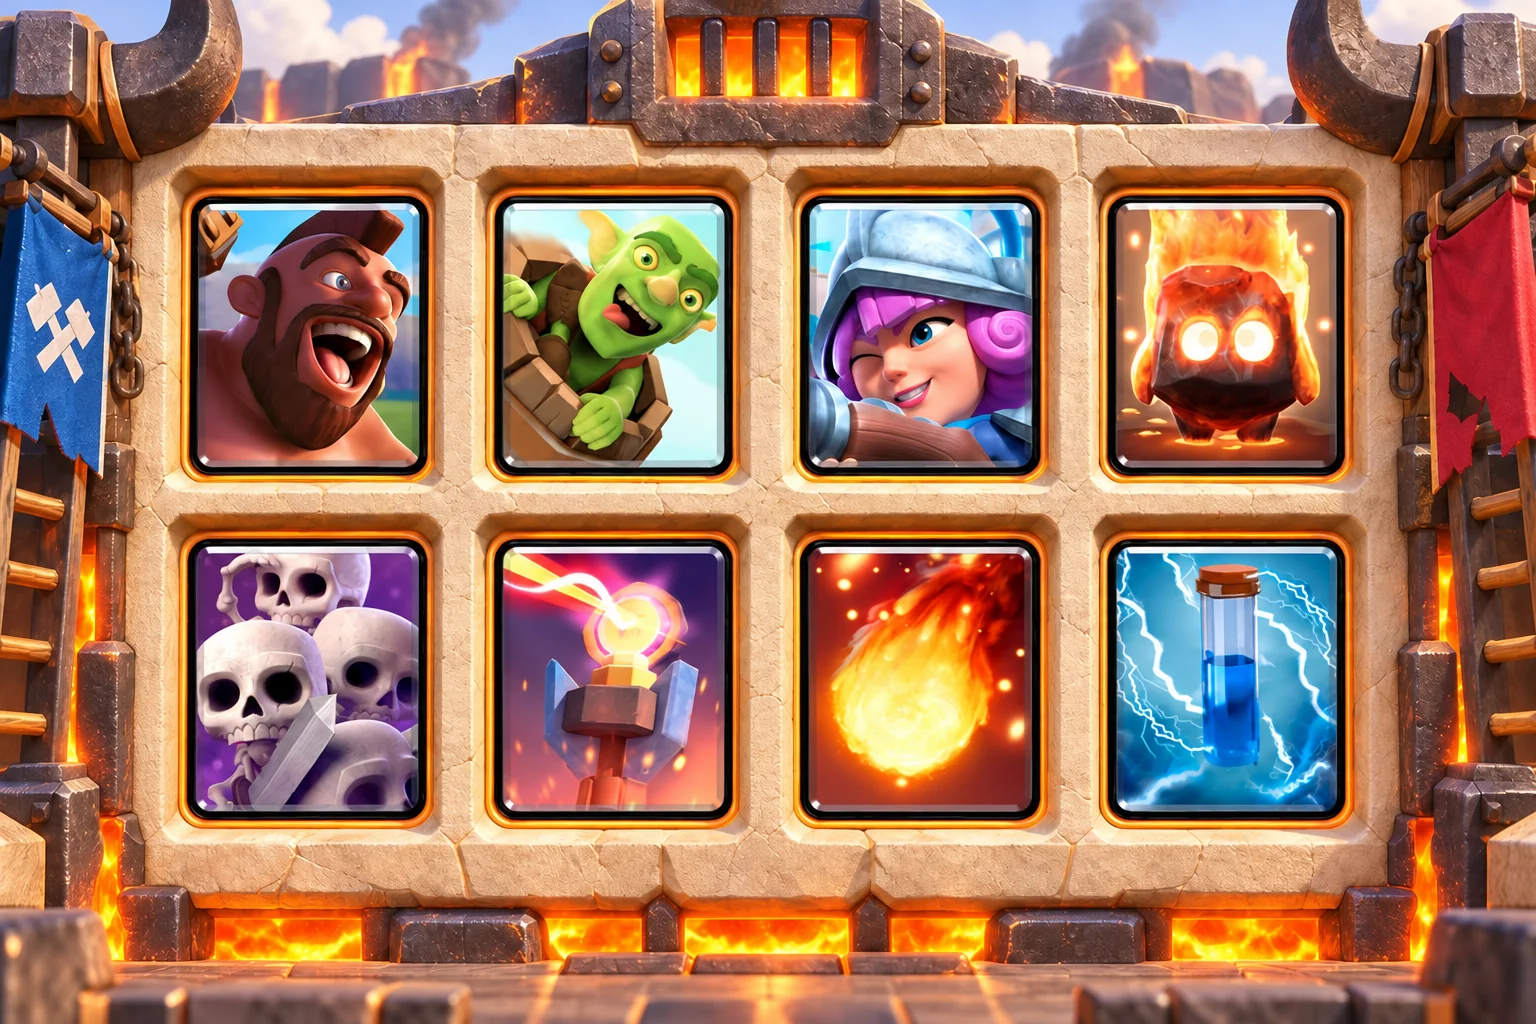
3.3 average elixir | Hog bait control | Medium difficulty
Choose it if: You want Hog Rider, Goblin Barrel, and a strong tank answer in the same list. Inferno Tower controls large targets while Fire Spirit and Skeleton Army tempt out the small spell. Goblin Barrel attacks after that spell is gone, and Hog Rider keeps the building answer busy.
The eight cards
- Hog Rider (4 elixir): fast tower pressure
- Goblin Barrel (3 elixir): tower pressure
- Musketeer (4 elixir): long-range air defense
- Fire Spirit (1 elixir): cycle and splash pressure
- Skeleton Army (3 elixir): high-damage swarm defense
- Inferno Tower (5 elixir): tank control
- Fireball (4 elixir): medium spell
- Zap (2 elixir): cheap stun and swarm reset
Your first minute: A lone Goblin Barrel or Fire Spirit can reveal the first response. Avoid placing Inferno Tower before there is a target. Track the small spell and the building. If Skeleton Army draws the spell, use Barrel. If the building is out of hand, use Hog Rider.
When elixir speeds up: Alternate threats quickly instead of combining them every time. Musketeer should stay available if the opponent has an air card that Inferno Tower cannot safely manage alone.
Defend in this order: Inferno Tower melts high-health units, Musketeer covers air, Fire Spirit clears fragile support, and Skeleton Army surrounds after the counter spell is spent.
The mistake to avoid: Reset effects can interrupt Inferno Tower, and opponents with two reliable swarm answers reduce the bait advantage. Do not rely on Skeleton Army before seeing their rotation.
If a card is missing or underleveled: Cannon can replace Inferno Tower for a cheaper cycle but weaker tank control. Guards can replace Skeleton Army for shielded defense.
Upgrade first: Hog Rider and Goblin Barrel first, then Musketeer, Inferno Tower, and Fireball.
Hog Electro Spirit Cycle
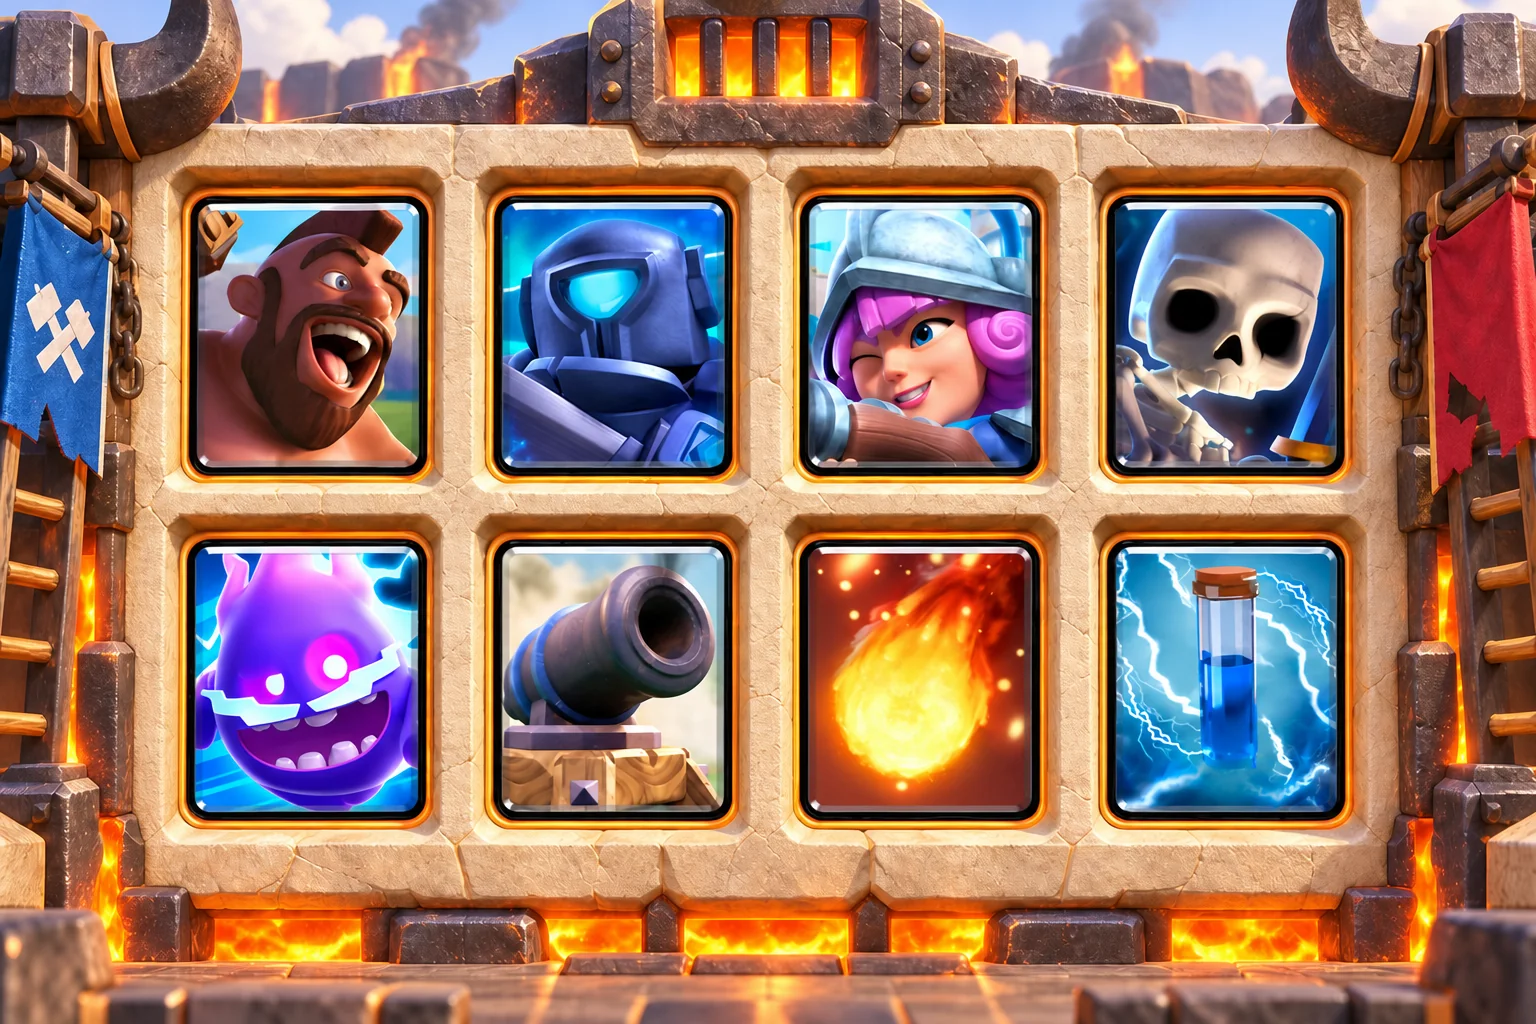
2.9 average elixir | Fast Hog cycle | Medium difficulty
Choose it if: You want the quickest Hog rotation in this guide without giving up Cannon, Mini P.E.K.K.A, or Musketeer. The 2.9 average comes from Skeletons and Electro Spirit, while the three defensive anchors handle tanks, air, and direct tower pressure.
The eight cards
- Hog Rider (4 elixir): fast tower pressure
- Mini P.E.K.K.A (4 elixir): single-target tank killer
- Musketeer (4 elixir): long-range air defense
- Skeletons (1 elixir): one-elixir cycle and distraction
- Electro Spirit (1 elixir): cycle and chain stun
- Cannon (3 elixir): low-cost building pull
- Fireball (4 elixir): medium spell
- Zap (2 elixir): cheap stun and swarm reset
Your first minute: Split Skeletons or cycle Electro Spirit when it cannot be punished. A lone Hog Rider at ten elixir is fine if Cannon remains affordable. Use Cannon to pull and Mini P.E.K.K.A to finish, then send Hog Rider before the opponent’s building returns. Musketeer should survive at range whenever possible.
When elixir speeds up: Cycle with a reason: each cheap card should help a defense or move you toward the next Hog. Fireball plus Zap clears many common blockers, but only spend both for real tower access.
Defend in this order: Cannon controls pathing, Mini P.E.K.K.A supplies damage, Musketeer handles air, and Skeletons distract single attackers. Electro Spirit interrupts a group and can reset its attack timing.
The mistake to avoid: There is no ground splash troop, so swarms depend on Fireball, Zap, and careful tower assistance. Cycling Cannon or Musketeer at the wrong time removes the safety of the deck.
If a card is missing or underleveled: Fire Spirit can replace Electro Spirit for more splash damage. Tombstone can replace Cannon when repeated distraction fits your card levels better.
Upgrade first: Hog Rider first, then Musketeer, Fireball, Cannon, and Mini P.E.K.K.A.
A useful battle script: After Cannon pulls a tank, place Mini P.E.K.K.A where it survives, use Skeletons to delay the support, and send Hog Rider as soon as the defense is secure.
Hog Barrel Splash Pressure
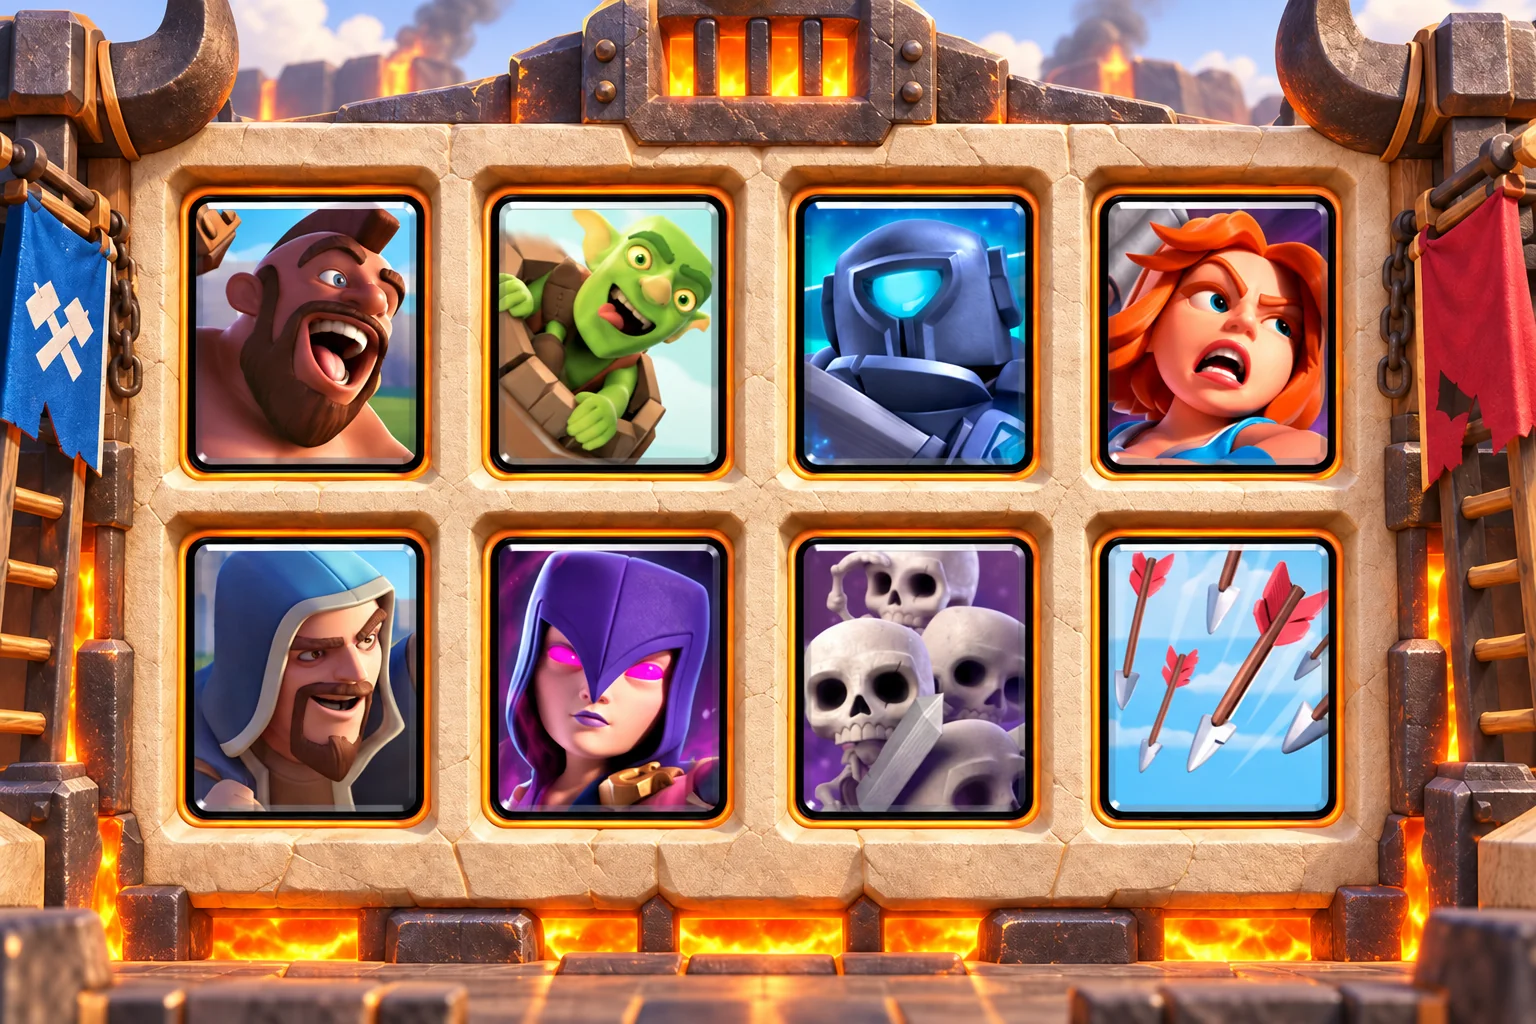
3.9 average elixir | Heavy Hog and Barrel pressure | Easy difficulty
Choose it if: Your strongest card levels are Valkyrie, Wizard, Witch, and Mini P.E.K.K.A, and you still want two tower threats. The four ground defenders make the list forgiving against messy pushes. Hog Rider and Goblin Barrel then attack whichever counter the opponent has just spent.
The eight cards
- Hog Rider (4 elixir): fast tower pressure
- Goblin Barrel (3 elixir): tower pressure
- Mini P.E.K.K.A (4 elixir): single-target tank killer
- Valkyrie (4 elixir): ground splash mini tank
- Wizard (5 elixir): ranged splash support
- Witch (5 elixir): ranged support and skeleton pressure
- Skeleton Army (3 elixir): high-damage swarm defense
- Arrows (3 elixir): wide swarm removal
Your first minute: Use a normal Goblin Barrel or wait. Avoid placing Wizard and Witch in the back together, because the 3.9 average can make an opposite-lane attack difficult to stop. Defend with Valkyrie or Mini P.E.K.K.A and only one ranged splash troop. Send Hog with survivors, then Barrel after the small spell is used.
When elixir speeds up: Pressure more often, but do not turn every attack into Hog plus Barrel plus support. Arrows should remain available for the swarm that blocks either win condition.
Defend in this order: Mini P.E.K.K.A removes tanks, Valkyrie controls ground groups, Wizard gives immediate splash, and Witch supplies longer support. Skeleton Army works after the spell is gone.
The mistake to avoid: There is no building and the deck is heavy. Wizard plus Witch also gives the opponent one attractive spell target if placed too close.
If a card is missing or underleveled: Baby Dragon can replace Wizard for flying splash. Musketeer can replace Witch for simpler, longer-range air defense.
Upgrade first: Hog Rider and Goblin Barrel first, then Valkyrie, Mini P.E.K.K.A, and Arrows.
Giant decks that turn defense into one clean push
Giant is the most forgiving way to learn a counterpush: defend on your side, let one troop survive, then place Giant in front. The 14 versions below change the defensive shell, support card, or second pressure option.
Giant Wizard Counterpush
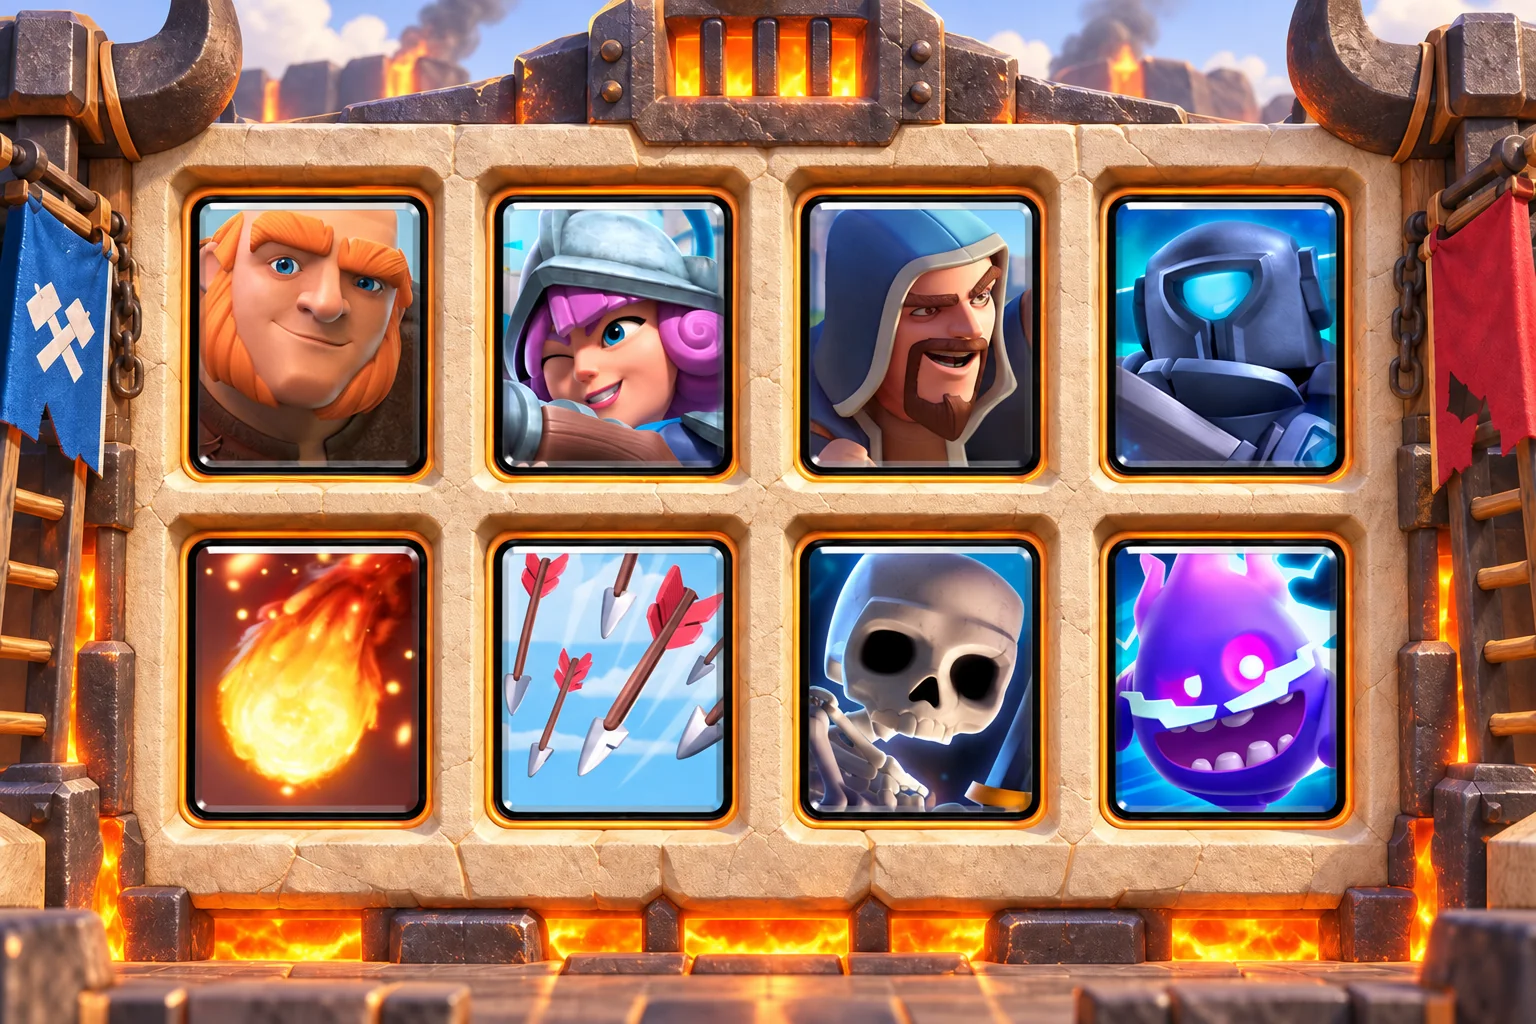
3.4 average elixir | Giant counterpush | Easy difficulty
Choose it if: You want obvious roles for every card and a push that starts from surviving defenders. Mini P.E.K.K.A stops tanks, Wizard clears groups, Musketeer handles air, and Giant turns either surviving ranged troop into a counterpush.
The eight cards
- Giant (5 elixir): building-targeting tank
- Musketeer (4 elixir): long-range air defense
- Wizard (5 elixir): ranged splash support
- Mini P.E.K.K.A (4 elixir): single-target tank killer
- Fireball (4 elixir): medium spell
- Arrows (3 elixir): wide swarm removal
- Skeletons (1 elixir): one-elixir cycle and distraction
- Electro Spirit (1 elixir): cycle and chain stun
Your first minute: Split Skeletons or wait. Musketeer in the back is acceptable at ten elixir, but do not open with Wizard at the bridge or Giant plus support. Defend first. When Wizard or Musketeer survives, place Giant in front near the river and save Arrows for the swarm placed on top of him.
When elixir speeds up: Build one supported Giant push, not an expensive parade. Keep Mini P.E.K.K.A or Musketeer available until you know whether the opponent will attack the other lane.
Defend in this order: Mini P.E.K.K.A takes the large target, Wizard clears ground support, Musketeer covers flying troops, and Electro Spirit interrupts small groups long enough for the tower to help.
The mistake to avoid: Wizard and Musketeer placed side by side offer excellent spell value. Stagger them and use only the one the matchup actually requires.
If a card is missing or underleveled: Baby Dragon can replace Wizard for flying splash at the same cost. Fire Spirit can replace Electro Spirit when splash damage matters more than the chain stun.
Upgrade first: Giant first, then Wizard, Fireball, Mini P.E.K.K.A, and Musketeer.
Giant Witch Counterpush
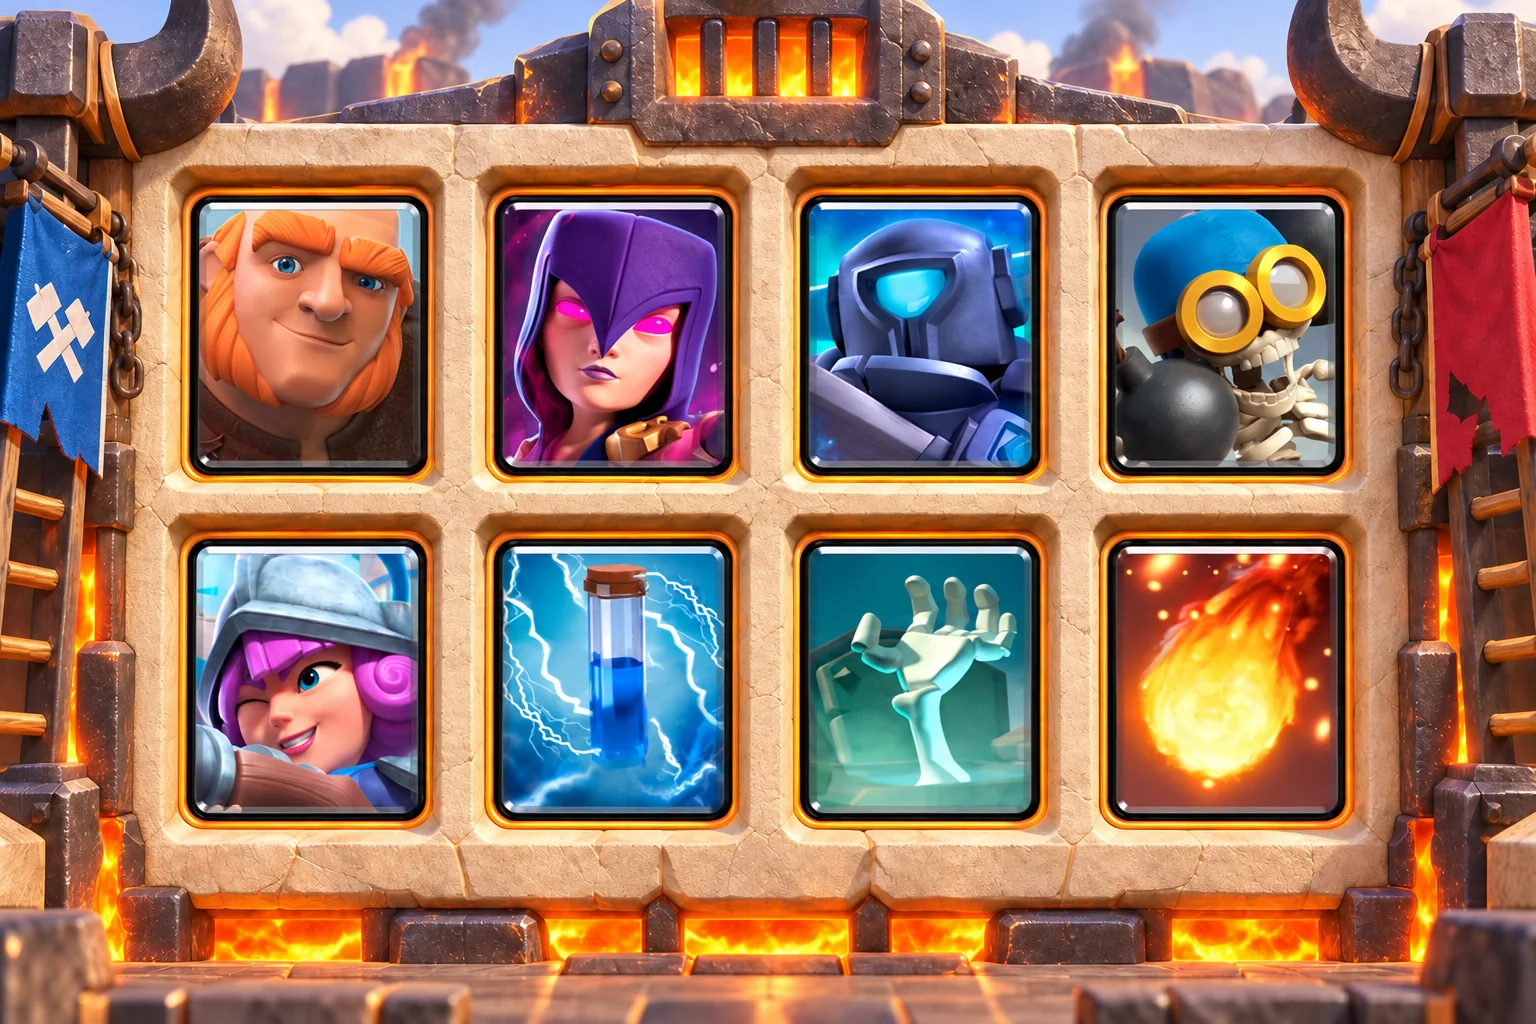
3.6 average elixir | Giant and Witch counterpush | Easy difficulty
Choose it if: You like a traditional Giant push but want Tombstone and Mini P.E.K.K.A available for safer defense. Tombstone pulls the first attacker, Mini P.E.K.K.A removes the main target, and Witch or Musketeer can survive long enough for Giant to tank in front.
The eight cards
- Giant (5 elixir): building-targeting tank
- Witch (5 elixir): ranged support and skeleton pressure
- Mini P.E.K.K.A (4 elixir): single-target tank killer
- Bomber (2 elixir): cheap ground splash
- Musketeer (4 elixir): long-range air defense
- Zap (2 elixir): cheap stun and swarm reset
- Tombstone (3 elixir): defensive pull and distraction
- Fireball (4 elixir): medium spell
Your first minute: Wait, or cycle Bomber in the back when the opponent cannot punish the other lane. Save Tombstone until a unit needs to be pulled. Use Witch for groups and Musketeer for focused air damage. Add Giant in front of the survivor after the defense, then keep Zap ready for a swarm.
When elixir speeds up: A Witch behind Giant becomes more practical, but do not add Musketeer automatically. Fireball is often more valuable as protection for the push than another support troop.
Defend in this order: Tombstone moves tanks to the center, Mini P.E.K.K.A supplies damage, Bomber clears ground swarms, and Musketeer stays far enough back to cover air.
The mistake to avoid: Witch is support, not a tank killer. If Mini P.E.K.K.A is out of hand, a large tank can walk through before her skeletons matter.
If a card is missing or underleveled: Wizard can replace Witch for immediate splash. Valkyrie can replace Bomber for a sturdier ground answer at a higher cost.
Upgrade first: Giant first, then Musketeer, Mini P.E.K.K.A, Fireball, and Witch.
Giant Valkyrie Fundamentals
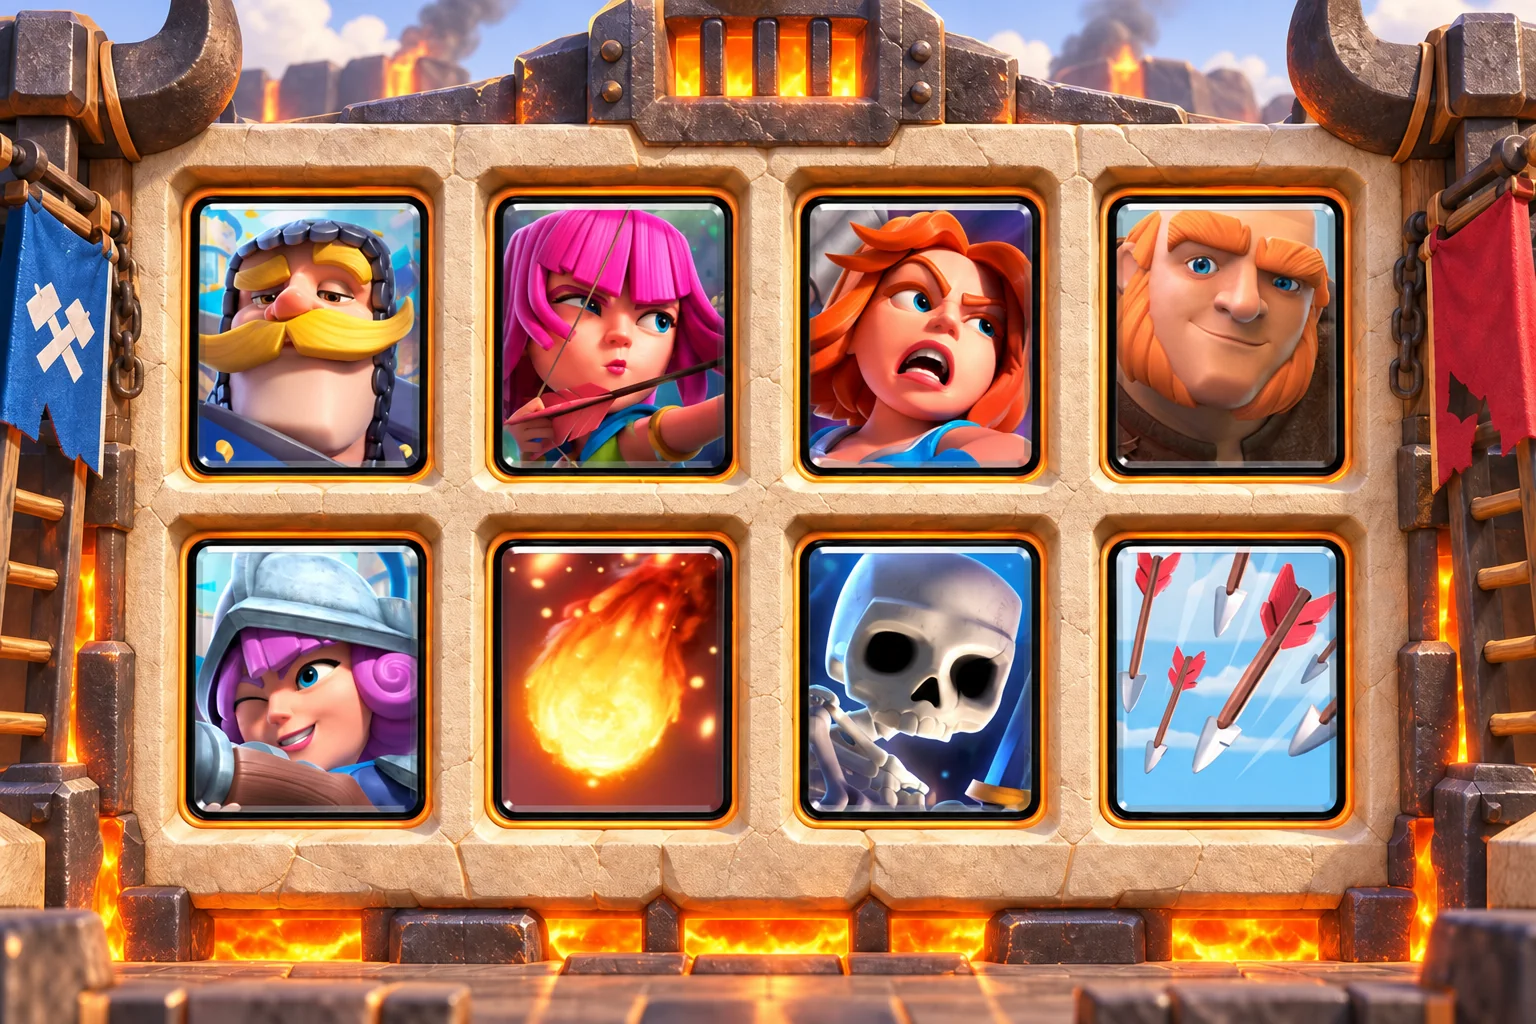
3.4 average elixir | Giant fundamentals | Easy difficulty
Choose it if: You want the cleanest beginner deck in this guide and prefer learning defense before adding tricky combinations. Every card has a plain job: Knight and Valkyrie absorb ground pressure, Archers and Musketeer cover range and air, and Giant converts a surviving defender into offense.
The eight cards
- Knight (3 elixir): low-cost mini tank
- Archers (3 elixir): split ranged defense
- Valkyrie (4 elixir): ground splash mini tank
- Giant (5 elixir): building-targeting tank
- Musketeer (4 elixir): long-range air defense
- Fireball (4 elixir): medium spell
- Skeletons (1 elixir): one-elixir cycle and distraction
- Arrows (3 elixir): wide swarm removal
Your first minute: Split Archers or Skeletons behind the king tower, then watch the opponent’s first card. Keep Giant in hand until you have an elixir lead or a defender walking toward the river. Defend on your side, let the tower help, and place Giant in front of the survivor. Use Arrows only when a swarm blocks the push and Fireball when a medium-health defender gives real value.
When elixir speeds up: Add one ranged troop behind Giant and keep enough elixir for the opposite lane. Repeating a small, supported push is safer than stacking every surviving card.
Defend in this order: Valkyrie clears groups, Knight stalls single targets, Musketeer focuses air, and split Archers cover both lanes. Skeletons can pull a melee unit away for one extra tower shot.
The mistake to avoid: This list has no building, so central troop placement matters. Do not place Musketeer beside Archers when one spell could remove both sources of air defense.
If a card is missing or underleveled: Mini P.E.K.K.A can replace Knight when tanks are the main problem. Minions can replace Archers for more air damage, although Arrows become more dangerous.
Upgrade first: Giant first, then Musketeer, Fireball, Valkyrie, and Archers.
A useful battle script: For the first ten matches, use one rule: never play Giant at the river with no survivor behind him. That single habit teaches positive defense, counterpush timing, and spell patience.
Giant Rocket Spell Pressure
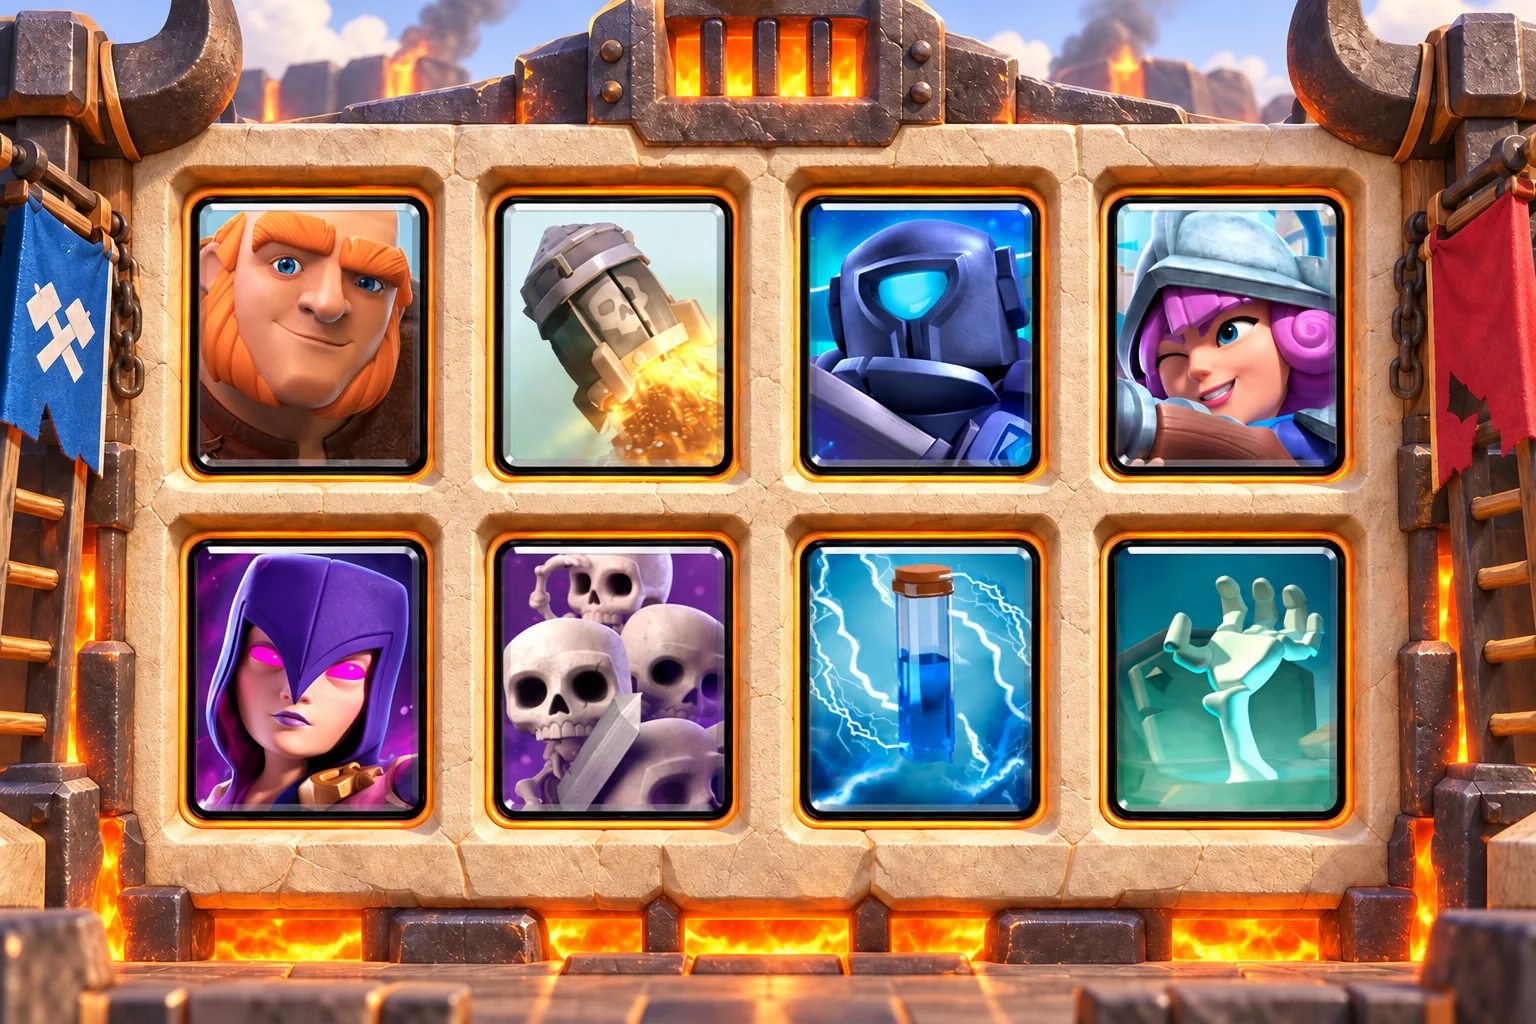
4.0 average elixir | Heavy Giant control | Medium difficulty
Choose it if: You prefer a slower defensive game and want Rocket as a precise answer or late finisher. Tombstone, Mini P.E.K.K.A, Musketeer, and Witch defend first. Giant tanks for survivors while Rocket removes expensive support or closes a tower only when the math is certain.
The eight cards
- Giant (5 elixir): building-targeting tank
- Rocket (6 elixir): heavy spell and finisher
- Mini P.E.K.K.A (4 elixir): single-target tank killer
- Musketeer (4 elixir): long-range air defense
- Witch (5 elixir): ranged support and skeleton pressure
- Skeleton Army (3 elixir): high-damage swarm defense
- Zap (2 elixir): cheap stun and swarm reset
- Tombstone (3 elixir): defensive pull and distraction
Your first minute: Wait or place Tombstone reactively. Avoid a Giant in the back if the opponent can rush the other lane while Rocket and Witch clog the hand. Defend with Mini P.E.K.K.A and one ranged troop, then put Giant in front. Save Rocket for a rare high-value target rather than using it as routine damage.
When elixir speeds up: The four-elixir average becomes easier to manage. Still keep one defensive answer in hand and use Zap to protect a Giant push from a small swarm.
Defend in this order: Tombstone pulls, Mini P.E.K.K.A removes the tank, Musketeer handles focused air damage, and Witch covers groups. Rocket is the emergency button against stacked support.
The mistake to avoid: This deck cycles slowly and carries only Zap as a cheap spell. If Rocket misses value, fast pressure can arrive before the right defender returns.
If a card is missing or underleveled: Fireball can replace Rocket for a safer average cost. Wizard can replace Witch when you want immediate splash instead of skeleton generation.
Upgrade first: Giant first, then Rocket, Mini P.E.K.K.A, Musketeer, and Zap.
Giant Double-Building Defense
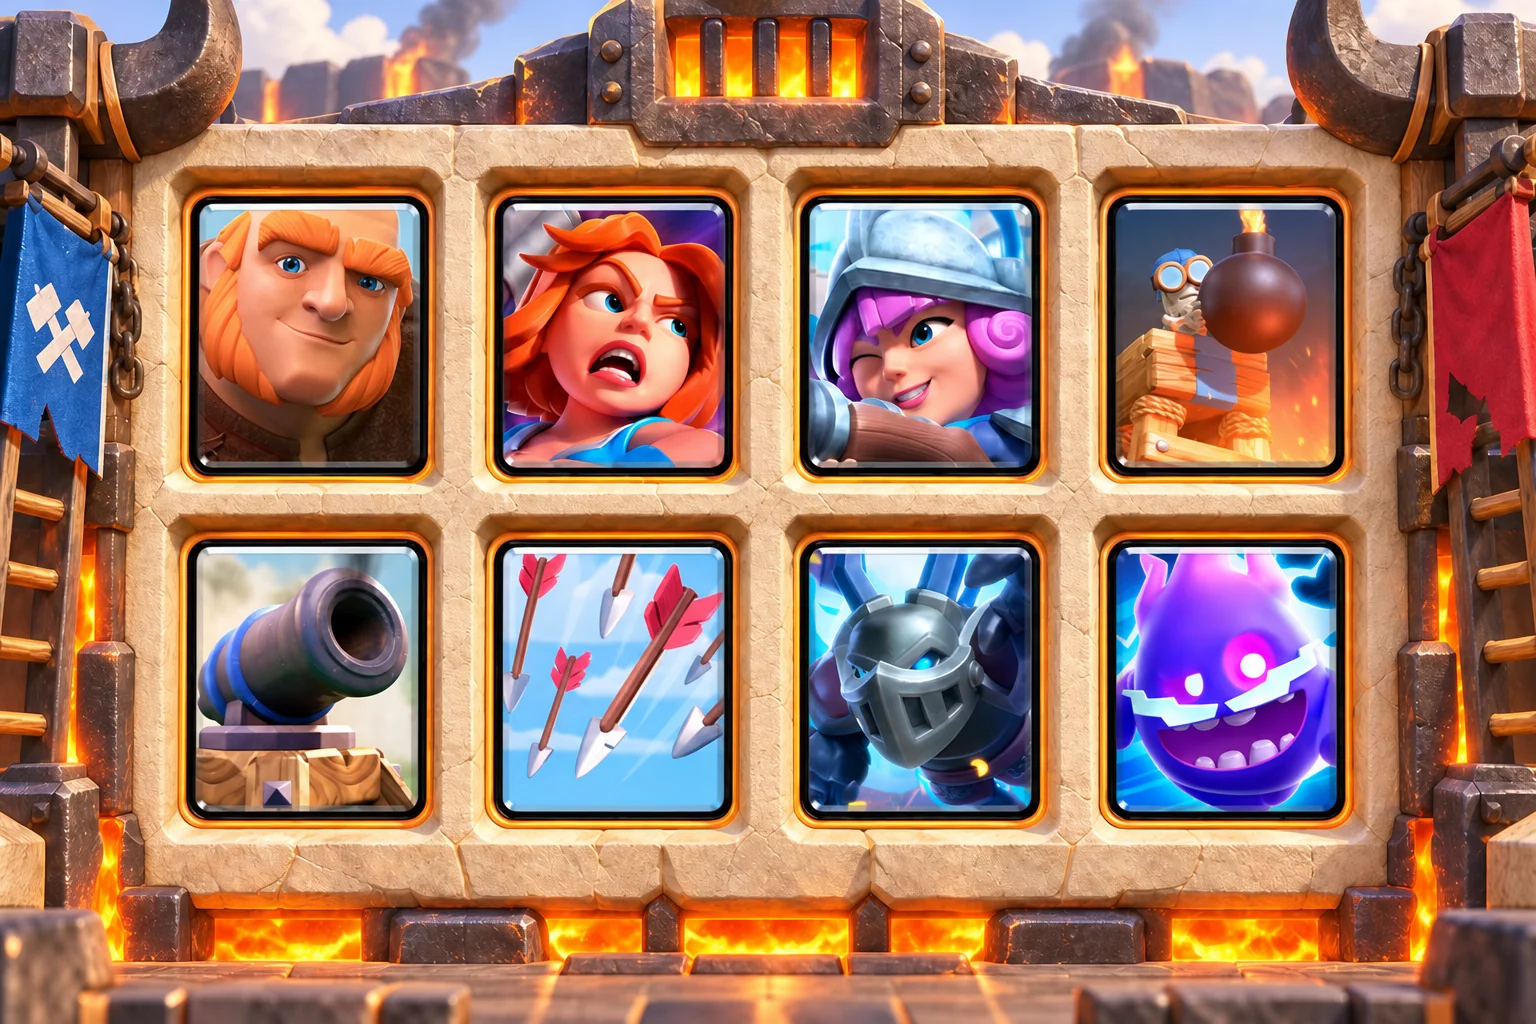
3.4 average elixir | Giant double-building control | Medium difficulty
Choose it if: Ground pushes are your main problem and you want a second building available when the first is out of cycle. Bomb Tower handles clustered ground troops, Cannon handles cheaper single pulls, and Giant carries Valkyrie, Musketeer, or Mega Minion after the defense.
The eight cards
- Giant (5 elixir): building-targeting tank
- Valkyrie (4 elixir): ground splash mini tank
- Musketeer (4 elixir): long-range air defense
- Bomb Tower (4 elixir): ground splash building
- Cannon (3 elixir): low-cost building pull
- Arrows (3 elixir): wide swarm removal
- Mega Minion (3 elixir): durable air damage
- Electro Spirit (1 elixir): cycle and chain stun
Your first minute: Cycle Electro Spirit or wait. Never place both buildings without a target, because their value comes from moving an attack into the middle. Choose Cannon for a simple pull and Bomb Tower when splash matters. Place Giant in front of the surviving troop only after the arena is stable.
When elixir speeds up: Rotate the two buildings rather than stacking them. Musketeer plus Mega Minion should also be separated so one spell cannot erase the air defense.
Defend in this order: Use one center building, Valkyrie on ground support, and the correct air troop behind the tower line. Electro Spirit can interrupt a group before Arrows finishes it.
The mistake to avoid: There is little direct tower damage and no medium spell. If every Giant push is passive, the opponent can defend repeatedly and win the spell exchange.
If a card is missing or underleveled: Goblin Cage can replace either building to create a counterpush. Skeletons can replace Electro Spirit if you need a physical distraction instead of a stun.
Upgrade first: Giant first, then Musketeer, Valkyrie, Arrows, and your preferred building.
Giant Minions Midrange
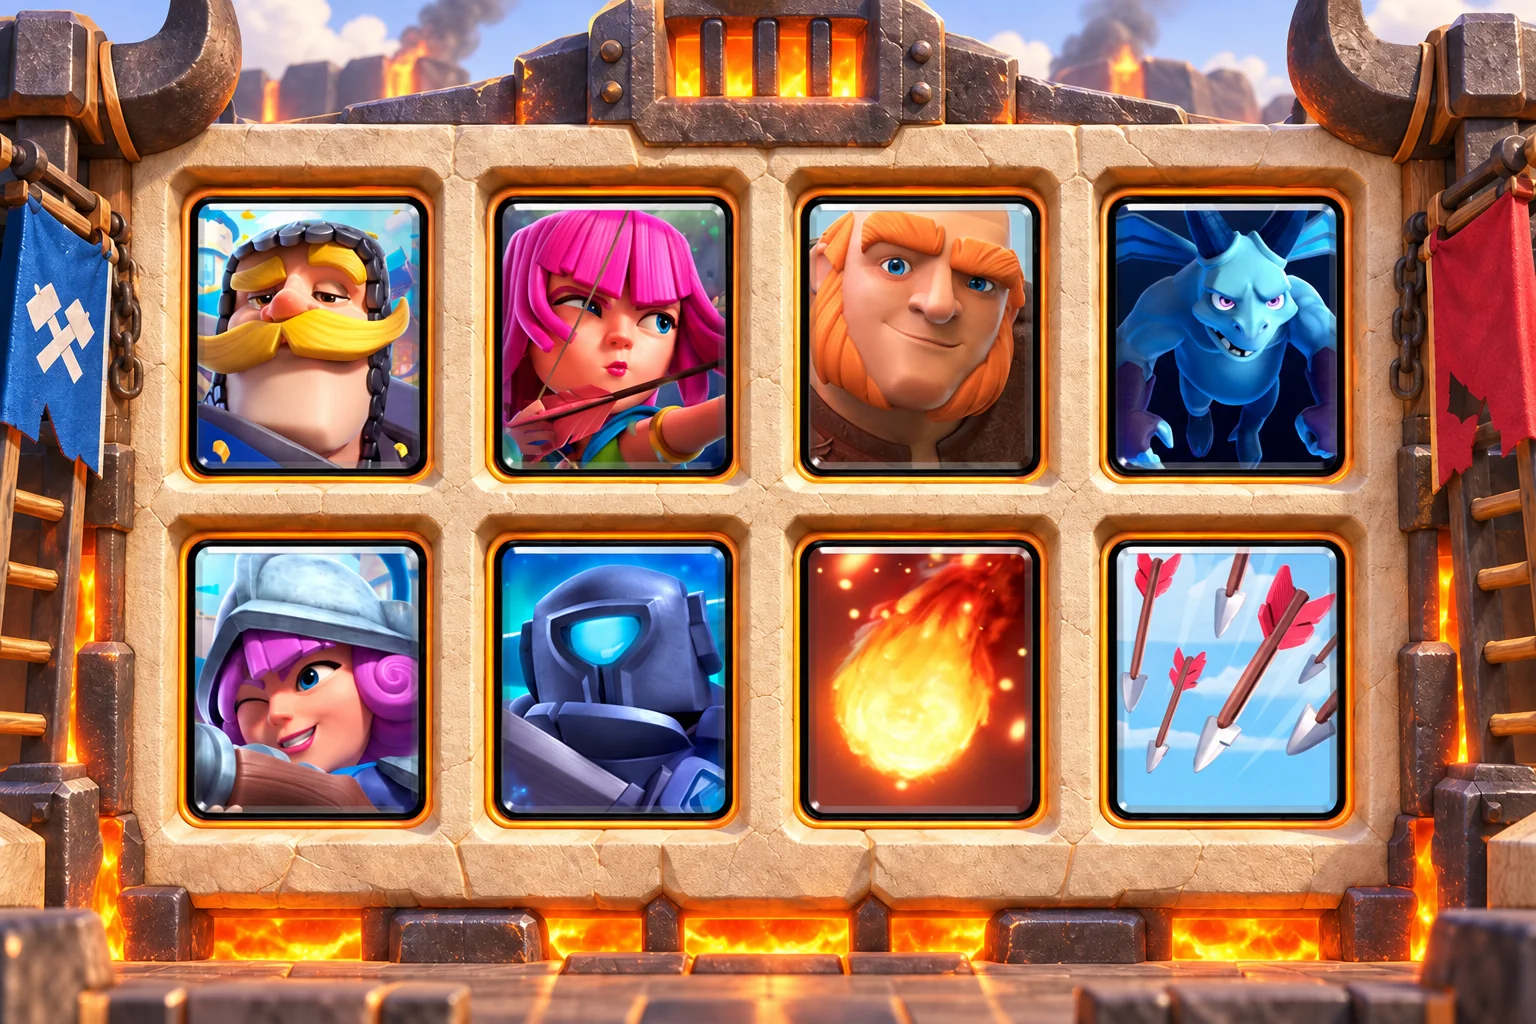
3.6 average elixir | Giant midrange | Easy difficulty
Choose it if: Your troop levels are spread across the early arenas and you want several straightforward defenders with no building dependency. Knight and Mini P.E.K.K.A cover the ground, Archers, Musketeer, and Minions cover the air, and Giant turns whichever group survives into pressure.
The eight cards
- Knight (3 elixir): low-cost mini tank
- Archers (3 elixir): split ranged defense
- Giant (5 elixir): building-targeting tank
- Minions (3 elixir): three-unit air damage
- Musketeer (4 elixir): long-range air defense
- Mini P.E.K.K.A (4 elixir): single-target tank killer
- Fireball (4 elixir): medium spell
- Arrows (3 elixir): wide swarm removal
Your first minute: Split Archers or play Knight in the back at full elixir. Hold Minions until you know whether Arrows or Zap is waiting. Defend with the fewest troops possible, then place Giant ahead of the survivor. Fireball supports the push while Arrows stays reserved for wide swarms.
When elixir speeds up: You can support Giant with one ranged troop and Minions after the opponent’s air spell is used. Keep Mini P.E.K.K.A available for the other lane.
Defend in this order: Mini P.E.K.K.A removes large ground units, Knight absorbs support fire, and the three ranged groups should be spaced across the arena rather than stacked.
The mistake to avoid: The deck has no building, and Arrows can hit both Archers and Minions. Central placement and staggered deployment are essential against quick pressure.
If a card is missing or underleveled: Mega Minion can replace Minions for better spell resistance. Valkyrie can replace Knight when ground splash is more valuable than the lower cost.
Upgrade first: Giant first, then Musketeer, Mini P.E.K.K.A, Fireball, and Archers.
Giant Cage Counterpush
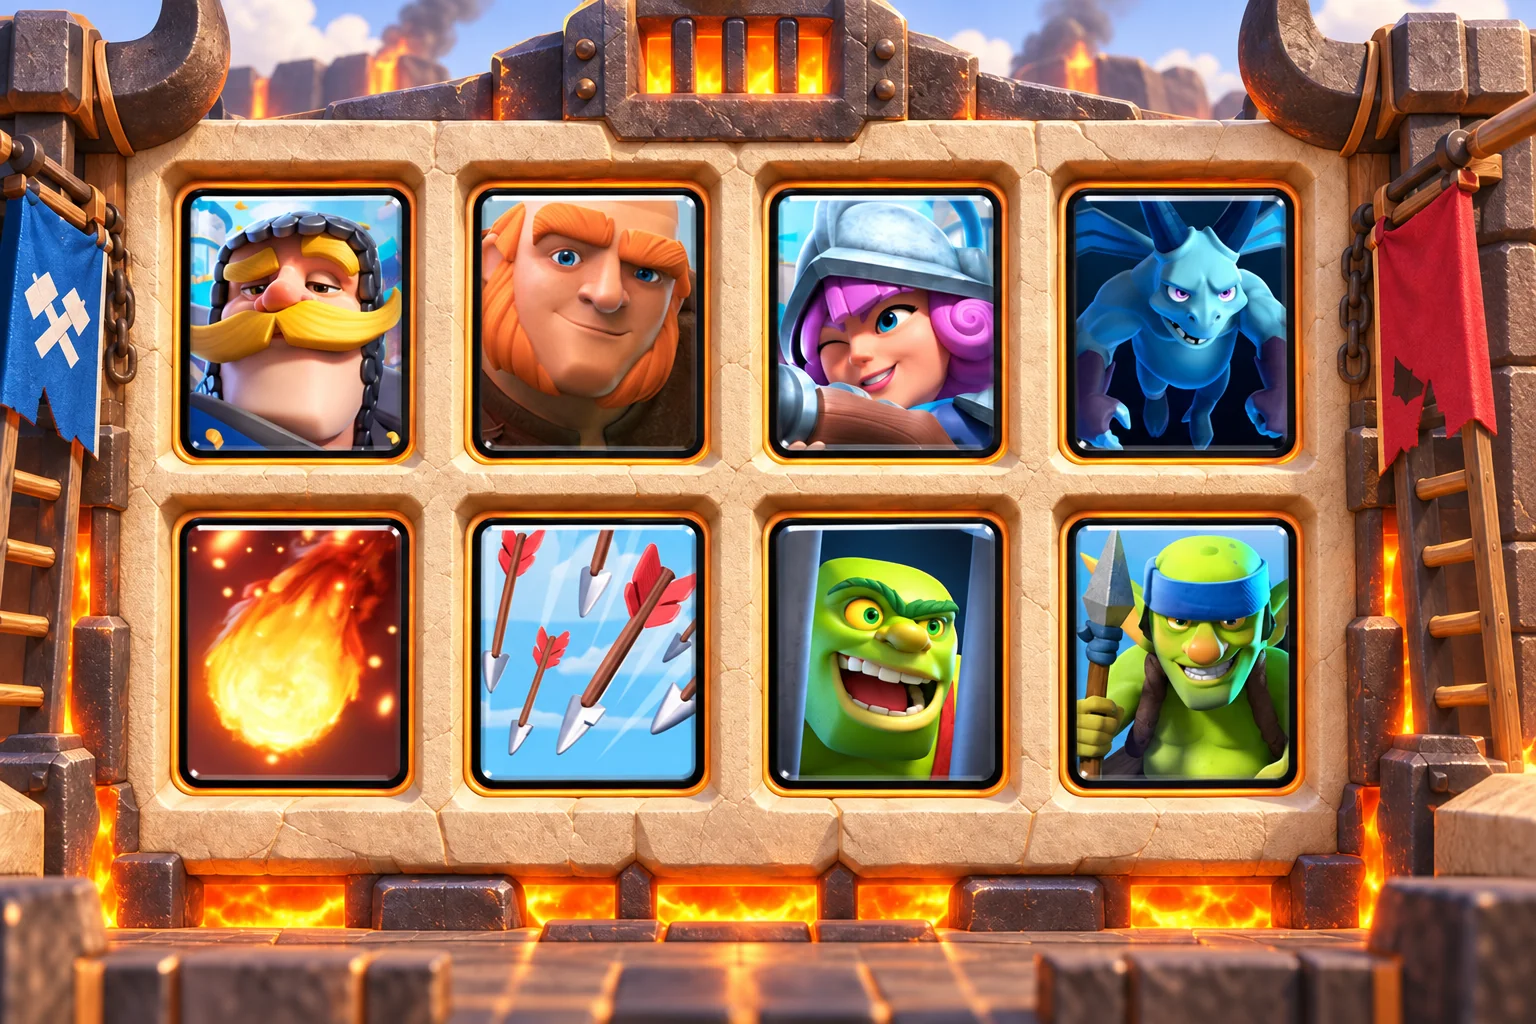
3.5 average elixir | Giant Cage counterpush | Easy difficulty
Choose it if: You want a building that becomes a troop and naturally starts the next Giant push. Goblin Cage pulls the attacker, then the Brawler walks forward. Giant can tank for that Brawler while Musketeer, Minions, and Spear Goblins cover range.
The eight cards
- Knight (3 elixir): low-cost mini tank
- Giant (5 elixir): building-targeting tank
- Musketeer (4 elixir): long-range air defense
- Minions (3 elixir): three-unit air damage
- Fireball (4 elixir): medium spell
- Arrows (3 elixir): wide swarm removal
- Goblin Cage (4 elixir): building pull and counterpush
- Spear Goblins (2 elixir): cheap ranged cycle
Your first minute: Split Spear Goblins or play Knight in the back. Save Goblin Cage until the opponent reveals a troop that can be pulled. Defend with Cage and one support card. If the Brawler survives, place Giant in front and decide whether Fireball or Arrows is needed before adding more troops.
When elixir speeds up: Repeat the same compact counterpush more often. A second support troop is safe only when the opponent has spent its main spell or committed in the other lane.
Defend in this order: Cage controls the path, Knight absorbs support, Musketeer handles air, and Minions add damage when the small spell is unavailable. Spear Goblins clean up at low cost.
The mistake to avoid: Inferno-style defenders can stall Giant because the deck has no stun. Use Fireball for value and avoid feeding the same counter with an oversized push.
If a card is missing or underleveled: Tombstone can replace Goblin Cage for a cheaper distraction plan. Goblins can replace Spear Goblins if ground damage matters more than range.
Upgrade first: Giant first, then Goblin Cage, Musketeer, Fireball, and Knight.
Giant Bomber Swarm Control
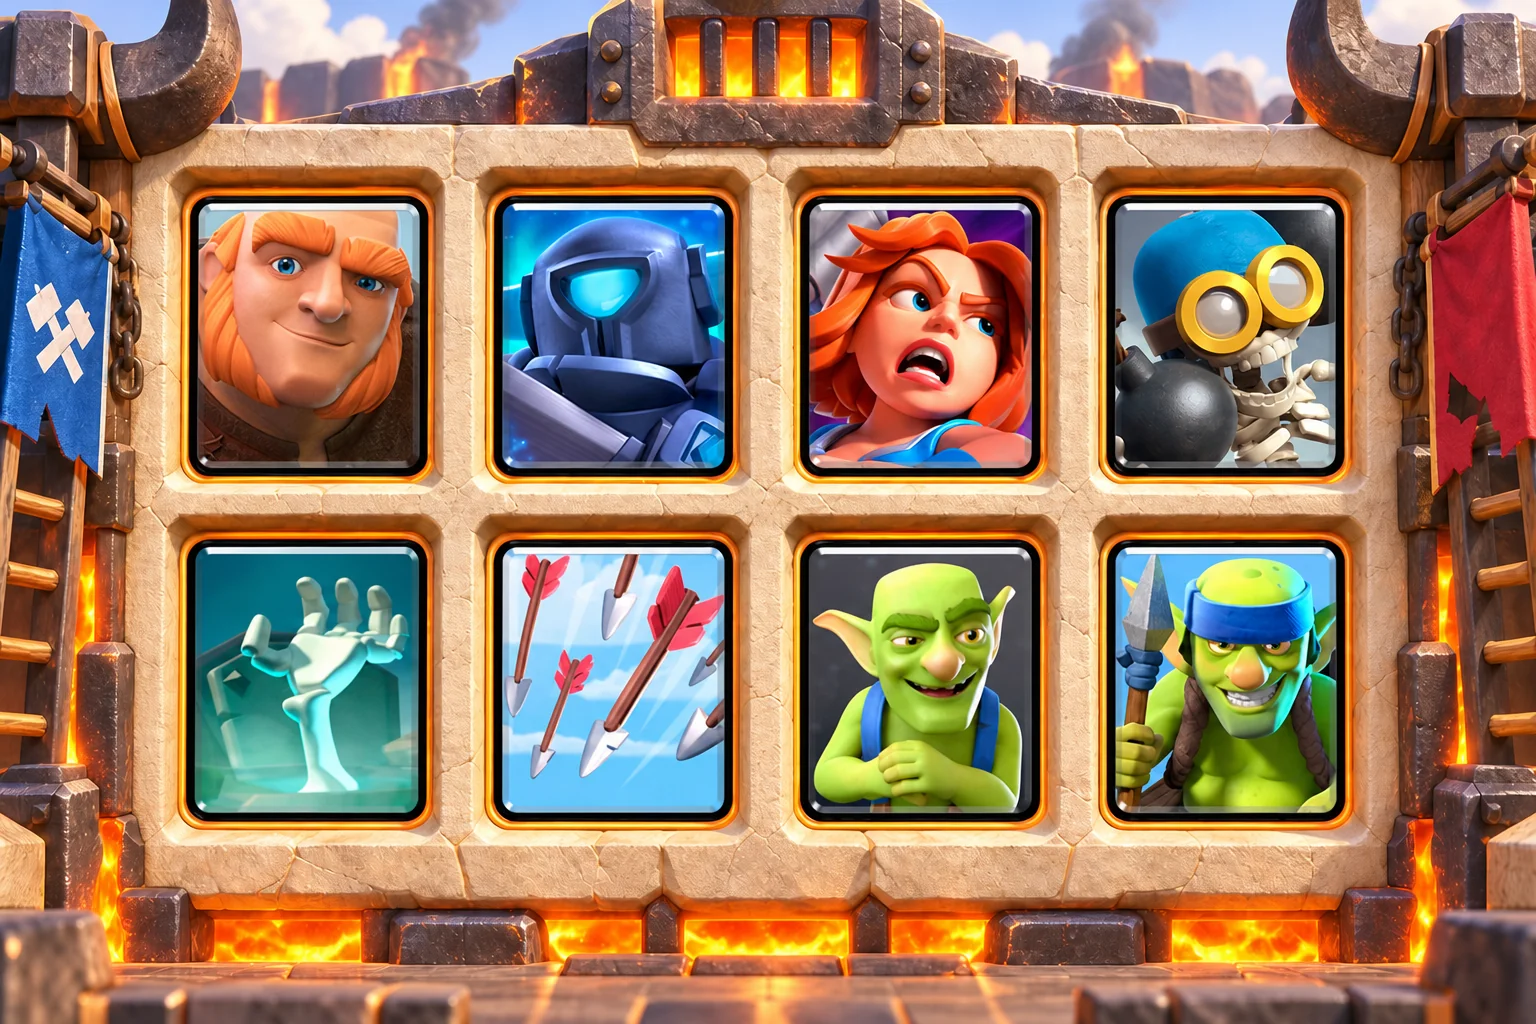
3.1 average elixir | Giant swarm control | Easy difficulty
Choose it if: Ground swarms dominate your matches and you want several cheap defenders around Giant. Tombstone and Mini P.E.K.K.A stop the main target, Valkyrie and Bomber clear ground support, and the two Goblin cards keep the rotation affordable.
The eight cards
- Giant (5 elixir): building-targeting tank
- Mini P.E.K.K.A (4 elixir): single-target tank killer
- Valkyrie (4 elixir): ground splash mini tank
- Bomber (2 elixir): cheap ground splash
- Tombstone (3 elixir): defensive pull and distraction
- Arrows (3 elixir): wide swarm removal
- Goblins (2 elixir): cheap ground damage
- Spear Goblins (2 elixir): cheap ranged cycle
Your first minute: Split Spear Goblins or cycle Bomber in the back. Keep Tombstone for a pull and avoid exposing both Goblin groups to one spell. Defend first, then place Giant in front of Valkyrie, Bomber, or Mini P.E.K.K.A. Arrows protects the counterpush from a wide swarm.
When elixir speeds up: Use the cheap cycle to rebuild the same push, but hold enough elixir for air. This deck cannot afford to waste Spear Goblins when a flying threat is still hidden.
Defend in this order: Tombstone pulls, Mini P.E.K.K.A handles high health, Valkyrie circles through groups, and Bomber stays safely behind. Goblins surround isolated attackers after the spell is used.
The mistake to avoid: Air defense is the clear weakness. Spear Goblins and Arrows can manage light air cards, but a larger air push requires careful tower support.
If a card is missing or underleveled: Archers can replace Goblins to improve air coverage. Musketeer can replace Bomber for stronger range, although the average cost rises sharply.
Upgrade first: Giant first, then Mini P.E.K.K.A, Valkyrie, Arrows, and Tombstone.
Giant Hog Dual Win Condition
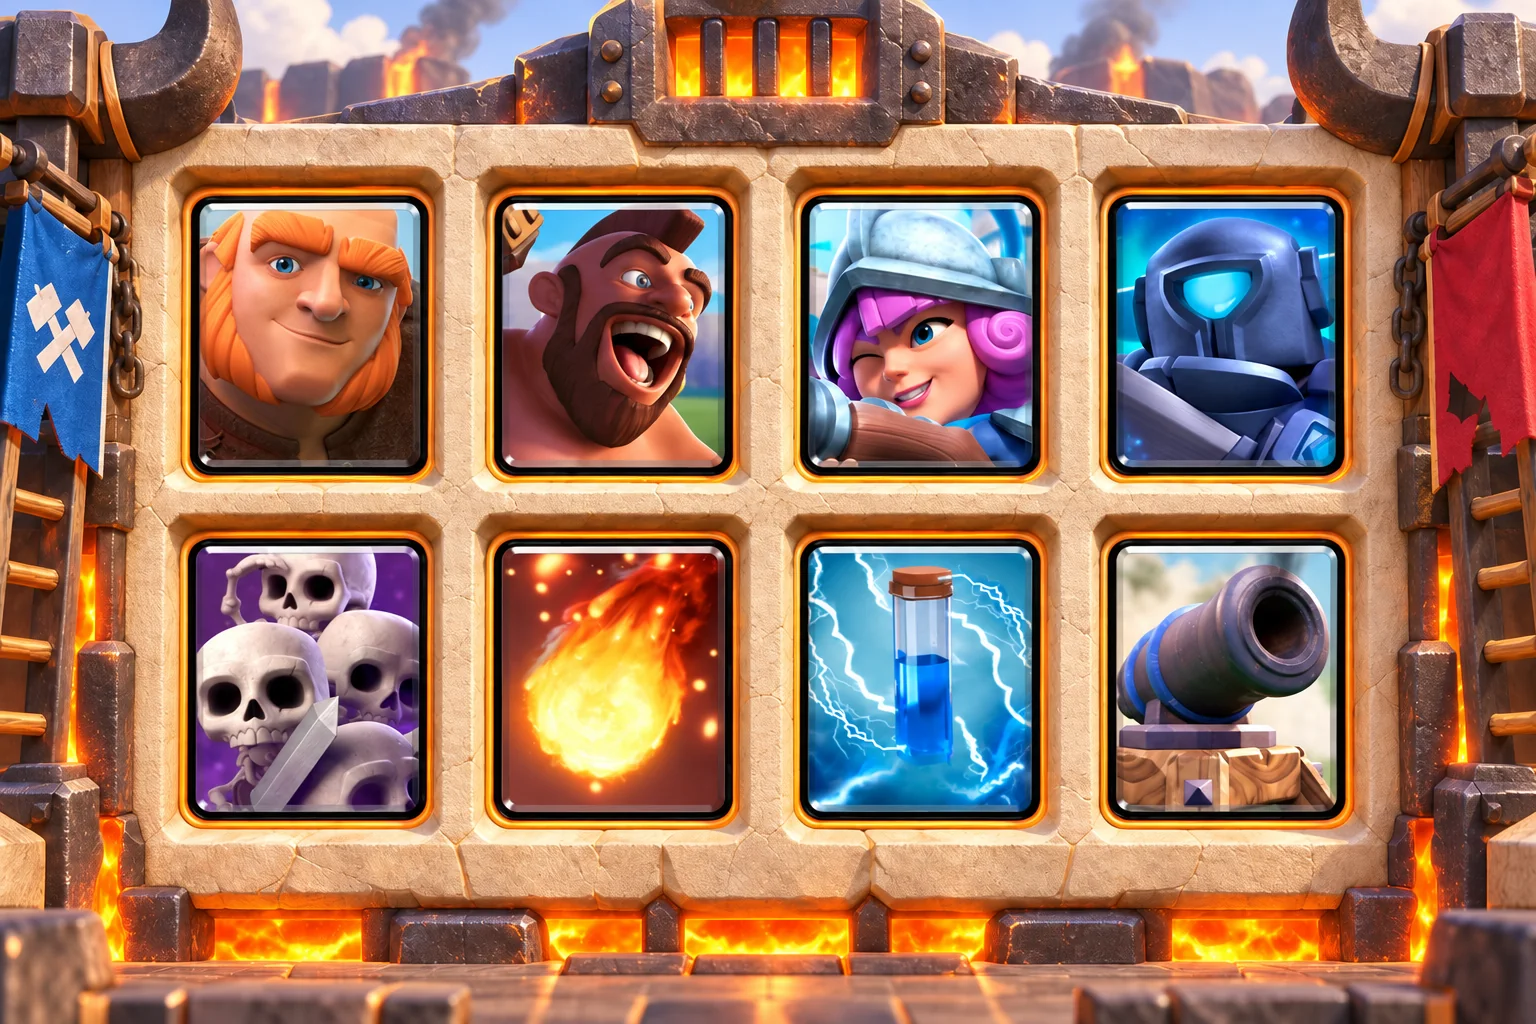
3.6 average elixir | Giant and Hog dual win condition | Medium difficulty
Choose it if: You want to change lanes when the opponent spends its best counter on Giant or Hog Rider. Cannon, Mini P.E.K.K.A, and Musketeer form the defensive core. Giant supports surviving troops, while Hog Rider punishes a slow or expensive response.
The eight cards
- Giant (5 elixir): building-targeting tank
- Hog Rider (4 elixir): fast tower pressure
- Musketeer (4 elixir): long-range air defense
- Mini P.E.K.K.A (4 elixir): single-target tank killer
- Skeleton Army (3 elixir): high-damage swarm defense
- Fireball (4 elixir): medium spell
- Zap (2 elixir): cheap stun and swarm reset
- Cannon (3 elixir): low-cost building pull
Your first minute: Wait or send a lone Hog Rider at full elixir. Keep Skeleton Army hidden until the small spell is known. Choose one win condition per attack. Giant belongs in front of surviving defenders; Hog belongs in the open lane after the opponent commits elsewhere.
When elixir speeds up: Track which answer stops each threat. If the same building handles both, use the cheaper Hog rotation to make it appear before that building returns.
Defend in this order: Cannon pulls, Mini P.E.K.K.A cuts down tanks, Musketeer covers air, and Skeleton Army punishes units after their spell support is gone.
The mistake to avoid: Combining Giant and Hog Rider without a large advantage spends nine elixir before support. Swarms can also be awkward when Fireball and Zap are mistimed.
If a card is missing or underleveled: Guards can replace Skeleton Army for steadier defense. Valkyrie can take that slot when splash is a bigger need than swarm damage.
Upgrade first: Choose Giant or Hog Rider as the first upgrade, then Musketeer, Fireball, Mini P.E.K.K.A, and Cannon.
Giant Goblin Swarm
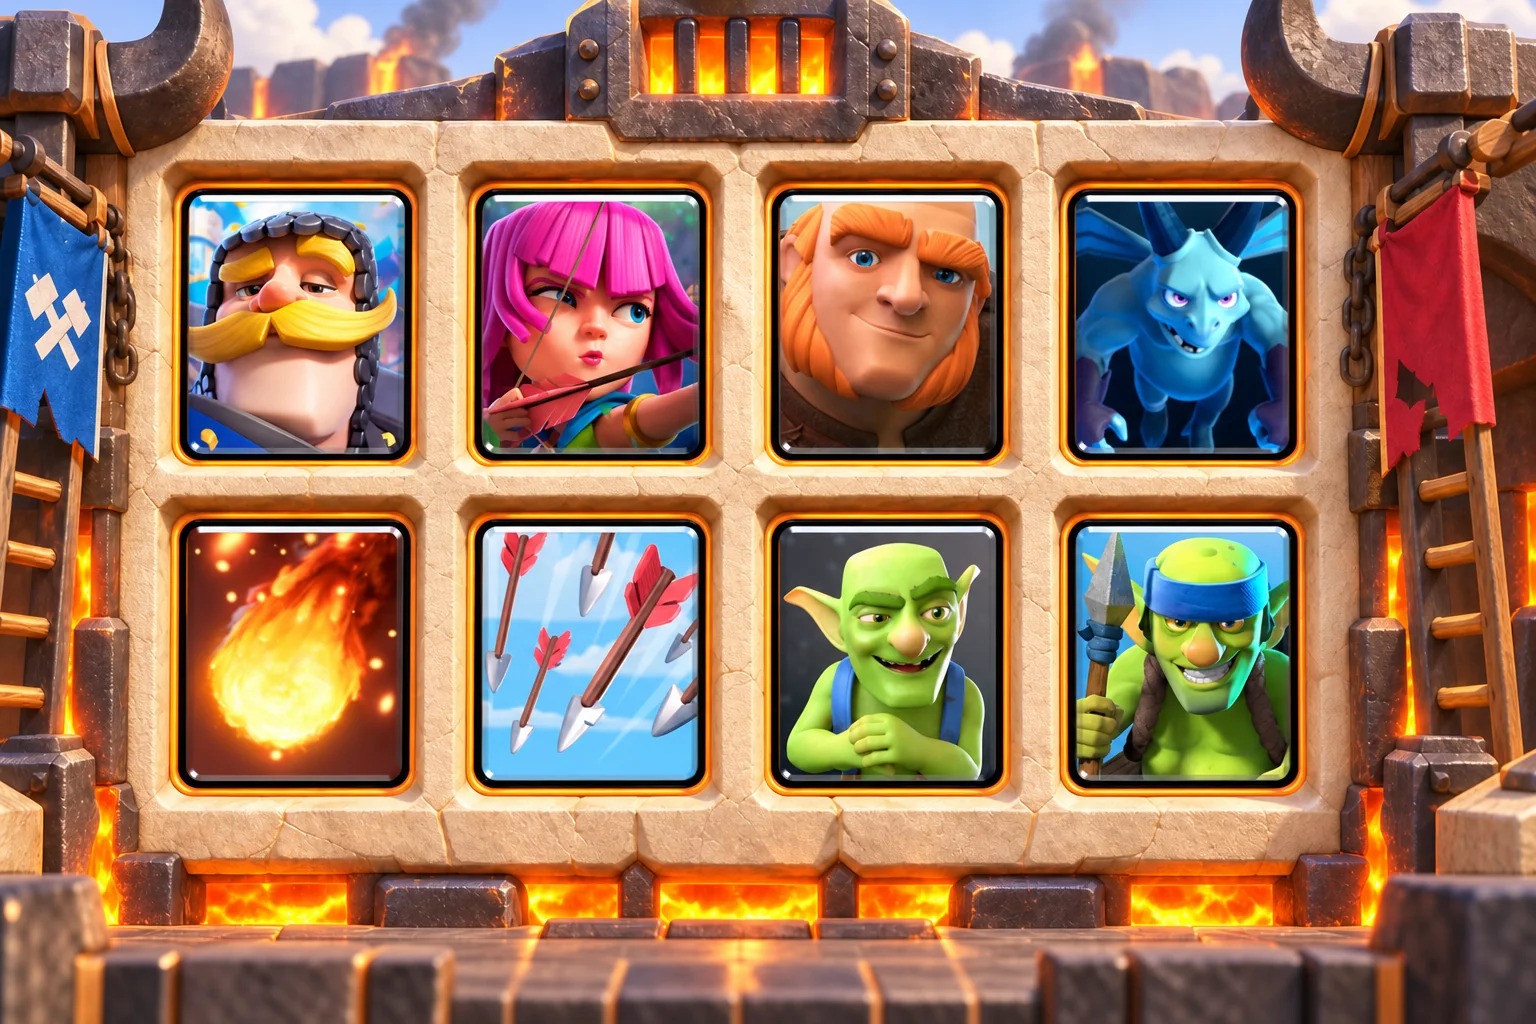
3.1 average elixir | Low-cost Giant swarm | Easy difficulty
Choose it if: You have strong common cards and want a 3.1-elixir Giant deck that cycles without complex mechanics. Knight, Archers, Minions, Goblins, and Spear Goblins create many small defenses. Giant gives the survivors a shield on the counterpush.
The eight cards
- Knight (3 elixir): low-cost mini tank
- Archers (3 elixir): split ranged defense
- Giant (5 elixir): building-targeting tank
- Minions (3 elixir): three-unit air damage
- Fireball (4 elixir): medium spell
- Arrows (3 elixir): wide swarm removal
- Goblins (2 elixir): cheap ground damage
- Spear Goblins (2 elixir): cheap ranged cycle
Your first minute: Split Archers or Spear Goblins. Keep Minions and Goblins apart until the opponent’s splash and spell choices are visible. Trade cheaply on defense, then add Giant in front of any two healthy survivors. Fireball removes medium defenders while Arrows handles the wide swarm.
When elixir speeds up: The low average lets you repeat Giant pushes quickly. Use that speed to force the opponent’s spell, then protect the next group by spacing it differently.
Defend in this order: Knight tanks, Archers split lanes, Minions cover air, and Goblins provide fast ground damage. Tower assistance matters because there is no building or dedicated tank killer.
The mistake to avoid: Splash troops and Arrows can erase several defenders at once. Large tanks are also harder to stop, so pull support away and use both towers when possible.
If a card is missing or underleveled: Mini P.E.K.K.A can replace Spear Goblins when tanks are the problem. Mega Minion can replace Minions for a more spell-resistant air unit.
Upgrade first: Giant first, then Fireball, Archers, Knight, and Minions.
Giant Double-Building Spawner
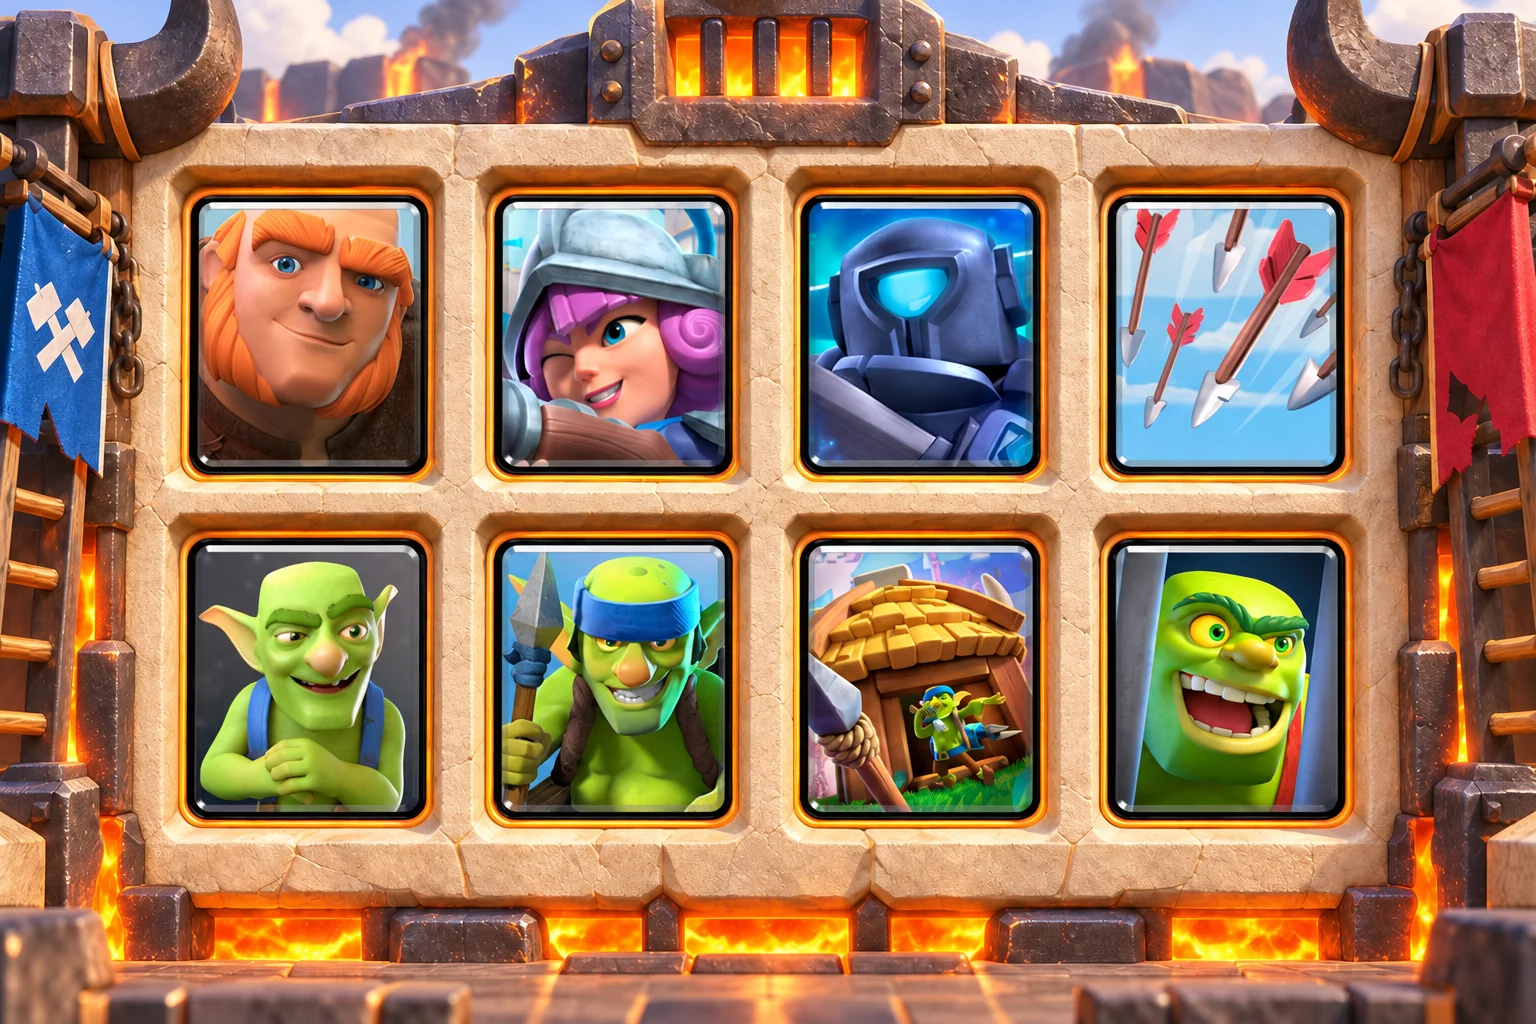
3.6 average elixir | Giant spawner control | Medium difficulty
Choose it if: You like slow lane pressure from Goblin Hut but still want Goblin Cage for the immediate defensive pull. Goblin Hut establishes a lane, Goblin Cage handles the urgent threat, and Giant tanks for the Brawler, Musketeer, or Mini P.E.K.K.A that survives.
The eight cards
- Giant (5 elixir): building-targeting tank
- Musketeer (4 elixir): long-range air defense
- Mini P.E.K.K.A (4 elixir): single-target tank killer
- Arrows (3 elixir): wide swarm removal
- Goblins (2 elixir): cheap ground damage
- Spear Goblins (2 elixir): cheap ranged cycle
- Goblin Hut (5 elixir): lane control and steady troops
- Goblin Cage (4 elixir): building pull and counterpush
Your first minute: Goblin Hut is acceptable at ten elixir when the opponent cannot immediately punish the other lane. Otherwise split Spear Goblins and wait. Use Cage for the current attack and Hut for long-term lane control. Giant should follow surviving troops, not be played merely because both buildings are on the board.
When elixir speeds up: The spawner pressure accumulates faster. Support one Giant lane while keeping Cage available for a sudden counterattack.
Defend in this order: Cage pulls first, Mini P.E.K.K.A adds concentrated damage, and Musketeer handles air. Hut Spear Goblins help over time but should not replace an immediate answer.
The mistake to avoid: Arrows is the only spell and the deck has several low-impact cycle troops. Ranged support behind a tank can survive unless Musketeer and Mini P.E.K.K.A are placed carefully.
If a card is missing or underleveled: Tombstone can replace Goblin Hut for a lighter defensive version. Valkyrie can replace Goblins when ground splash is missing.
Upgrade first: Giant first, then Goblin Cage, Musketeer, Mini P.E.K.K.A, and Arrows.
Giant Archers Fundamentals
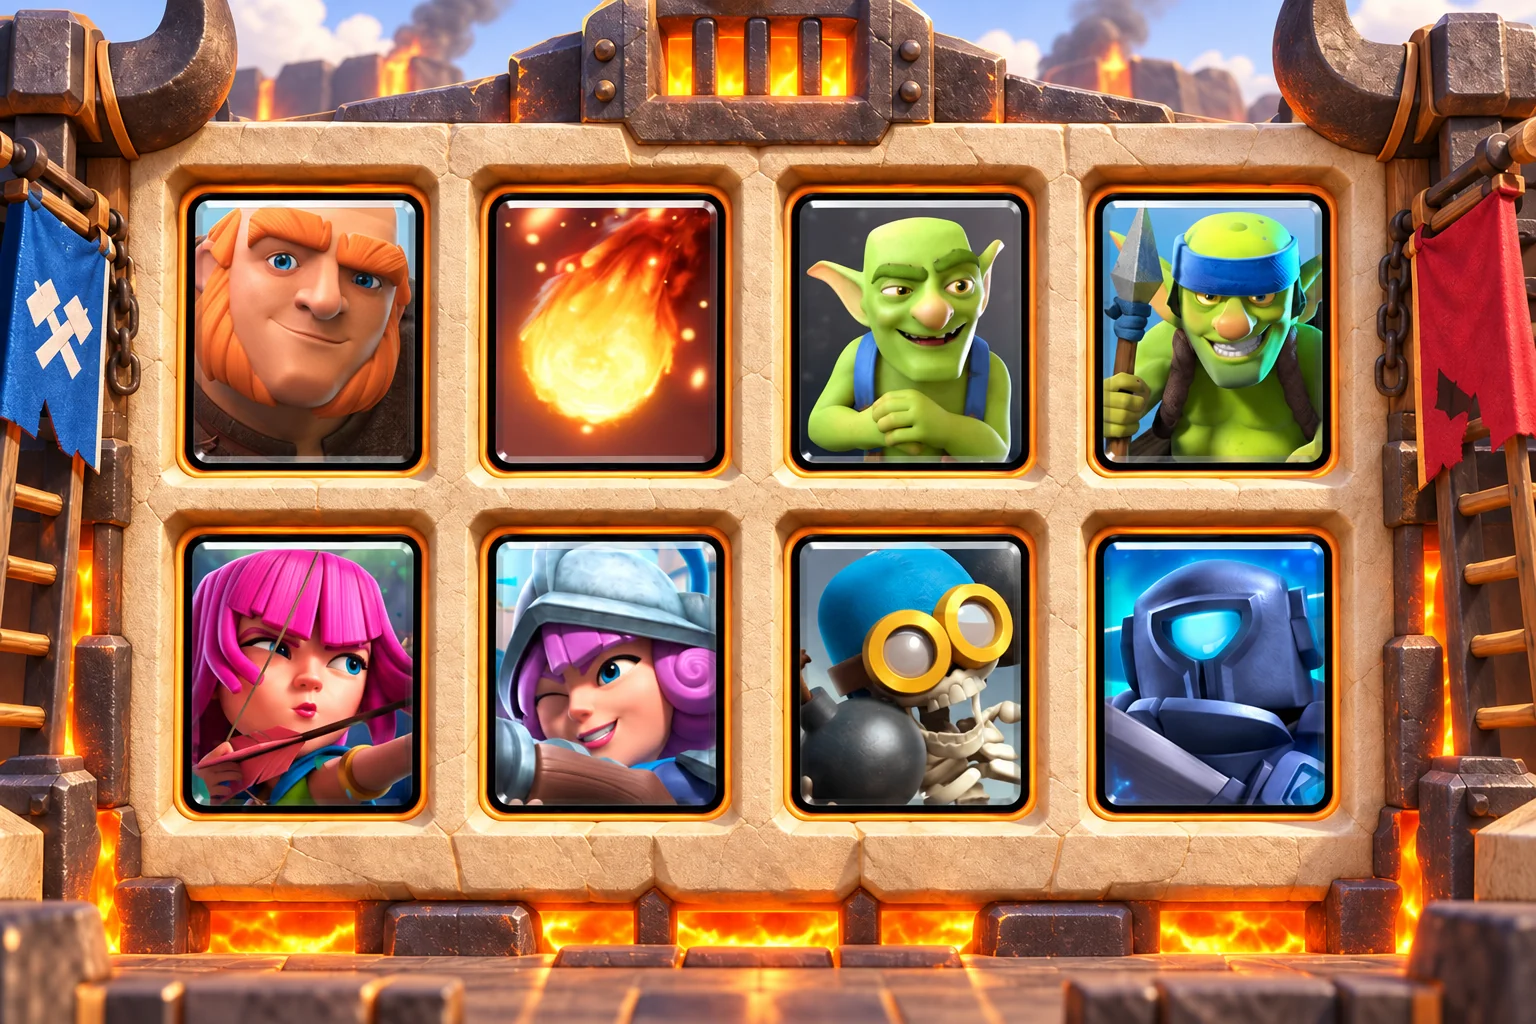
3.3 average elixir | Giant basics | Easy difficulty
Choose it if: You want a deck built entirely around familiar early cards and do not mind playing without a building. Mini P.E.K.K.A supplies single-target damage, Bomber clears the ground, Archers and Musketeer cover range, and Giant turns a simple defense into offense.
The eight cards
- Giant (5 elixir): building-targeting tank
- Fireball (4 elixir): medium spell
- Goblins (2 elixir): cheap ground damage
- Spear Goblins (2 elixir): cheap ranged cycle
- Archers (3 elixir): split ranged defense
- Musketeer (4 elixir): long-range air defense
- Bomber (2 elixir): cheap ground splash
- Mini P.E.K.K.A (4 elixir): single-target tank killer
Your first minute: Split Goblins, Spear Goblins, or Archers. Wait before committing Musketeer so the opponent cannot force her away from an air defense. Defend with Mini P.E.K.K.A, Bomber, and one ranged group, then place Giant in front. Fireball should clear a defender or rescue the tower from a crowded push.
When elixir speeds up: Add one support troop behind Giant and keep the other lane covered. The cheap Goblin cards help you recover if the first push is stopped.
Defend in this order: Mini P.E.K.K.A handles tanks, Bomber handles ground groups, Musketeer focuses air, and Archers split their coverage. Use the center to let both towers help.
The mistake to avoid: Fireball is the only spell, so small swarms can demand troop answers. There is also no building, making clean placement more important against direct tower threats.
If a card is missing or underleveled: Arrows can replace Spear Goblins to add wide spell coverage. Skeletons can replace Goblins when a one-elixir distraction improves the cycle.
Upgrade first: Giant first, then Musketeer, Mini P.E.K.K.A, Fireball, and Bomber.
Giant Baby Dragon Control
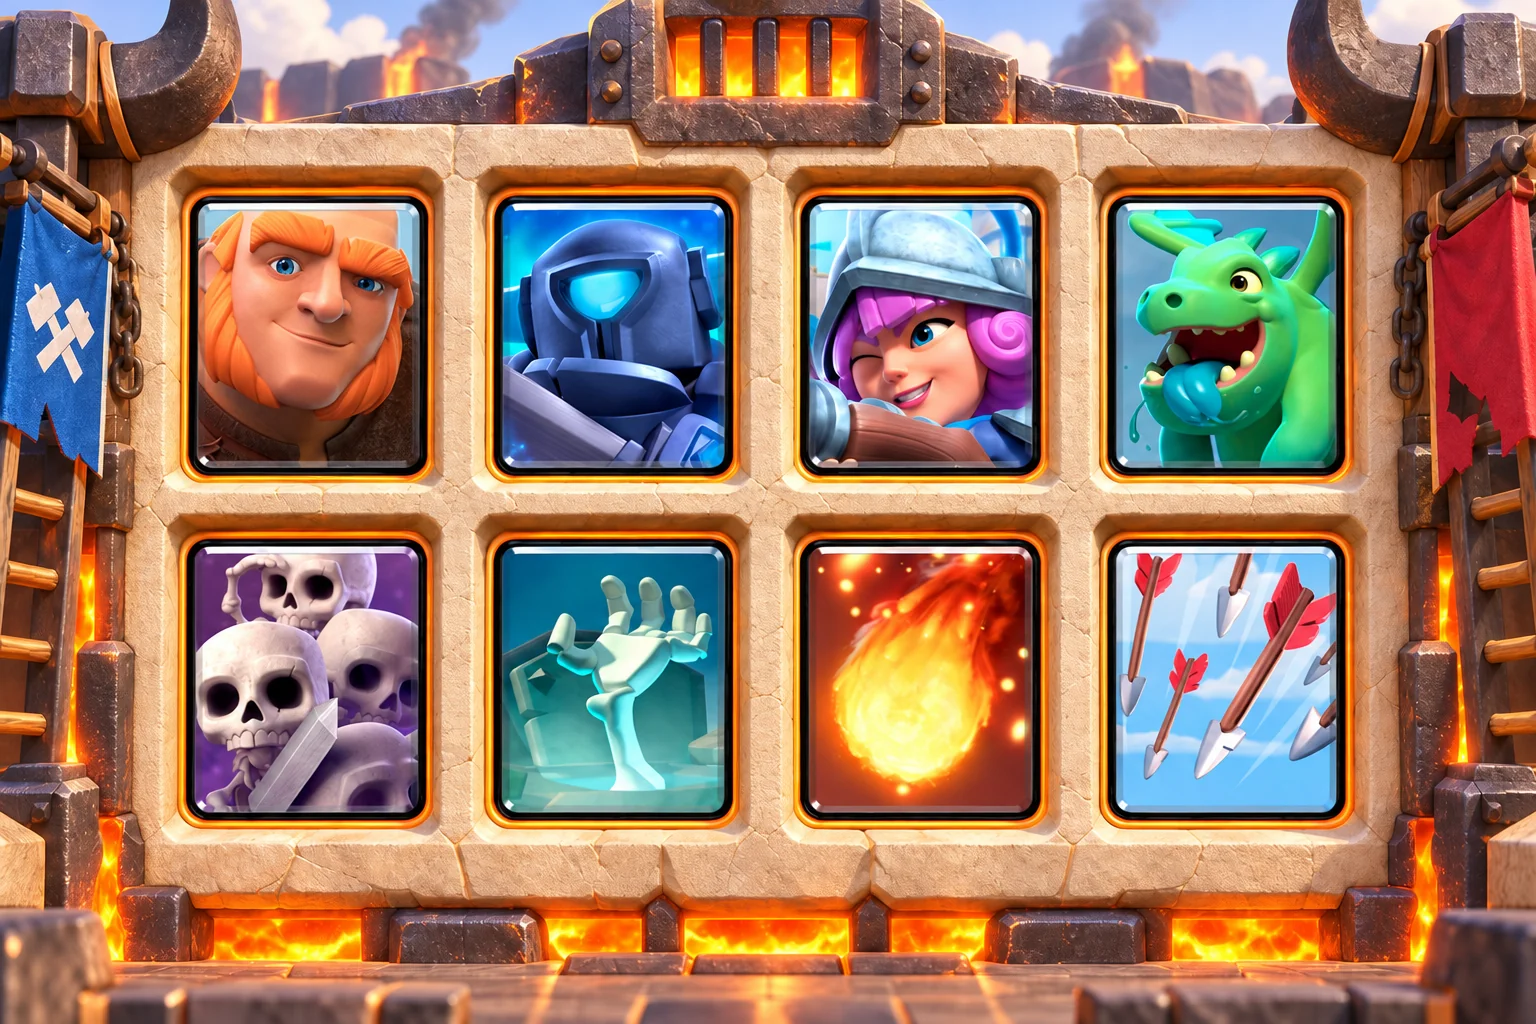
3.8 average elixir | Giant air-support control | Easy difficulty
Choose it if: You want Baby Dragon’s splash and Tombstone’s pull in a sturdy Giant deck. Tombstone moves tanks, Mini P.E.K.K.A removes them, Baby Dragon clears clustered support, and Musketeer supplies long-range air damage for the counterpush.
The eight cards
- Giant (5 elixir): building-targeting tank
- Mini P.E.K.K.A (4 elixir): single-target tank killer
- Musketeer (4 elixir): long-range air defense
- Baby Dragon (4 elixir): flying splash support
- Skeleton Army (3 elixir): high-damage swarm defense
- Tombstone (3 elixir): defensive pull and distraction
- Fireball (4 elixir): medium spell
- Arrows (3 elixir): wide swarm removal
Your first minute: Wait or place Tombstone only when it will pull something. A Baby Dragon in the back is safer at ten elixir than an unsupported Giant at the river. Defend, then put Giant ahead of Baby Dragon or Musketeer. Choose Fireball for medium troops and Arrows for the swarm rather than spending both spells on one defense.
When elixir speeds up: Build a stronger Giant counterpush after a clean defense, but keep Mini P.E.K.K.A ready for the opposite lane. Space the two ranged air defenders.
Defend in this order: Tombstone pulls, Mini P.E.K.K.A focuses the tank, Baby Dragon clears groups, and Musketeer stays at range. Skeleton Army is safest after the small spell appears.
The mistake to avoid: At 3.8 elixir, a Giant plus two supports can empty the bar. Grouping Baby Dragon, Musketeer, and Skeleton Army also gives spells too much value.
If a card is missing or underleveled: Wizard can replace Baby Dragon for more immediate ranged splash. Guards can replace Skeleton Army for a shielded, less explosive defense.
Upgrade first: Giant first, then Baby Dragon, Musketeer, Fireball, and Mini P.E.K.K.A.
Giant Wizard Minions Beatdown
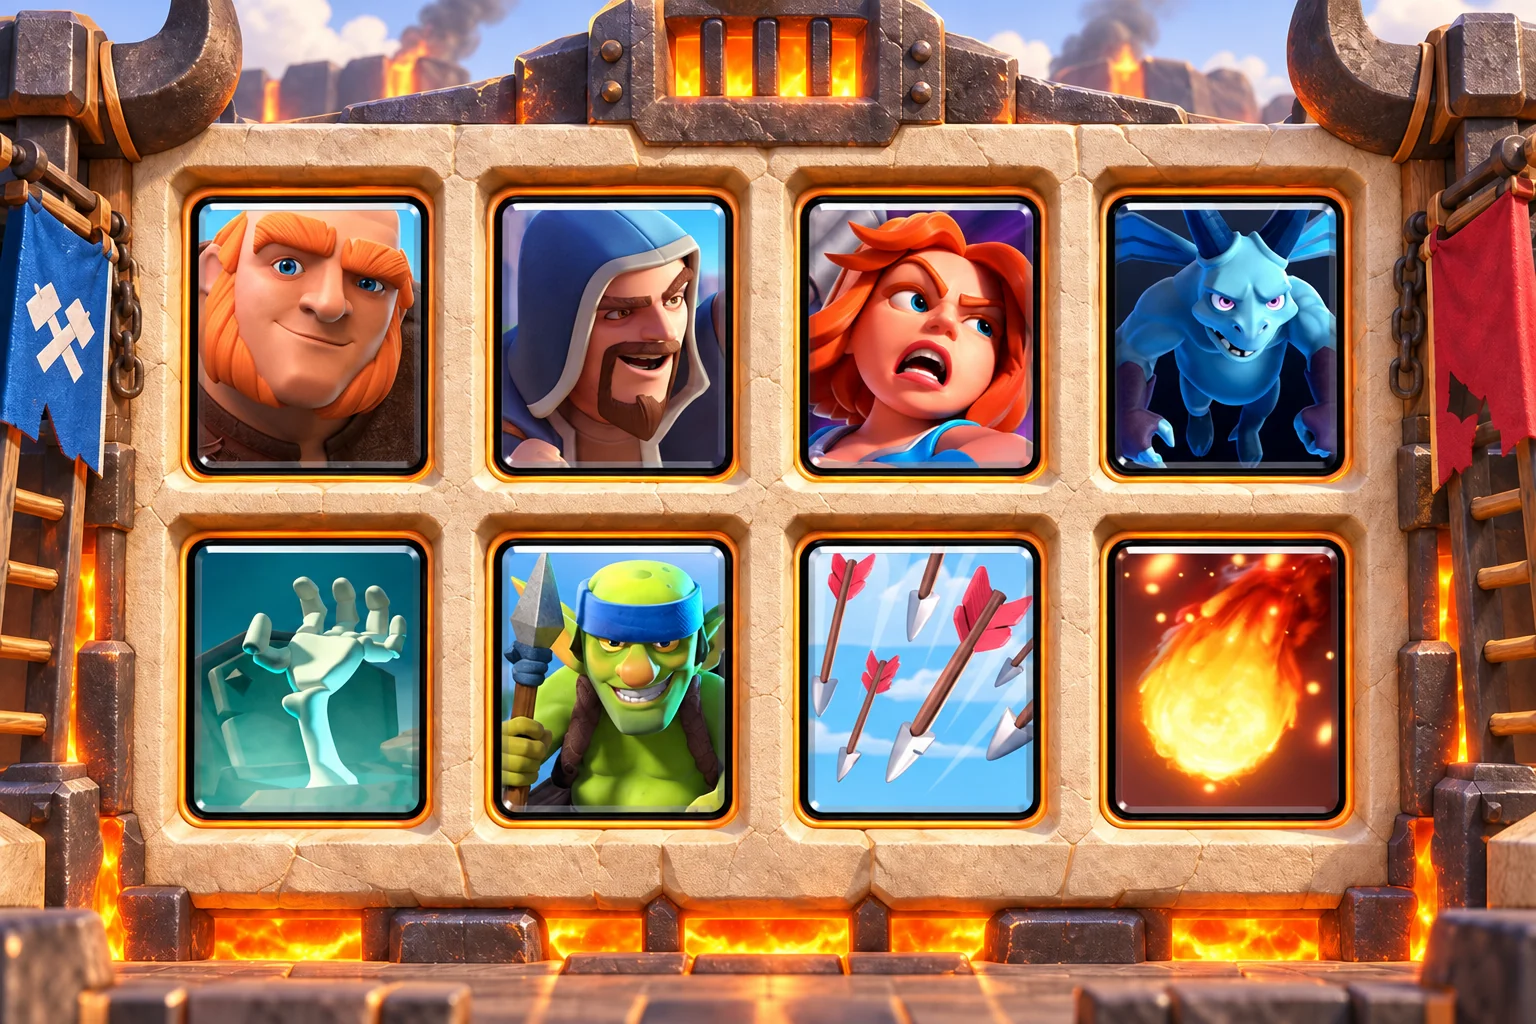
3.6 average elixir | Giant splash beatdown | Easy difficulty
Choose it if: You want Wizard and Valkyrie to clear swarms while Tombstone keeps the defense organized. Tombstone pulls the attack, Valkyrie and Wizard remove its support, and Giant tanks for whichever defender survives. Minions and Spear Goblins cover the air cheaply.
The eight cards
- Giant (5 elixir): building-targeting tank
- Wizard (5 elixir): ranged splash support
- Valkyrie (4 elixir): ground splash mini tank
- Minions (3 elixir): three-unit air damage
- Tombstone (3 elixir): defensive pull and distraction
- Spear Goblins (2 elixir): cheap ranged cycle
- Arrows (3 elixir): wide swarm removal
- Fireball (4 elixir): medium spell
Your first minute: Split Spear Goblins or wait. Tombstone belongs in response to a threat, and Wizard is safest in the back only at full elixir. Defend, then place Giant in front of Valkyrie or Wizard. Hold Arrows for a wide swarm and Fireball for a medium defender that blocks the push.
When elixir speeds up: One Wizard behind Giant is enough when Valkyrie already survived. Keep Tombstone or Minions available for the other lane instead of making the push unnecessarily expensive.
Defend in this order: Tombstone pulls, Valkyrie controls ground groups, Wizard supplies ranged splash, and Minions add concentrated air damage. Spear Goblins finish small targets at low cost.
The mistake to avoid: Wizard and Minions can both be caught by a spell if placed together. The deck also lacks a stun, so Inferno-style defenders may require pressure rather than brute force.
If a card is missing or underleveled: Mega Minion can replace Minions for better spell resistance. Musketeer can replace Spear Goblins when stronger single-target air defense is worth two extra elixir.
Upgrade first: Giant first, then Wizard, Fireball, Valkyrie, and Tombstone.
P.E.K.K.A and Battle Ram decks for the counterpush
These decks ask you to defend before attacking. P.E.K.K.A should meet an expensive ground unit, while Battle Ram is used to turn that defense into pressure or punish the open lane.
P.E.K.K.A Witch Air Support
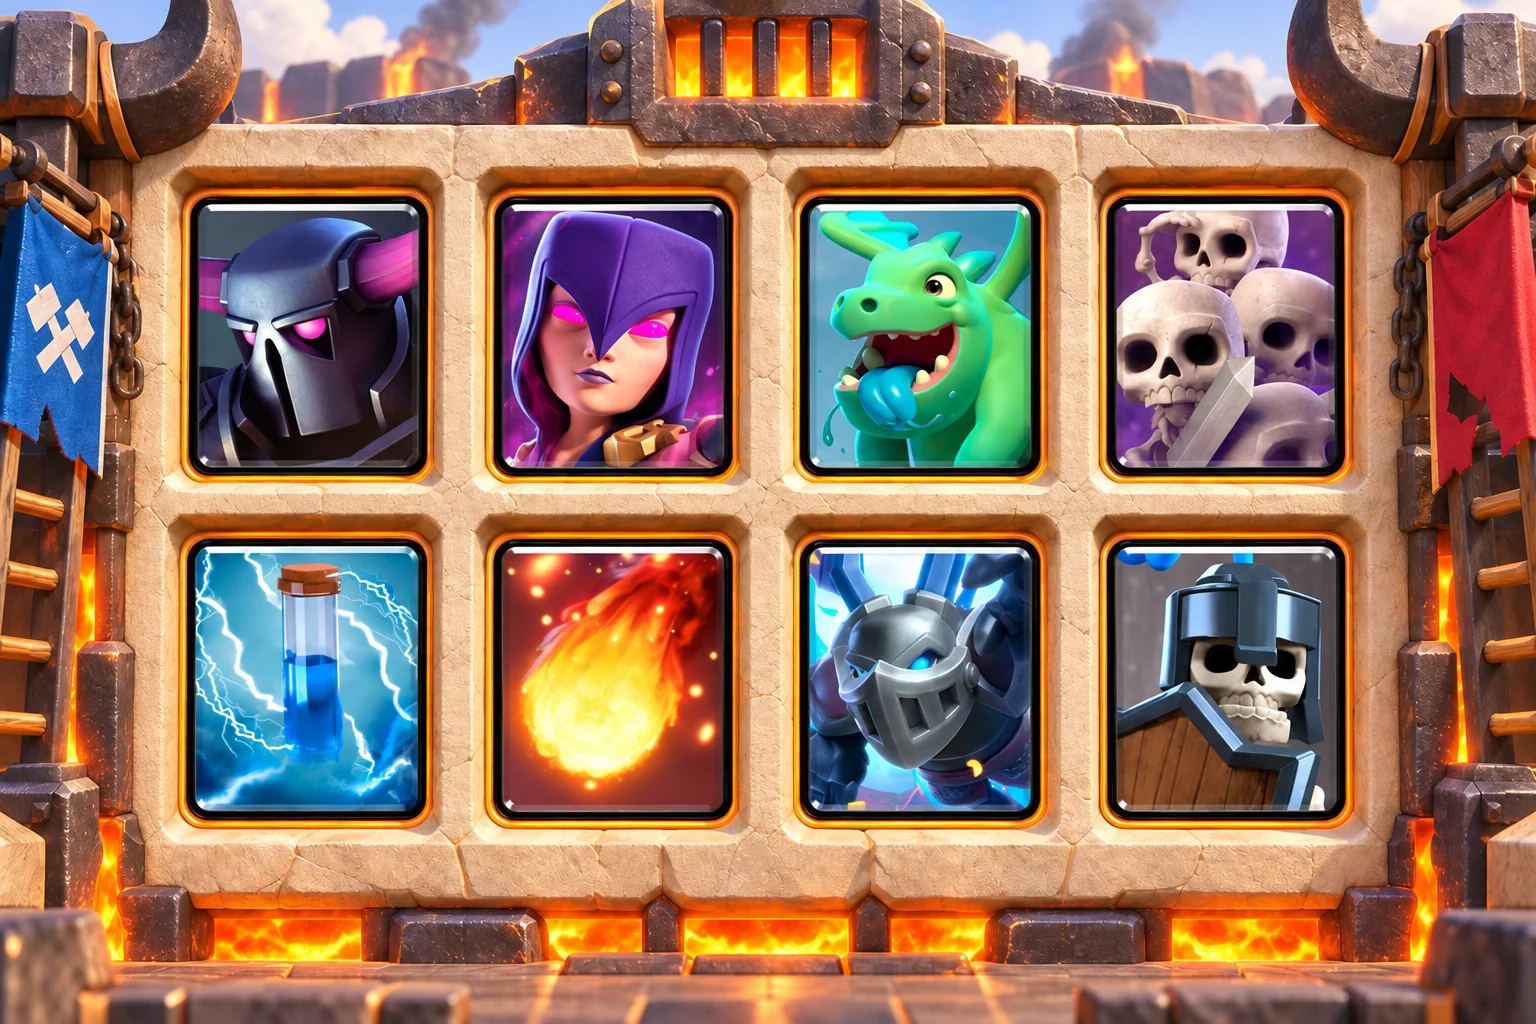
3.9 average elixir | P.E.K.K.A counterpush | Medium difficulty
Choose it if: You keep meeting large ground pushes and want several answers to air and swarm support. P.E.K.K.A is the defensive anchor. Witch, Baby Dragon, and Mega Minion give the surviving unit enough support to become a dangerous counterpush.
The eight cards
- P.E.K.K.A (7 elixir): heavy ground stopper
- Witch (5 elixir): ranged support and skeleton pressure
- Baby Dragon (4 elixir): flying splash support
- Skeleton Army (3 elixir): high-damage swarm defense
- Zap (2 elixir): cheap stun and swarm reset
- Fireball (4 elixir): medium spell
- Mega Minion (3 elixir): durable air damage
- Guards (3 elixir): shielded ground defense
Your first minute: Split Guards or play Mega Minion in the back at full elixir. Avoid P.E.K.K.A behind the king tower in single elixir unless the opponent has already committed a costly tank. Place P.E.K.K.A on the biggest ground threat, then add only the support needed to win the defense. If she survives, let her cross first and hold Fireball for the defender.
When elixir speeds up: You can build behind P.E.K.K.A more safely, but keep space between Witch and Baby Dragon. One support troop is often enough when the opponent has already spent heavily.
Defend in this order: P.E.K.K.A removes tanks, Guards and Skeleton Army surround single targets after the small spell is gone, Baby Dragon clears swarms, and Mega Minion adds concentrated air damage.
The mistake to avoid: There is no building, so quick tower-targeting troops can force awkward placements. A patient opponent can also pull P.E.K.K.A away while attacking the other lane.
If a card is missing or underleveled: Musketeer can replace Witch for simpler long-range air defense. Barbarians can replace Guards when their level is stronger, but the deck becomes heavier.
Upgrade first: P.E.K.K.A first, then Fireball, Baby Dragon, Witch, and Mega Minion.
A useful battle script: Against a Giant push, wait until the Giant crosses, place P.E.K.K.A close enough to engage, use Baby Dragon on the troops behind it, and counterpush only if at least one defender survives with useful health.
Giant Battle Ram Two-Lane
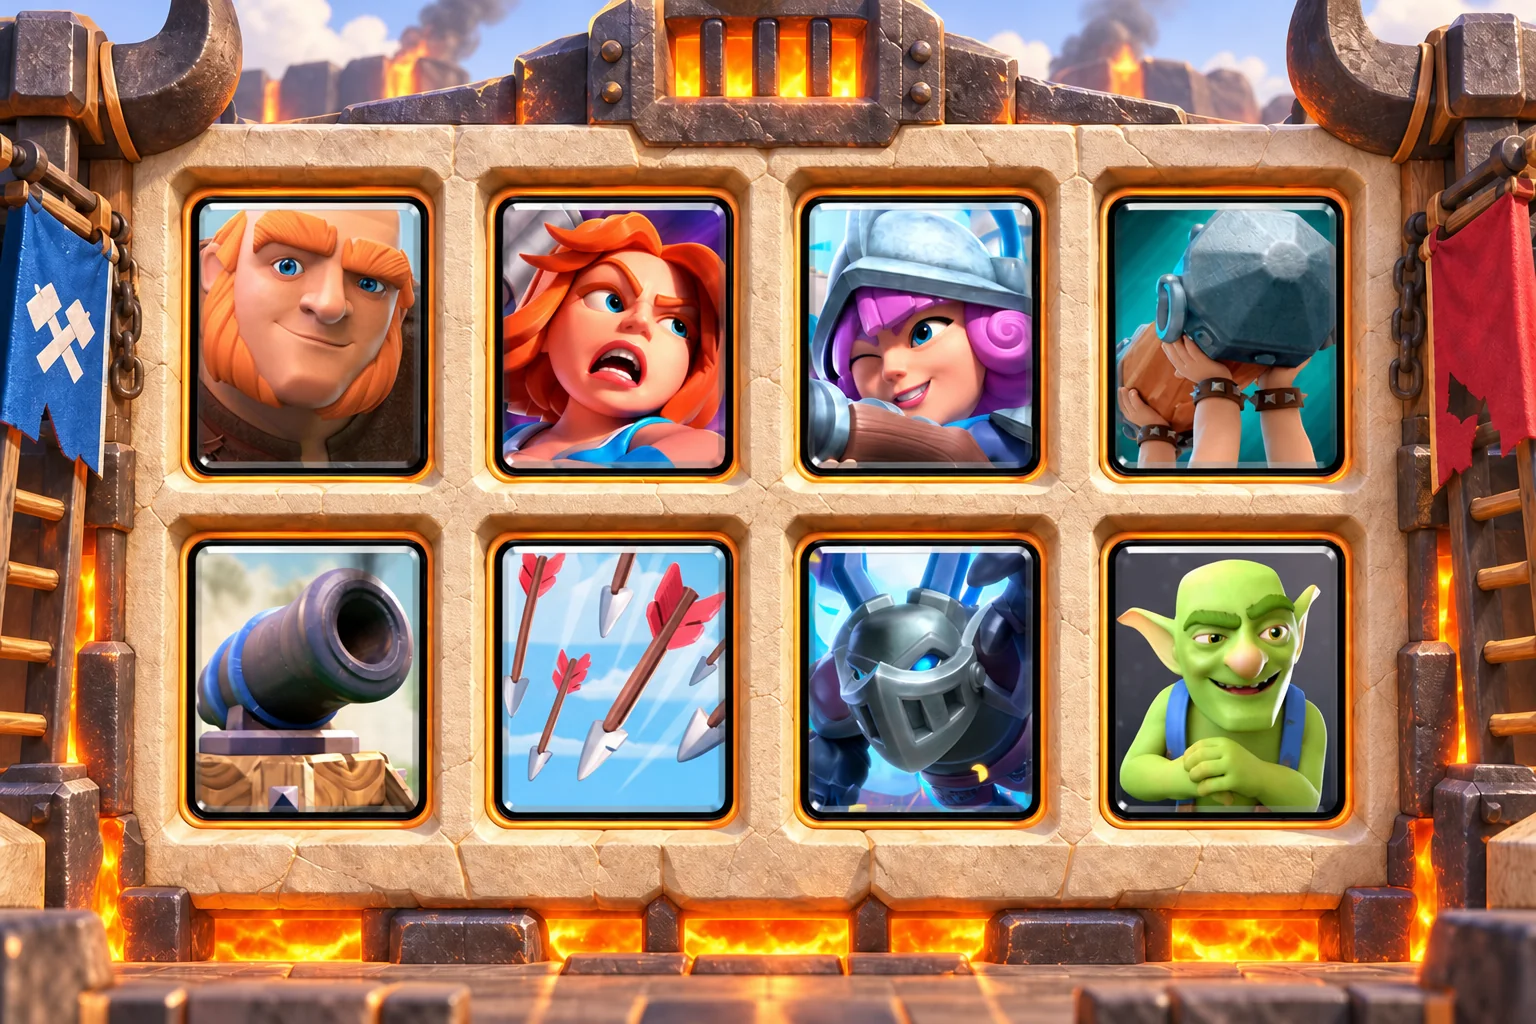
3.5 average elixir | Giant and Battle Ram pressure | Medium difficulty
Choose it if: You want to punish a slow play in one lane without abandoning a normal Giant counterpush. Giant carries surviving defenders in one lane while Battle Ram threatens the other. Cannon, Valkyrie, Musketeer, and Mega Minion keep the defense stable enough to choose between them.
The eight cards
- Giant (5 elixir): building-targeting tank
- Valkyrie (4 elixir): ground splash mini tank
- Musketeer (4 elixir): long-range air defense
- Battle Ram (4 elixir): bridge win condition
- Cannon (3 elixir): low-cost building pull
- Arrows (3 elixir): wide swarm removal
- Mega Minion (3 elixir): durable air damage
- Goblins (2 elixir): cheap ground damage
Your first minute: Split Goblins or play Mega Minion in the back. Do not show Giant and Battle Ram together before you know which defensive cards the opponent holds. After defending, use Giant in front of survivors. If the opponent spends heavily to stop that lane, send Battle Ram opposite only when Cannon remains affordable.
When elixir speeds up: Two-lane pressure becomes stronger, but each lane still needs a purpose. A lone Battle Ram can force a response while the real support stays with Giant.
Defend in this order: Cannon pulls, Valkyrie clears ground swarms, Musketeer and Mega Minion cover air, and Goblins add fast damage after the opponent’s spell is gone.
The mistake to avoid: Splitting elixir too early creates two harmless attacks. Build one credible lane first, then use Battle Ram only when the opponent overcommits.
If a card is missing or underleveled: Goblin Cage can replace Cannon for a stronger counterpush at one extra elixir. Minions can replace Mega Minion for more damage and less durability.
Upgrade first: Giant and Battle Ram first, then Musketeer, Valkyrie, and Arrows.
P.E.K.K.A Battle Ram Counterpush
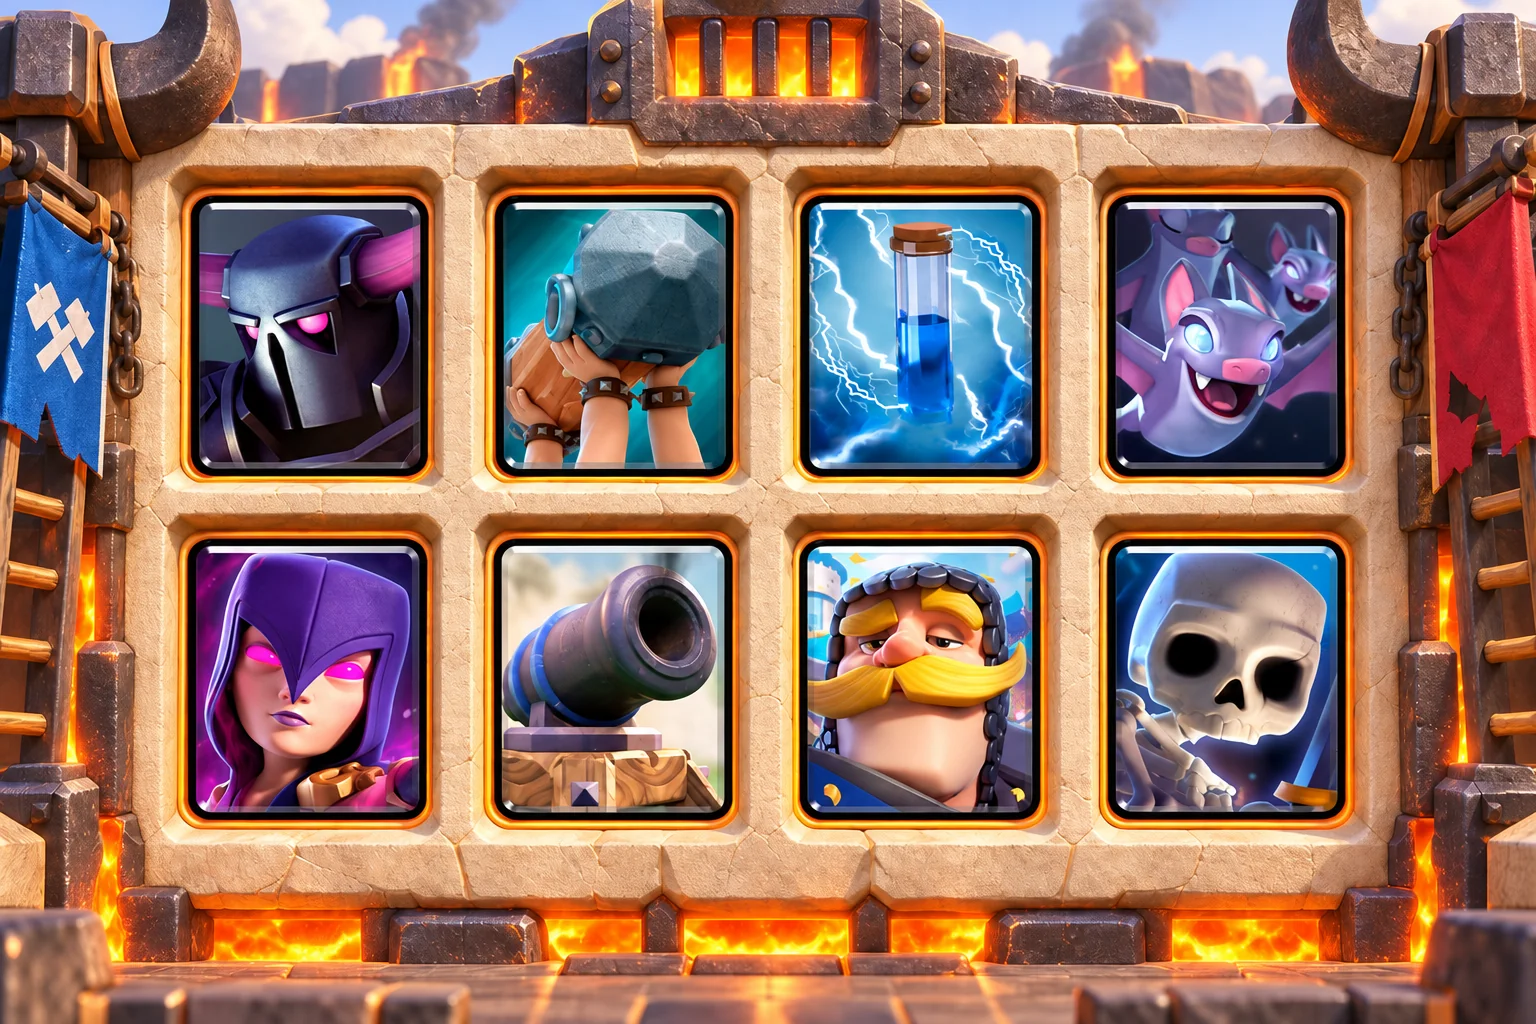
3.4 average elixir | P.E.K.K.A and Battle Ram counterpush | Medium difficulty
Choose it if: You want P.E.K.K.A defense but prefer a fast Battle Ram counterattack over a slow heavy push. P.E.K.K.A and Cannon stabilize the ground, Witch and Bats cover support, and Battle Ram turns surviving defenders into bridge pressure.
The eight cards
- P.E.K.K.A (7 elixir): heavy ground stopper
- Battle Ram (4 elixir): bridge win condition
- Zap (2 elixir): cheap stun and swarm reset
- Bats (2 elixir): cheap air damage
- Witch (5 elixir): ranged support and skeleton pressure
- Cannon (3 elixir): low-cost building pull
- Knight (3 elixir): low-cost mini tank
- Skeletons (1 elixir): one-elixir cycle and distraction
Your first minute: Split Skeletons or play Knight in the back. Keep Bats until the opponent’s small spell is known and keep P.E.K.K.A for a real target. Defend with Cannon or P.E.K.K.A, then send Battle Ram when a defender survives. Witch belongs behind the counterpush, not in front of it.
When elixir speeds up: Battle Ram can attack the open lane while P.E.K.K.A walks with one support card. Do not add everything, because the deck has no medium or heavy spell.
Defend in this order: Cannon pulls, P.E.K.K.A deletes high-health ground units, Knight stalls, and Witch plus Bats manage groups and air at different ranges.
The mistake to avoid: Zap is the only spell. Ranged defenders can remain behind a tank, and a spell that removes Bats can expose the air defense.
If a card is missing or underleveled: Goblin Cage can replace Cannon for a stronger counterpush. Minions can replace Bats for more damage at a slower cycle.
Upgrade first: P.E.K.K.A and Battle Ram first, then Witch, Zap, and Cannon.
Battle Ram Double-Spirit Cycle
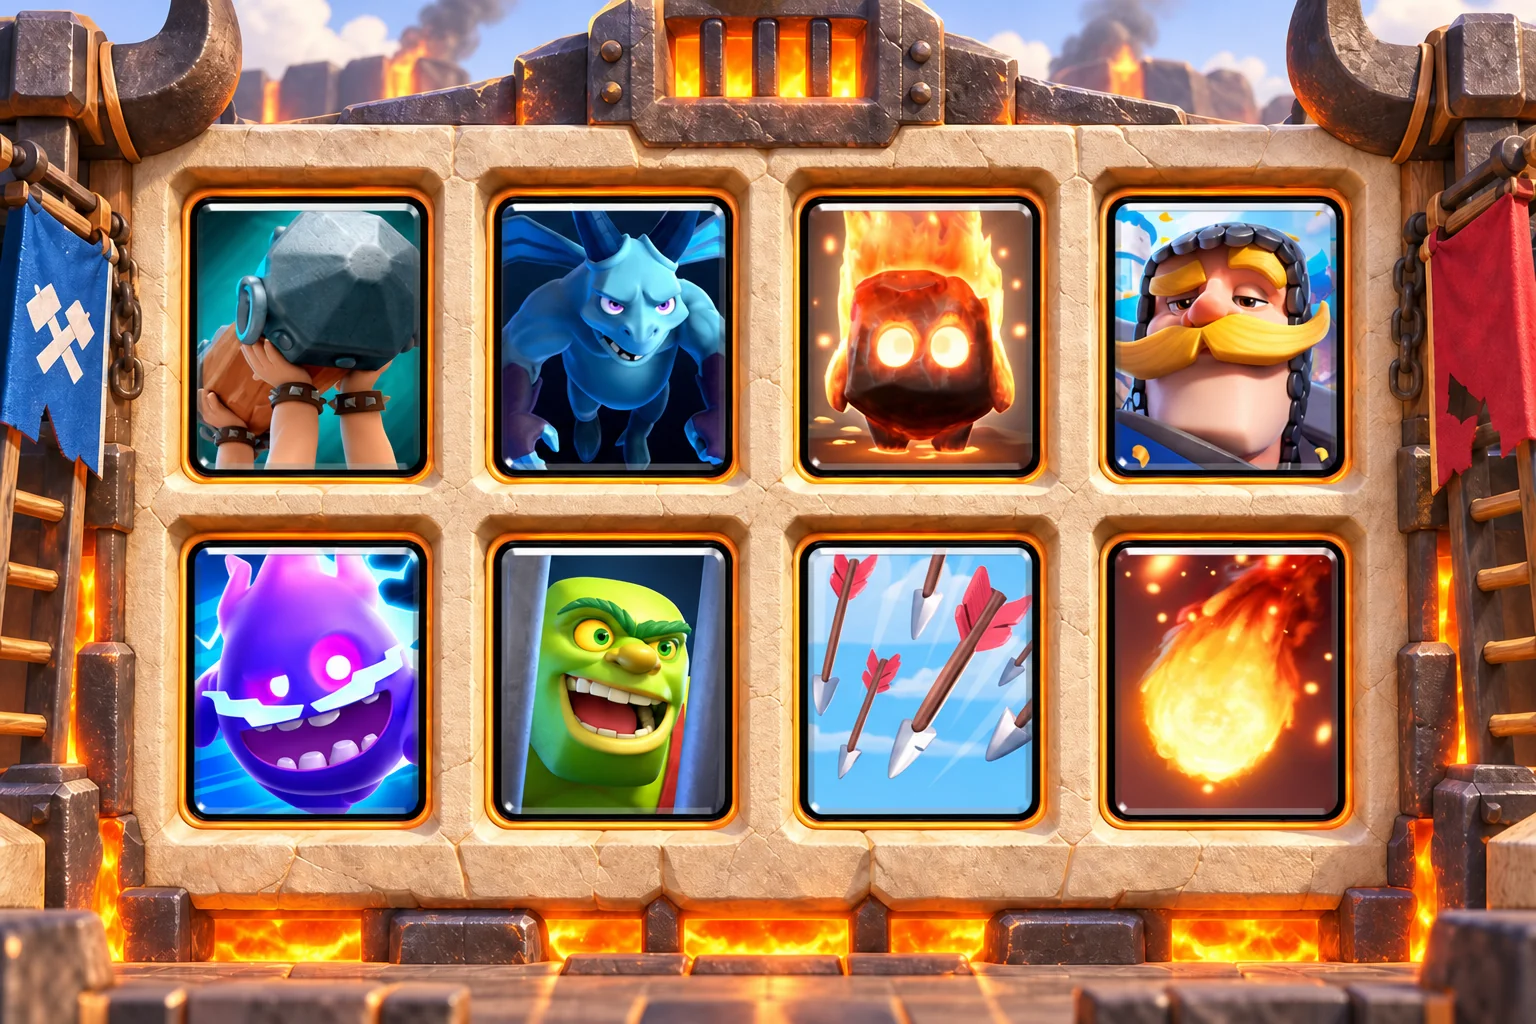
2.9 average elixir | Battle Ram cycle | Medium difficulty
Choose it if: You like quick bridge pressure and want both spirits to help a low-cost rotation. Goblin Cage and Knight create the defense, Minions cover the air, and Fire Spirit plus Electro Spirit make it easier to cycle back to Battle Ram.
The eight cards
- Battle Ram (4 elixir): bridge win condition
- Minions (3 elixir): three-unit air damage
- Fire Spirit (1 elixir): cycle and splash pressure
- Knight (3 elixir): low-cost mini tank
- Electro Spirit (1 elixir): cycle and chain stun
- Goblin Cage (4 elixir): building pull and counterpush
- Arrows (3 elixir): wide swarm removal
- Fireball (4 elixir): medium spell
Your first minute: Wait, play Knight in the back, or send one spirit when its effect will not be needed immediately. Hold Goblin Cage for a pull. Defend with Cage and Knight, then send Battle Ram as the Brawler crosses. Use the spirits to clear or stun cheap blockers rather than dropping both at once.
When elixir speeds up: Cycle to Battle Ram before the opponent’s main ground stopper returns. Fireball and Arrows should support a real connection, not turn into blind tower damage.
Defend in this order: Cage redirects the threat, Knight absorbs hits, Minions provide the main sustained air damage, and the spirits clean up fragile support.
The mistake to avoid: Large tanks can strain Knight and Cage, and Minions carry much of the air defense. Protect them from Arrows and do not waste both spirits on offense.
If a card is missing or underleveled: Mini P.E.K.K.A can replace Knight when tank damage is missing. Musketeer can replace Minions for steadier range at one extra elixir.
Upgrade first: Battle Ram first, then Goblin Cage, Fireball, Arrows, and Minions.
P.E.K.K.A Ram Split-Lane
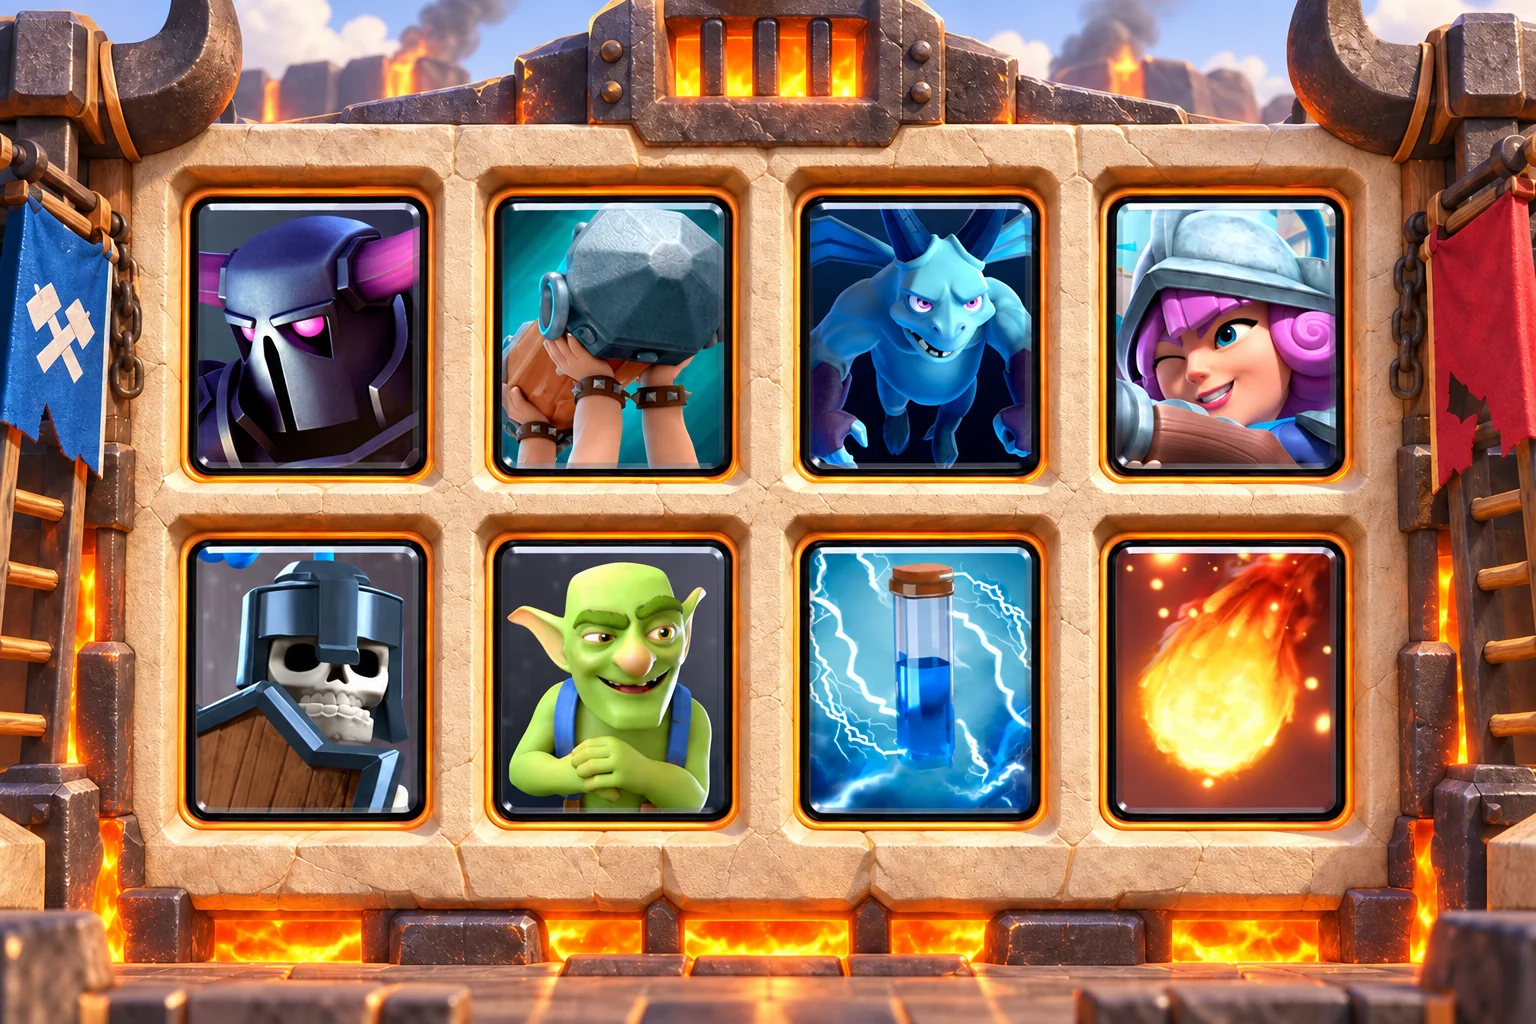
3.6 average elixir | P.E.K.K.A split-lane pressure | Medium difficulty
Choose it if: You want P.E.K.K.A to anchor defense and Battle Ram to punish the lane the opponent leaves open. Musketeer and Minions cover air, Guards and Goblins provide low-cost ground support, and Fireball plus Zap help Battle Ram reach the tower.
The eight cards
- P.E.K.K.A (7 elixir): heavy ground stopper
- Battle Ram (4 elixir): bridge win condition
- Minions (3 elixir): three-unit air damage
- Musketeer (4 elixir): long-range air defense
- Guards (3 elixir): shielded ground defense
- Goblins (2 elixir): cheap ground damage
- Zap (2 elixir): cheap stun and swarm reset
- Fireball (4 elixir): medium spell
Your first minute: Split Goblins or Guards, or play Musketeer in the back at ten elixir. Save P.E.K.K.A for an expensive ground commitment. Defend with P.E.K.K.A and one support troop. Send Battle Ram with survivors or opposite a slow tank, depending on how much elixir remains.
When elixir speeds up: Force two answers only after one lane is credible. Fireball can remove a ranged defender while Zap clears the cheap blocker in Battle Ram’s path.
Defend in this order: P.E.K.K.A stops the main ground unit, Guards and Goblins distract, Musketeer handles range, and Minions add air damage once the small spell is spent.
The mistake to avoid: There is no building, and splash can clear Guards, Goblins, and Minions quickly. Do not stack the cheap support into one spell or splash attack.
If a card is missing or underleveled: Mega Minion can replace Minions for better spell resistance. Barbarians can replace Guards when you need a heavier ground stop.
Upgrade first: P.E.K.K.A and Battle Ram first, then Musketeer, Fireball, and Guards.
P.E.K.K.A Barrel Swarm Counterpush
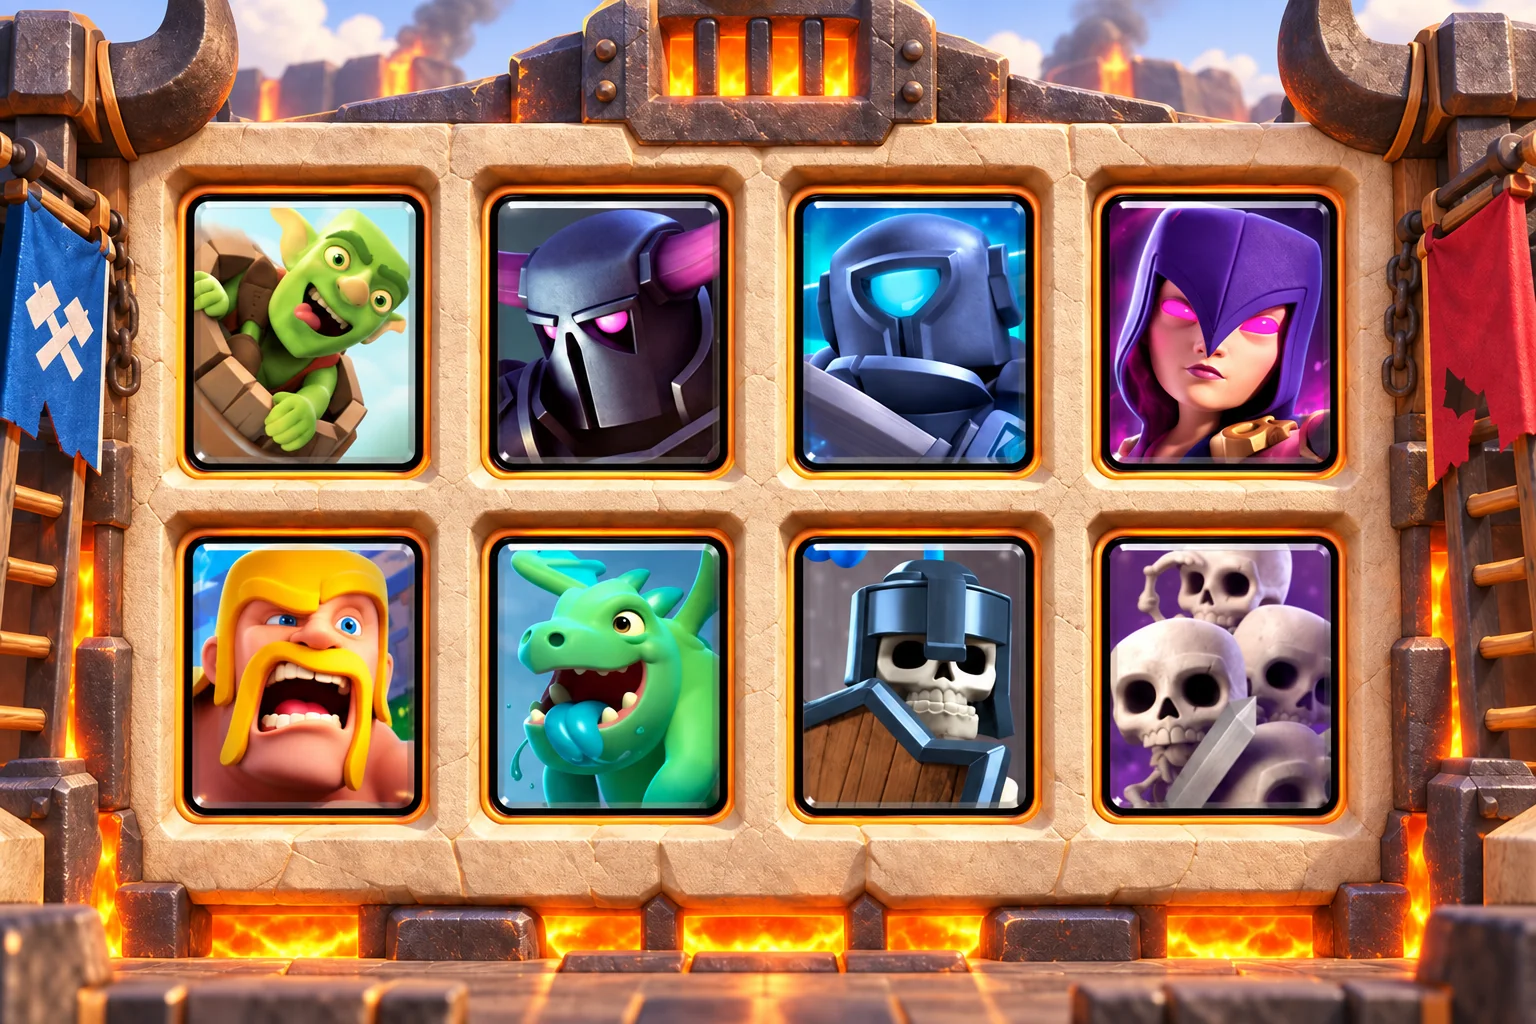
4.3 average elixir | Heavy P.E.K.K.A bait | Medium difficulty
Choose it if: Your troop levels are unusually strong and you want a risky all-troop defense that can turn into a large counterpush. P.E.K.K.A and Mini P.E.K.K.A provide heavy ground damage, Baby Dragon and Witch control groups, and Goblin Barrel pressures after a defensive spell is spent.
The eight cards
- Goblin Barrel (3 elixir): tower pressure
- P.E.K.K.A (7 elixir): heavy ground stopper
- Mini P.E.K.K.A (4 elixir): single-target tank killer
- Witch (5 elixir): ranged support and skeleton pressure
- Barbarians (5 elixir): ground stop and surround
- Baby Dragon (4 elixir): flying splash support
- Guards (3 elixir): shielded ground defense
- Skeleton Army (3 elixir): high-damage swarm defense
Your first minute: Split Guards or wait. Never open P.E.K.K.A in the back unless the opponent has already committed heavily, because the 4.3 average is the highest in this guide. Use the smallest defensive group that works, then place Barrel while the opponent deals with the survivor. A P.E.K.K.A counterpush needs only one support troop.
When elixir speeds up: Barbarians or Guards can protect one lane while P.E.K.K.A handles the other. Build slowly and stop adding troops once the opponent has spell value.
Defend in this order: P.E.K.K.A handles the main tank, Mini P.E.K.K.A reinforces single-target damage, and Baby Dragon clears swarms. Guards are safer into spells than Skeleton Army.
The mistake to avoid: This is the least forgiving list here: it has no normal spell, no building, and a slow rotation. Use it only when the eight card levels justify those tradeoffs.
If a card is missing or underleveled: Replace Witch with Fireball to add a medium spell, or replace Barbarians with Cannon to lower the cost and create a building pull.
Upgrade first: P.E.K.K.A and Goblin Barrel first, then Baby Dragon, Guards, and Mini P.E.K.K.A.
Mortar decks for players who like control
Mortar demands better counting and placement than Giant or Hog Rider. Use it on defense when necessary, and treat an offensive lock as something earned by the previous trade.
Mortar Rocket Control
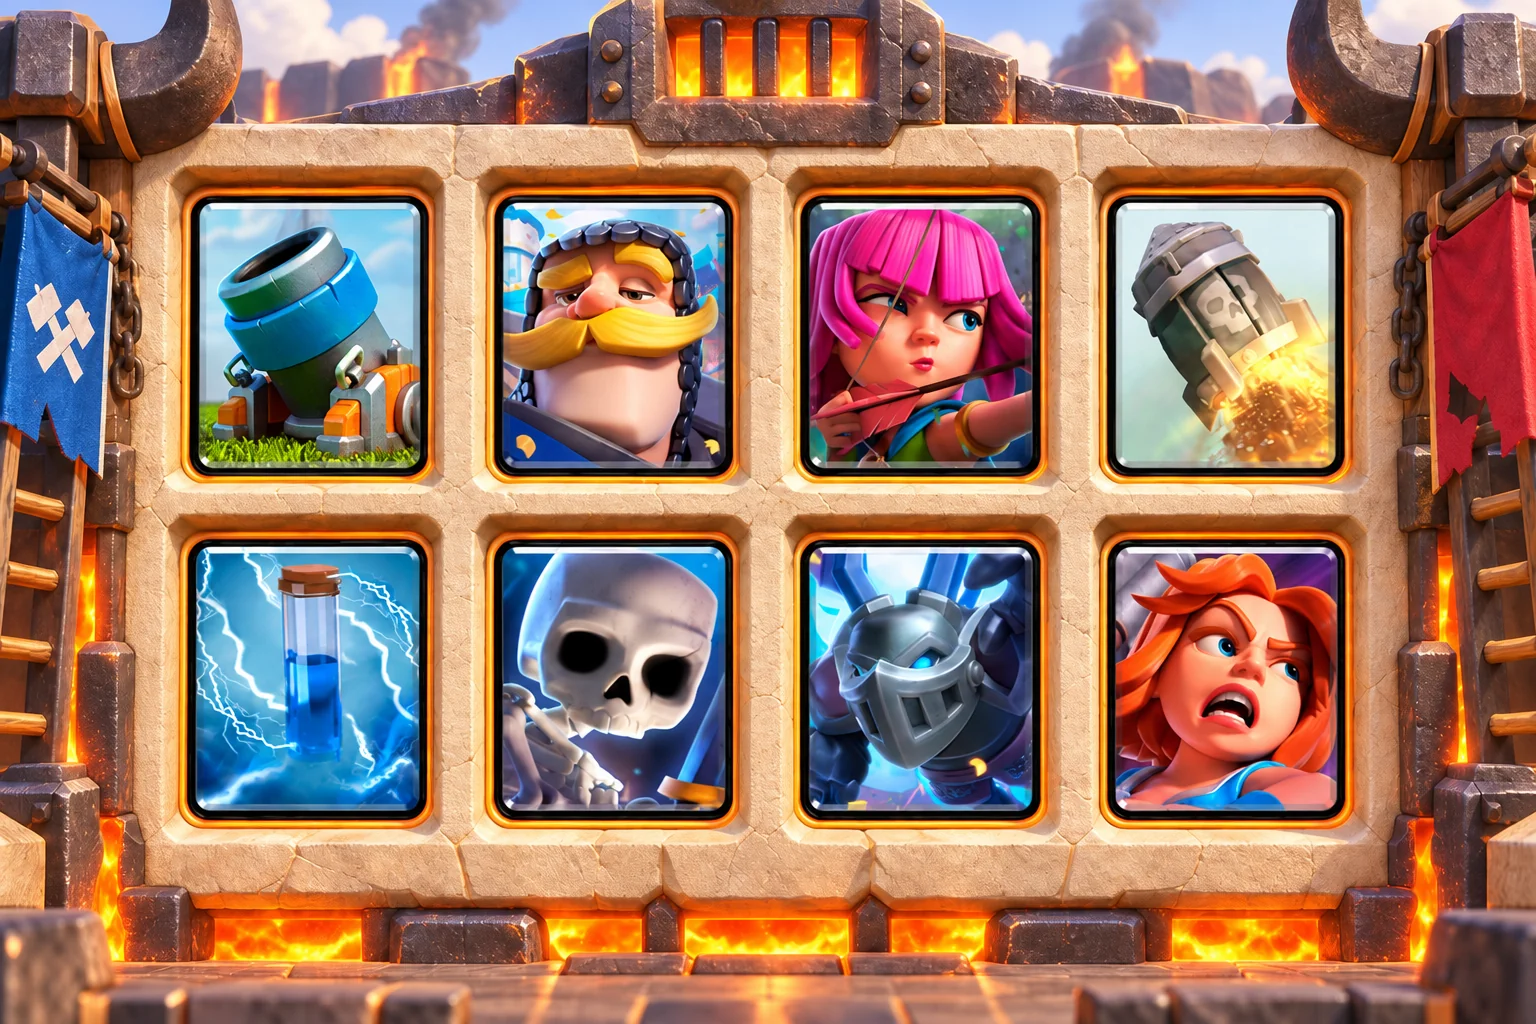
3.3 average elixir | Mortar control | Hard difficulty
Choose it if: You want to learn siege placement and are willing to win through repeated small advantages. Mortar is both the tower threat and an emergency defensive building. Knight, Valkyrie, Archers, and Mega Minion buy the time needed for it to lock on.
The eight cards
- Mortar (4 elixir): siege win condition and defensive building
- Knight (3 elixir): low-cost mini tank
- Archers (3 elixir): split ranged defense
- Rocket (6 elixir): heavy spell and finisher
- Zap (2 elixir): cheap stun and swarm reset
- Skeletons (1 elixir): one-elixir cycle and distraction
- Mega Minion (3 elixir): durable air damage
- Valkyrie (4 elixir): ground splash mini tank
Your first minute: Cycle Skeletons or split Archers. A first-play Mortar is reasonable only at full elixir and only if you are ready to defend the opposite lane. Defend cheaply, then place Mortar when the opponent’s tank or building answer is out of hand. Use Knight or Valkyrie in front instead of piling troops behind it.
When elixir speeds up: Return to Mortar faster with Skeletons and Zap. Rocket is for a valuable troop plus tower hit, a dangerous unit you cannot otherwise stop, or the final confirmed tower damage.
Defend in this order: Defensive Mortar pulls building-targeting troops, Valkyrie controls ground groups, and Archers plus Mega Minion split the air work. Knight protects a Mortar placed on offense.
The mistake to avoid: A careless Rocket leaves six elixir missing from the defense. Mortar placement also matters: one tile can decide whether a unit is pulled or walks straight to the tower.
If a card is missing or underleveled: Fireball can replace Rocket for a lighter, more forgiving version. Minions can replace Mega Minion if you need faster damage and can protect them from spells.
Upgrade first: Mortar first, then Rocket, Archers, Knight, and Valkyrie.
A useful battle script: Treat the first Mortar as a question, not an all-in attack. Note the answer, defend it, and make the second Mortar when that answer is two or three cards away.
Mortar Fireball Cycle

2.8 average elixir | Mortar cycle | Hard difficulty
Choose it if: You want a faster Mortar deck with a conventional Fireball and one clear ranged defender. Knight and Tombstone absorb the first wave, Musketeer covers air, and the three cheap cycle cards help Mortar return before the opponent’s best answer.
The eight cards
- Mortar (4 elixir): siege win condition and defensive building
- Knight (3 elixir): low-cost mini tank
- Musketeer (4 elixir): long-range air defense
- Skeletons (1 elixir): one-elixir cycle and distraction
- Fire Spirit (1 elixir): cycle and splash pressure
- Zap (2 elixir): cheap stun and swarm reset
- Fireball (4 elixir): medium spell
- Tombstone (3 elixir): defensive pull and distraction
Your first minute: Split Skeletons, play Knight in the back, or send Fire Spirit only when giving up that splash will not hurt the next defense. Keep Tombstone for an actual pull. Place Mortar after a positive trade and protect it with Knight. Fireball should remove a defender while clipping the tower whenever possible.
When elixir speeds up: Cycle deliberately through Skeletons, Fire Spirit, and Zap to reach another Mortar. Do not cycle Musketeer when the opponent’s air threat is waiting.
Defend in this order: Tombstone redirects tanks, Knight stalls support, Musketeer supplies the main air damage, and Fire Spirit clears fragile groups. Mortar can defend when the normal building is out of hand.
The mistake to avoid: The list depends on placement more than raw stats. A badly placed Tombstone and an offensive Mortar at the same time can leave no center pull available.
If a card is missing or underleveled: Cannon can replace Tombstone for sturdier direct damage. Electro Spirit can replace Fire Spirit when the chain stun fits your timing better.
Upgrade first: Mortar first, then Fireball, Musketeer, Knight, and Tombstone.
A useful battle script: Count four cards after the opponent shows the main Mortar answer. If you defend with three cheap cards, your next Mortar can arrive one card before that answer returns.
Mortar Bats Cycle
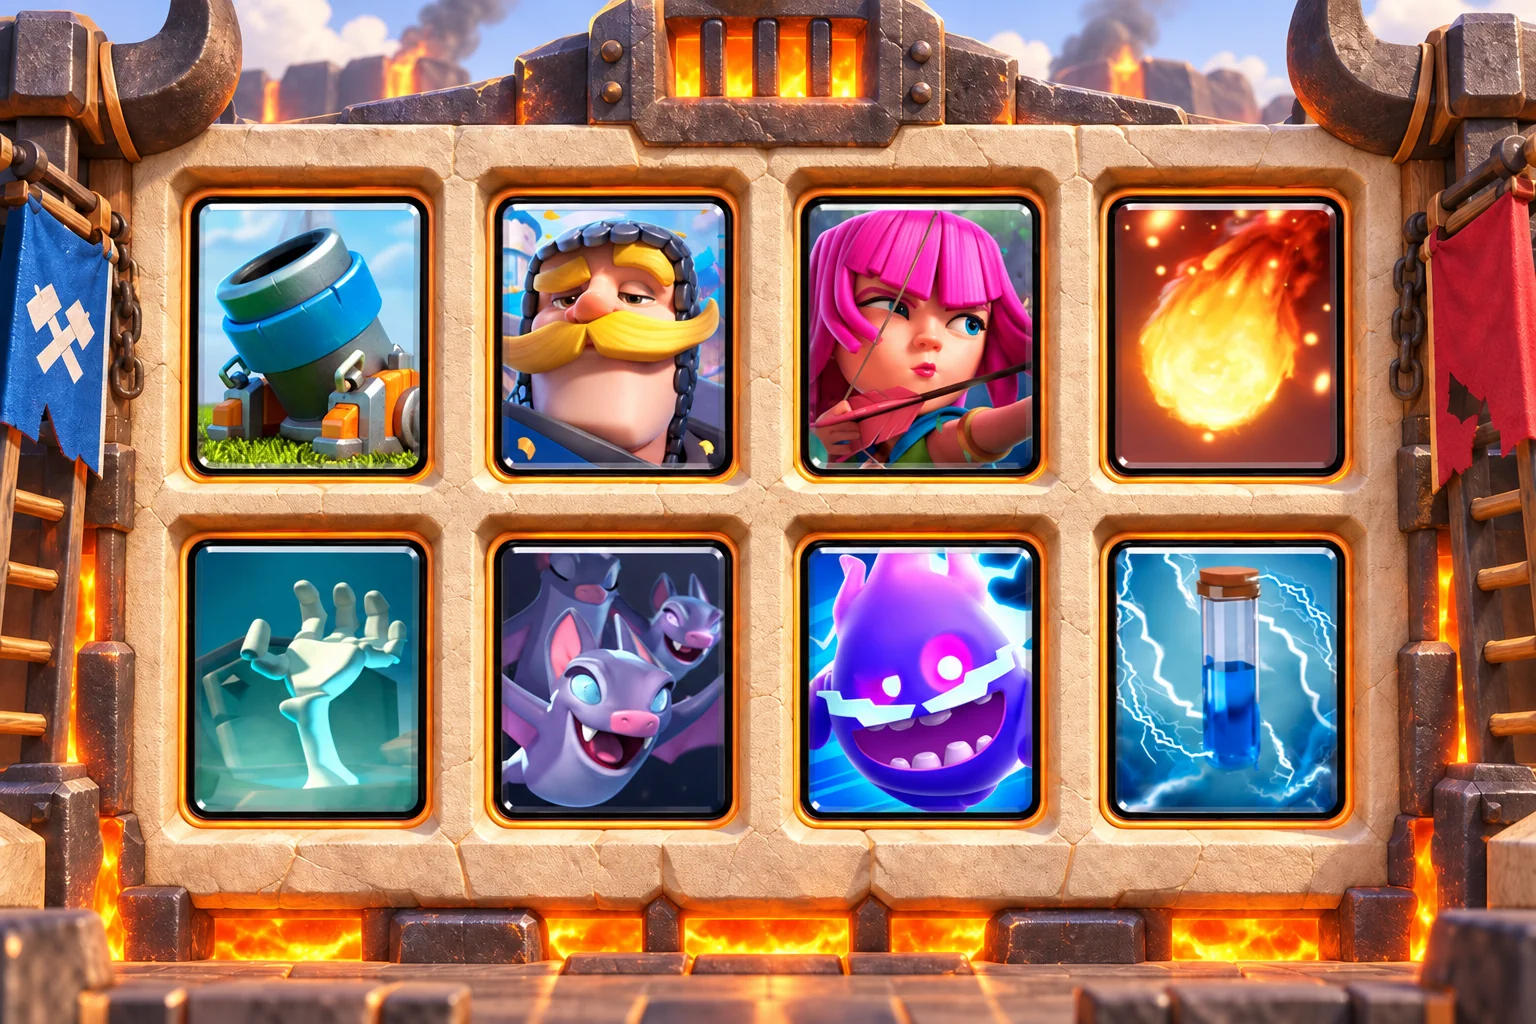
2.8 average elixir | Mortar cycle | Hard difficulty
Choose it if: You want the cheapest Mortar list here and can protect fragile air troops through spacing and spell tracking. Knight and Tombstone stall the ground while Archers and Bats cover air. Electro Spirit and Zap keep the cycle moving back to Mortar.
The eight cards
- Mortar (4 elixir): siege win condition and defensive building
- Knight (3 elixir): low-cost mini tank
- Archers (3 elixir): split ranged defense
- Fireball (4 elixir): medium spell
- Tombstone (3 elixir): defensive pull and distraction
- Bats (2 elixir): cheap air damage
- Electro Spirit (1 elixir): cycle and chain stun
- Zap (2 elixir): cheap stun and swarm reset
Your first minute: Play Knight in the back, split Archers, or cycle Electro Spirit. Keep Bats hidden until the opponent’s Arrows or Zap is known. Use Mortar after a cheap defense and place Knight in front when needed. Fireball the defender only when it preserves a meaningful lock or also hits the tower.
When elixir speeds up: Cycle through the one and two-elixir cards to reach another Mortar. Defensive Mortar remains an option when Tombstone is not in hand.
Defend in this order: Tombstone pulls, Knight stalls support, Archers split the air coverage, and Bats add fast damage after a spell is used. Electro Spirit buys one extra attack window.
The mistake to avoid: Arrows can remove Archers and Bats together. The list also lacks a heavy tank killer, so center pulls and tower assistance must be accurate.
If a card is missing or underleveled: Minions can replace Bats for more durability at a higher cost. Cannon can replace Tombstone for sturdier direct building damage.
Upgrade first: Mortar first, then Fireball, Archers, Knight, and Bats.
A Goblin Barrel deck for tracking spells
This list wins by learning the opponent’s small-spell rotation. The normal Barrel placement is the baseline; different placements matter only after you know how the opponent responds.
Goblin Barrel Inferno Control
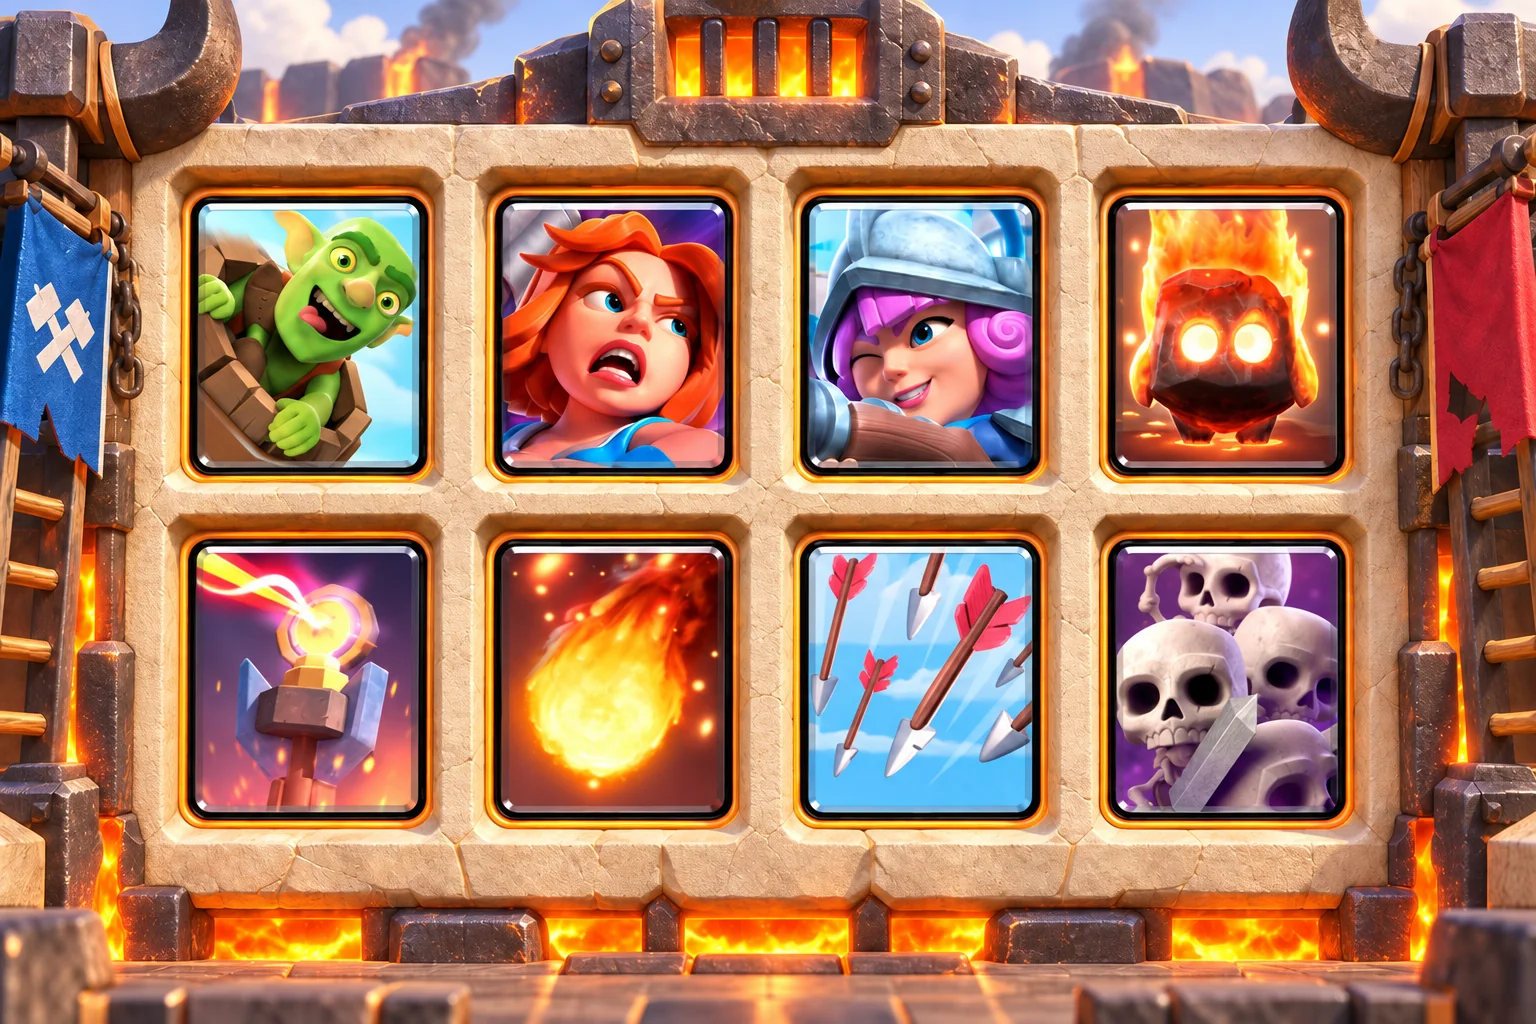
3.4 average elixir | Goblin Barrel control | Medium difficulty
Choose it if: You want a Barrel win condition without Hog Rider and prefer winning through defense and spell tracking. Inferno Tower controls tanks, Valkyrie and Fire Spirit clear ground pressure, and Goblin Barrel attacks after the opponent’s small spell leaves the hand.
The eight cards
- Goblin Barrel (3 elixir): tower pressure
- Valkyrie (4 elixir): ground splash mini tank
- Musketeer (4 elixir): long-range air defense
- Fire Spirit (1 elixir): cycle and splash pressure
- Inferno Tower (5 elixir): tank control
- Fireball (4 elixir): medium spell
- Arrows (3 elixir): wide swarm removal
- Skeleton Army (3 elixir): high-damage swarm defense
Your first minute: A normal Barrel at full elixir can reveal the counter. Fire Spirit is another safe probe, while Inferno Tower should remain hidden until needed. Defend with Inferno Tower, Valkyrie, and Musketeer, then send Barrel when the small spell is out of rotation. Change the landing spot only after the normal placement is understood.
When elixir speeds up: Cycle pressure without sacrificing the defense. Fireball and Arrows can remove support, but one should remain available for the opponent’s next swarm or ranged troop.
Defend in this order: Inferno Tower removes large targets, Valkyrie handles ground groups, Musketeer covers air, and Skeleton Army punishes an attacker after its spell is gone.
The mistake to avoid: Reset effects can break Inferno Tower, while two small spells make Barrel damage harder to earn. Avoid predictable Skeleton Army placements.
If a card is missing or underleveled: Cannon can replace Inferno Tower for a lighter cycle. Guards can replace Skeleton Army for a more reliable shielded defense.
Upgrade first: Goblin Barrel first, then Inferno Tower, Valkyrie, Musketeer, and Fireball.
Missing a card? Replace the job, not just the elixir cost
A replacement works when it preserves the job the deck needs. Equal elixir does not mean equal function. Use the table below as a starting point, then read the deck-specific note because every swap changes at least one matchup or rotation.
| Job you need | Closest Arena 6 options | Tradeoff |
|---|---|---|
| Cheap building pull | Cannon, Tombstone | Cannon deals direct damage; Tombstone adds distractions after it breaks. |
| Building plus counterpush | Goblin Cage | Costs more, but the Brawler can walk behind Giant or Battle Ram. |
| Focused air defense | Musketeer, Mega Minion, Minions | Musketeer has range, Mega Minion survives more spells, Minions give faster damage. |
| Ground splash | Valkyrie, Bomber, Wizard | Valkyrie is sturdy, Bomber is cheap, Wizard is ranged and expensive. |
| Tank damage | Mini P.E.K.K.A, P.E.K.K.A, Barbarians | The heavier options slow the cycle and can be pulled away. |
| Wide swarm spell | Arrows | Reliable area, but no stun and one more elixir than Zap. |
| Cheap reset | Zap, Electro Spirit | Zap is immediate; Electro Spirit can be intercepted before it connects. |
Four habits that make a good deck feel bad
- Starting the full push at the bridge. Giant and P.E.K.K.A decks need a defended troop or an elixir lead. Building from zero at the river removes the time that makes the tank useful.
- Using the building as a cycle card. Cannon, Tombstone, Cage, Bomb Tower, and Inferno Tower exist to change the attacker’s path. If they leave the hand for no reason, the next direct push becomes much harder.
- Stacking every air defender. Archers, Musketeer, Minions, Bats, and Mega Minion should usually be spaced. One Fireball or Arrows should not remove the whole defense.
- Changing decks after two losses. Keep the same list long enough to learn its safe opening and defensive order. Review which card was missing or misplaced in each loss before deciding whether the deck needs a change.
Questions players ask before leaving Arena 6
Which Arena 6 deck should a beginner build first?
Start with Giant Valkyrie Fundamentals. Its cards have clear jobs, the two spells cover different problems, and the plan teaches defense before counterpush. If Giant is underleveled, Hog Valkyrie Control is the next clean option.
Do I need P.E.K.K.A to leave P.E.K.K.A’s Playhouse?
No. Only four lists here contain P.E.K.K.A, and Giant, Hog Rider, Mortar, Battle Ram, or Goblin Barrel can all serve as the main tower plan. Use the win condition that matches your levels and preferred pace.
Why are there no performance percentages beside the decks?
A stable public sample limited to every exact Arena 6 list is not available. Percentages from the broader ladder would look more certain than they are. The order on this page is an editorial starting point, so use the play-style notes and your card levels to choose.
Why does a copy link open a web page on desktop?
Supercell’s copy link is designed to hand the deck to the Clash Royale app. Open it on a phone or tablet where the game is installed. On desktop, the same URL may stop at a handoff page instead of importing the deck.
What should I upgrade first?
Upgrade the win condition, the defensive card that must survive key interactions, and the main spell before spreading resources across the whole list. The priority under each deck gives a practical order, but your current card levels can move one item ahead.
Should I keep several Arena 6 decks upgraded?
One main deck and one backup are enough while resources are limited. Use the main deck to learn match timing. Keep the backup only if it shares several upgraded cards or covers a completely different problem.
Moving down or up an arena? Compare the Arena 5 decks, Arena 7 decks, and Arena 11 deck guide.
Clash Royale and its game assets are trademarks and copyrights of Supercell. ClashRoyaleDecks.co is an unofficial fan site and is not endorsed by Supercell. Fan Kit assets are used under Supercell’s Fan Content Policy.
More arena deck guides
Building your collection before P.E.K.K.A’s Playhouse? Start with the Arena 5 deck guide for Builder’s Workshop. Ready for the next step? Continue to the Arena 7 deck guide for Royal Arena.