
If you have just reached Hog Mountain, start with Giant Musketeer Fundamentals when your levels are similar. It has a clear answer to a ground tank, a dependable air shooter, two swarm answers and a simple counterpush. If Hog Rider is already your strongest card, begin with Hog Valkyrie Control. The better deck is the one whose defense you can repeat with the cards you own, not the one with the most expensive collection.
Arena 10 begins at 3,000 trophies. It gives you more ways to build around Hunter, Tesla, Golem, Zappies and X-Bow, but a new unlock is not an instruction to rebuild your whole deck. Below are 30 distinct eight-card lists arranged from straightforward to specialist. Every card is available by Arena 10 in the card registry checked September 26, 2026. Availability does not mean you have already unlocked or leveled it.
I judge these decks by their jobs: how they reach a tower, what pulls a fast win condition, who handles air, what clears a swarm, and whether the first four-card hand can defend. The suggestions are editorial choices, not a win-rate ranking or a promise of trophies. Open a copy link on a phone with Clash Royale installed and check the eight cards in the game before playing.
Which Arena 10 deck fits your collection?
Pick your best upgraded win condition first. Then check the defender and spell beside it. A weak Musketeer in an otherwise strong Hog deck can matter more than swapping the whole deck to something new.
| Your situation | Start with | Watch for |
|---|---|---|
| You want clear roles without Epic cards | Giant Musketeer Fundamentals | A slower return to Giant |
| Your Hog Rider is well leveled | Hog Valkyrie Control | Buildings that keep pulling Hog |
| You own Royal Giant and Hunter | Royal Giant Hunter Cage | Hunter placement and Lightning cost |
| Balloon is your best win condition | Giant Skeleton Balloon | Protected anti-air and buildings |
| You enjoy pressure in both lanes | Royal Hogs Recruits | Fireball value on grouped support |
| You need a tank killer | P.E.K.K.A Battle Ram | Fast pressure after a heavy spend |
| You like patient building control | X-Bow Tesla Cycle | Overdefending a lost X-Bow |
The gallery shows cards left to right across the top row, then the bottom row. The list under each image follows that same order. Average elixir is recalculated from the eight card costs. Replacements are alternatives, not instructions to change both cards at once.
Start with a deck you can defend with
These lists make the defensive jobs plain. I would choose the one closest to the cards I already have leveled, then keep that deck unchanged long enough to learn its rotations.
Giant Musketeer Fundamentals
Start here if your card levels are fairly even and you want a plan that is easy to read during a match. It uses no Epic or Legendary.

Average elixir: 3.6
Cards and their jobs
- Giant (5 elixir): Tanks tower fire and protects surviving support during the counterattack.
- Mini P.E.K.K.A (4 elixir): Removes high-health ground attackers while a tank or building absorbs pressure.
- Musketeer (4 elixir): Supplies sustained ranged damage, especially against air threats.
- Bomber (2 elixir): Clears ground swarms; cannot help against flying attackers.
- Minions (3 elixir): Provides flying damage against air or ground targets; keep clear of splash.
- Goblin Cage (4 elixir): Pulls building-targeting attackers centrally, then releases a Brawler for cleanup.
- Fireball (4 elixir): Hits clustered support immediately; seek useful troop damage alongside the tower.
- Arrows (3 elixir): Removes vulnerable swarms over a wide area, including flying units.
Why this deck works
Giant gives surviving defenders a front line. Cage pulls the attack, Mini P.E.K.K.A removes the tough ground unit, and Musketeer stays alive long enough to turn defense into a push. Bomber and Arrows cover different kinds of swarms.
Opening and double elixir
First minute: Open with a reactive Cage or a split Minions play if you know the opponent's spell. Keep Musketeer away from your tower so Fireball cannot hit both. Do not send Giant before you know their building.
Double elixir: Place Giant ahead of the defender that survived. Add Bomber only when their ground swarm or support actually appears. Save enough elixir to stop an opposite-lane Hog.
Defense and matchups
Cage handles a building-targeting threat while Mini P.E.K.K.A handles the tank. Musketeer is your reliable sustained air answer, so protect her from cheap troops.
- Against Hog Rider, pull centrally with Cage and keep Mini P.E.K.K.A for the support or next attack. If the Cage is out of hand, Mini P.E.K.K.A must meet Hog early.
- Against Balloon, Musketeer must shoot from a protected tile. Minions can finish the job, but wait until Arrows or Zap is no longer ready.
A decision to watch: If the opponent reveals Inferno Tower, make them use it before adding a full support line. Arrows does not reset its beam, so a second lane or a delayed push may be better.
Common mistake
Giant, Musketeer and Bomber at the back together give the opponent a costly spell target and expose the other lane.
Replacements and upgrades
- Mega Minion can replace Minions if your swarm gets erased too easily. You lose fast multi-body damage.
- Tombstone can replace Cage when you need a cheaper pull. Its smaller counterpush changes your timing.
Upgrade focus: Giant, Musketeer, then Fireball and Mini P.E.K.K.A.
Hog Valkyrie Control
Choose this if your Hog is your best upgraded win condition and ground swarms keep ending your attacks.

Average elixir: 2.9
Cards and their jobs
- Hog Rider (4 elixir): Main tower attacker; punish an unavailable building or an expensive commitment.
- Valkyrie (4 elixir): Clears ground support and swarms while giving ranged defenders room to work.
- Musketeer (4 elixir): Supplies sustained ranged damage, especially against air threats.
- Skeletons (1 elixir): Distracts single-target ground attackers and speeds your rotation at low cost.
- Ice Spirit (1 elixir): Briefly freezes nearby targets after its jump, buying your defenders attack time.
- Cannon (3 elixir): Cheap central pull and ground damage; does not attack air.
- Fireball (4 elixir): Hits clustered support immediately; seek useful troop damage alongside the tower.
- Zap (2 elixir): Resets an Inferno or other interruptible target and clears fragile distractions.
Why this deck works
Valkyrie cleans crowded ground defense; Cannon and Musketeer let you defend for less than a full Hog push. The cheap cards bring Hog back while Fireball threatens support beside a tower.
Opening and double elixir
First minute: A lone Hog is a useful probe when Cannon and Musketeer are available. Split Skeletons or cycle Ice Spirit if you do not yet know their building. Save Valkyrie for real ground support.
Double elixir: Attack after a clean defense. If Valkyrie survives, Hog can run ahead while she removes small defenders. Fireball the building only when it also catches worthwhile troop or tower value.
Defense and matchups
Cannon pulls tanks and Hog. Musketeer handles air; do not spend her behind an unsupported Hog when Balloon is still in the opponent's cycle.
- Against Witch behind Giant, pull Giant with Cannon and put Valkyrie on Witch after she crosses. Keep Musketeer out of Witch splash and spell value.
- Against Balloon, place Musketeer early enough to keep shooting and use Cannon to influence its path if placement allows. Zap is a last moment reset, not your main air damage.
A decision to watch: If their building stops Hog every time, count its four-card cycle. A defense with Skeletons and Ice Spirit can bring Hog back before their building returns.
Common mistake
Playing Valkyrie on the tank while its Wizard survives is how a manageable push becomes a tower loss.
Replacements and upgrades
- Knight can replace Valkyrie for a faster cycle, but you lose ground splash and must protect Fireball for swarms.
- Tesla can replace Cannon if your air defense is thin. The extra elixir makes each Hog rotation slower.
Upgrade focus: Hog Rider and Musketeer first, then Fireball and Valkyrie.
Royal Giant Hunter Cage
Pick this when Royal Giant and Hunter are already leveled and you prefer one supported attack over constant cheap Hog probes.
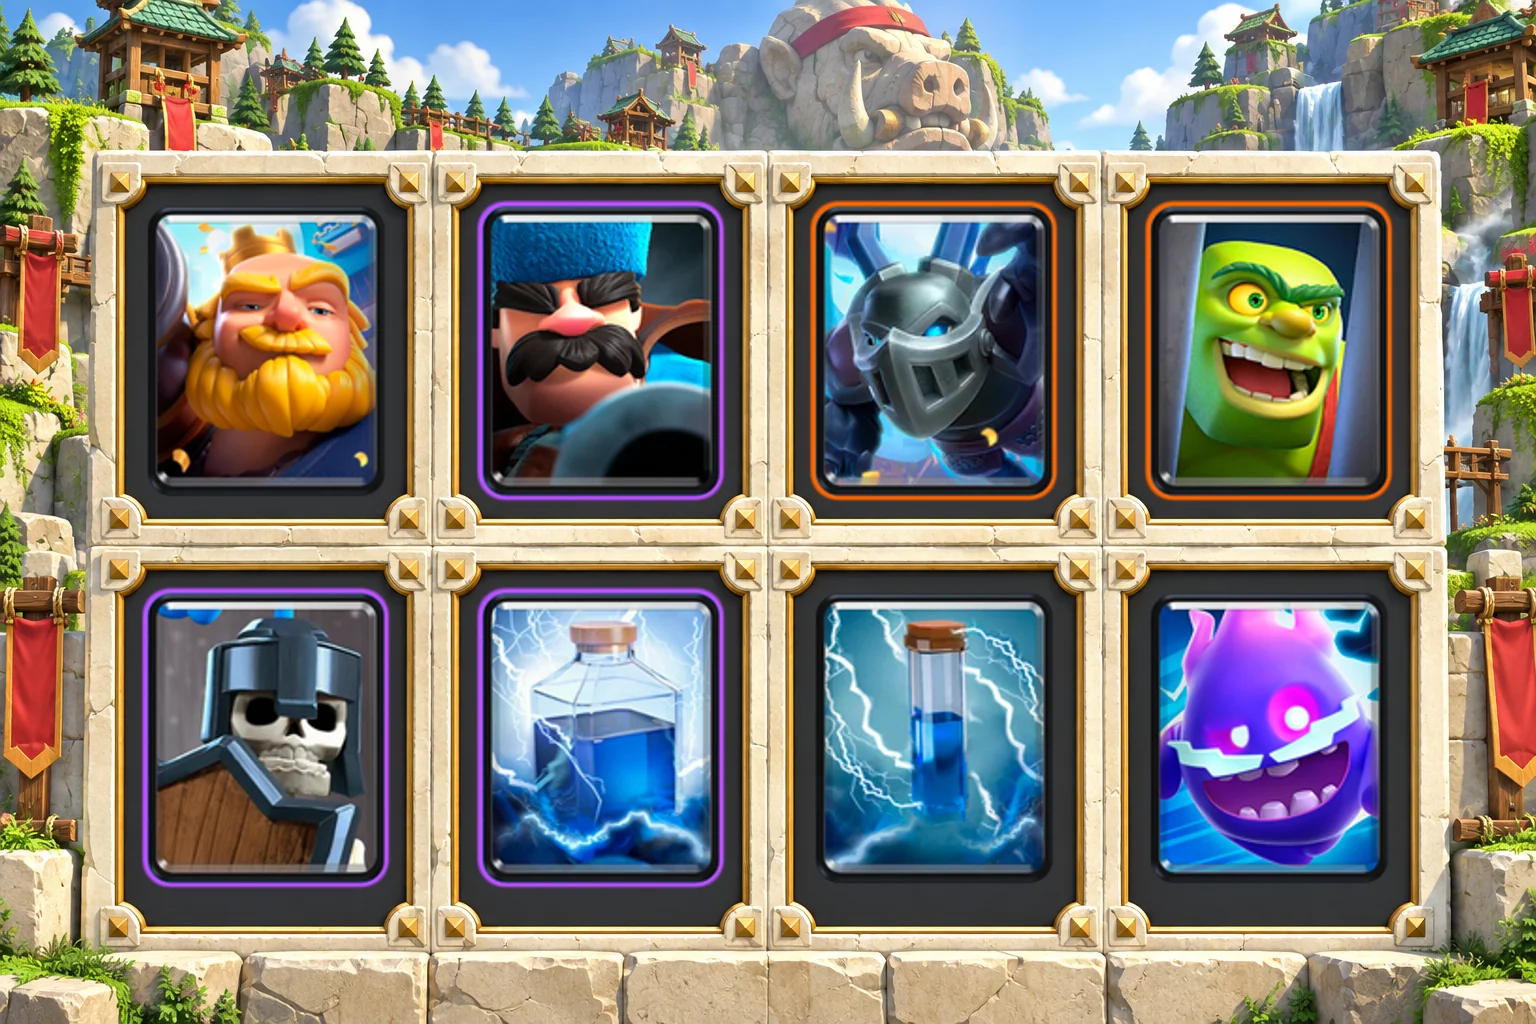
Average elixir: 3.6
Cards and their jobs
- Royal Giant (6 elixir): Ranged building attacker that turns a surviving defense into tower pressure.
- Hunter (4 elixir): Close-range burst against air or ground; shot placement strongly affects damage.
- Mega Minion (3 elixir): Provides concentrated air or ground damage from a flying defender.
- Goblin Cage (4 elixir): Pulls a win condition into the middle, then its Brawler can support a Royal Giant counterpush.
- Guards (3 elixir): Shielded ground distractions that buy time for ranged or building damage.
- Lightning (6 elixir): Heavy spell for valuable targets, especially a defensive building plus nearby support.
- Zap (2 elixir): Resets an Inferno or other interruptible target and clears fragile distractions.
- Electro Spirit (1 elixir): Chains a brief stun across nearby targets and helps cycle to a key card.
Why this deck works
Cage and Hunter make the defensive core. A surviving Hunter or Mega Minion can follow Royal Giant; Lightning removes a building and high-value defender only when both are in range.
Opening and double elixir
First minute: Wait to see their win condition. Cage in the middle can collect a Hog or Giant, while Hunter needs a close tile to land his full burst. Keep Guards ready if Prince is cycling.
Double elixir: Send Royal Giant after defense, when the opponent has committed elixir or a key counter. Add Lightning when it catches a building and support or tower, then leave Zap for a swarm or Inferno reset.
Defense and matchups
Hunter is lethal close up and less impressive at range. Mega Minion is your second air defender, while Cage buys time for either.
- Against P.E.K.K.A, use Cage to pull and Hunter on your side. Royal Giant in the other lane can punish a heavy P.E.K.K.A placed at the back, but only with enough defense left.
- Against Inferno Tower, hold Zap until the beam has ramped. If the opponent protects Inferno with troops, a Lightning that also hits the tower may be worth the cost.
A decision to watch: You do not need Lightning every attack. Watch whether the same four-elixir defender is truly stopping Royal Giant before paying six to remove it.
Common mistake
Hunter placed far behind Royal Giant loses the close-range damage you brought him for.
Replacements and upgrades
- Musketeer can replace Hunter for safer range. You lose his tank burst and should lean harder on Cage and Guards.
- Fireball can replace Lightning for a lighter cycle, but it may not remove a healthy building.
Upgrade focus: Royal Giant, Hunter and Lightning, then Cage.
Giant Double Prince
Choose this if both Princes have useful levels and you like a heavy counterattack after stopping a ground push.

Average elixir: 3.6
Cards and their jobs
- Giant (5 elixir): Tanks tower fire and protects surviving support during the counterattack.
- Prince (5 elixir): Deals focused ground damage, then threatens a charge on the counterattack.
- Dark Prince (4 elixir): Clears ground groups and shields the approach of your damage dealers.
- Mega Minion (3 elixir): Provides concentrated air or ground damage from a flying defender.
- Bats (2 elixir): Adds cheap air-targeting damage once splash and small spells are occupied.
- Fireball (4 elixir): Hits clustered support immediately; seek useful troop damage alongside the tower.
- Zap (2 elixir): Resets an Inferno or other interruptible target and clears fragile distractions.
- Goblin Cage (4 elixir): Pulls building-targeting attackers centrally, then releases a Brawler for cleanup.
Why this deck works
Prince deals concentrated damage and Dark Prince clears small ground troops. Giant takes tower fire once one of them survives. Cage buys the time that this expensive hand needs.
Opening and double elixir
First minute: Keep Giant in hand early. Try Cage to pull their attacker or Mega Minion behind your King Tower. Do not reveal Bats into an unseen small spell when air defense is thin.
Double elixir: Giant in front of a surviving Prince is the clean attack. Use Dark Prince only if ground clutter demands splash. Fireball is for support troops, not automatic tower chip.
Defense and matchups
Cage and Prince cover ground; Bats and Mega Minion cover air. A Wizard plus Arrows can erase both air defenders, so separate them.
- Against Hog Rider, Cage first and Prince only if the Hog is already hitting or their support is valuable. Giant should wait until the defense actually wins.
- Against Balloon, Mega Minion must stay on the Balloon while Bats join after their spell appears. Fireball can knock it back in an emergency, but is expensive insurance.
A decision to watch: When you have one Prince alive and six elixir, Giant may be enough. Spending the second Prince often turns a winning exchange into an exposed opposite lane.
Common mistake
Giant at the back while both Princes are in hand invites a fast attack you cannot answer cleanly.
Replacements and upgrades
- Musketeer can replace Bats for a safer air defender. The deck becomes heavier and slower to recover.
- Arrows can replace Zap if Minion Horde is common, but you lose an instant Inferno reset.
Upgrade focus: Giant and Prince, then Dark Prince and Fireball.
Giant Skeleton Balloon
Choose this if Balloon is your strongest win condition and you want Giant Skeleton to make ground counterpushes awkward.

Average elixir: 3.4
Cards and their jobs
- Balloon (5 elixir): Main air win condition; needs enough protection to reach a building or tower.
- Giant Skeleton (6 elixir): Anchors ground defense and threatens nearby troops with its death bomb.
- Musketeer (4 elixir): Supplies sustained ranged damage, especially against air threats.
- Ice Golem (2 elixir): Draws troops away and tanks briefly; its death effect slows nearby enemies.
- Bats (2 elixir): Adds cheap air-targeting damage once splash and small spells are occupied.
- Bomb Tower (4 elixir): Pulls attackers and damages ground groups; needs troops to deal with air.
- Giant Snowball (2 elixir): Knocks back eligible targets and slows them, buying space for attack or defense.
- Barbarian Barrel (2 elixir): Clears fragile ground troops along its path and leaves a Barbarian to distract.
Why this deck works
Bomb Tower and Giant Skeleton slow the opponent before Balloon ever crosses the bridge. Ice Golem can tank for Balloon, while Snowball can move or delay one defender at the exact moment Balloon approaches.
Opening and double elixir
First minute: Split Bats only after seeing their small spell. Use Bomb Tower for the first ground win condition and place Musketeer where a spell cannot also hit your tower.
Double elixir: Once Giant Skeleton survives, Balloon can go behind it. Otherwise try Ice Golem plus Balloon only when their air answer is out of hand. Hold Snowball until a defender starts shooting.
Defense and matchups
Musketeer supplies sustained air damage and Bats help only while they survive. Giant Skeleton's bomb threatens grouped ground troops, not a distant Balloon defender.
- Against Hog Rider, Bomb Tower pulls and Giant Skeleton can meet supporting troops. Avoid using both unless the support makes the extra cost worthwhile.
- Against Minion Horde, keep Snowball for a timing window and Musketeer for cleanup; do not depend on Snowball to kill a healthy Horde outright.
A decision to watch: If their building stays in cycle, an unsupported Balloon is a probe. Make a positive defensive trade before committing Giant Skeleton and Balloon together.
Common mistake
Eleven elixir of Giant Skeleton and Balloon from an empty board can cost you the other lane.
Replacements and upgrades
- Knight can replace Ice Golem if you need a stronger ground fighter. The cycle gets heavier and the kite changes.
- Arrows can replace Barbarian Barrel when air swarms dominate, but you lose its ground body.
Upgrade focus: Balloon and Musketeer first, then Giant Skeleton and Snowball.
Royal Hogs Recruits
Use this when you can defend both lanes and want the opponent to make two defensive decisions at once.

Average elixir: 4.1
Cards and their jobs
- Royal Hogs (5 elixir): Four building-targeting attackers that can divide pressure between the lanes.
- Royal Recruits (7 elixir): Shielded ground defense that can cover and counterattack in both lanes.
- Flying Machine (4 elixir): Long-range flying support; keep it away from shared spell value.
- Zappies (4 elixir): Repeated stuns and ranged support that can be split across lanes.
- Goblin Cage (4 elixir): Pulls building-targeting attackers centrally, then releases a Brawler for cleanup.
- Fireball (4 elixir): Hits clustered support immediately; seek useful troop damage alongside the tower.
- Arrows (3 elixir): Removes vulnerable swarms over a wide area, including flying units.
- Barbarian Barrel (2 elixir): Clears fragile ground troops along its path and leaves a Barbarian to distract.
Why this deck works
Recruits split naturally. Flying Machine and Zappies support from distance while Cage stalls a single strong threat. Royal Hogs turn a defended lane into pressure without requiring every support card at once.
Opening and double elixir
First minute: Start with Cage or a cautious Flying Machine from safety. A seven-elixir Recruit start is only sensible if you know the opponent cannot punish the opposite lane.
Double elixir: Split Hogs if one lane has a building or splash defender. Support the weaker defensive lane with Flying Machine and keep Fireball for a defender that matters.
Defense and matchups
Cage pulls central threats; Recruits absorb ground attacks across both lanes. Zappies interrupt but lose value when grouped into one spell.
- Against P.E.K.K.A, spread Recruits so one swing cannot clear the defense and pressure the other lane with Hogs after she commits.
- Against Balloon, Flying Machine and Zappies need separation. Cage can buy a moment, but neither Recruits nor Hogs shoots air.
A decision to watch: Watch their Fireball. If it removes Flying Machine, do not also place Zappies into the same line on the next defense.
Common mistake
Putting Recruits, Zappies and Flying Machine together hands one spell the whole push.
Replacements and upgrades
- Musketeer can replace Flying Machine for a sturdier air targeter, but cannot float over the river.
- Zap can replace Barbarian Barrel for an air reset, but you lose the ground body and knockback pattern.
Upgrade focus: Royal Hogs, Flying Machine and Fireball before upgrading every Recruit.
Golem Baby Dragon
Choose Golem only if it is already a serious part of your collection. This is a patient build that can defend before investing eight elixir.
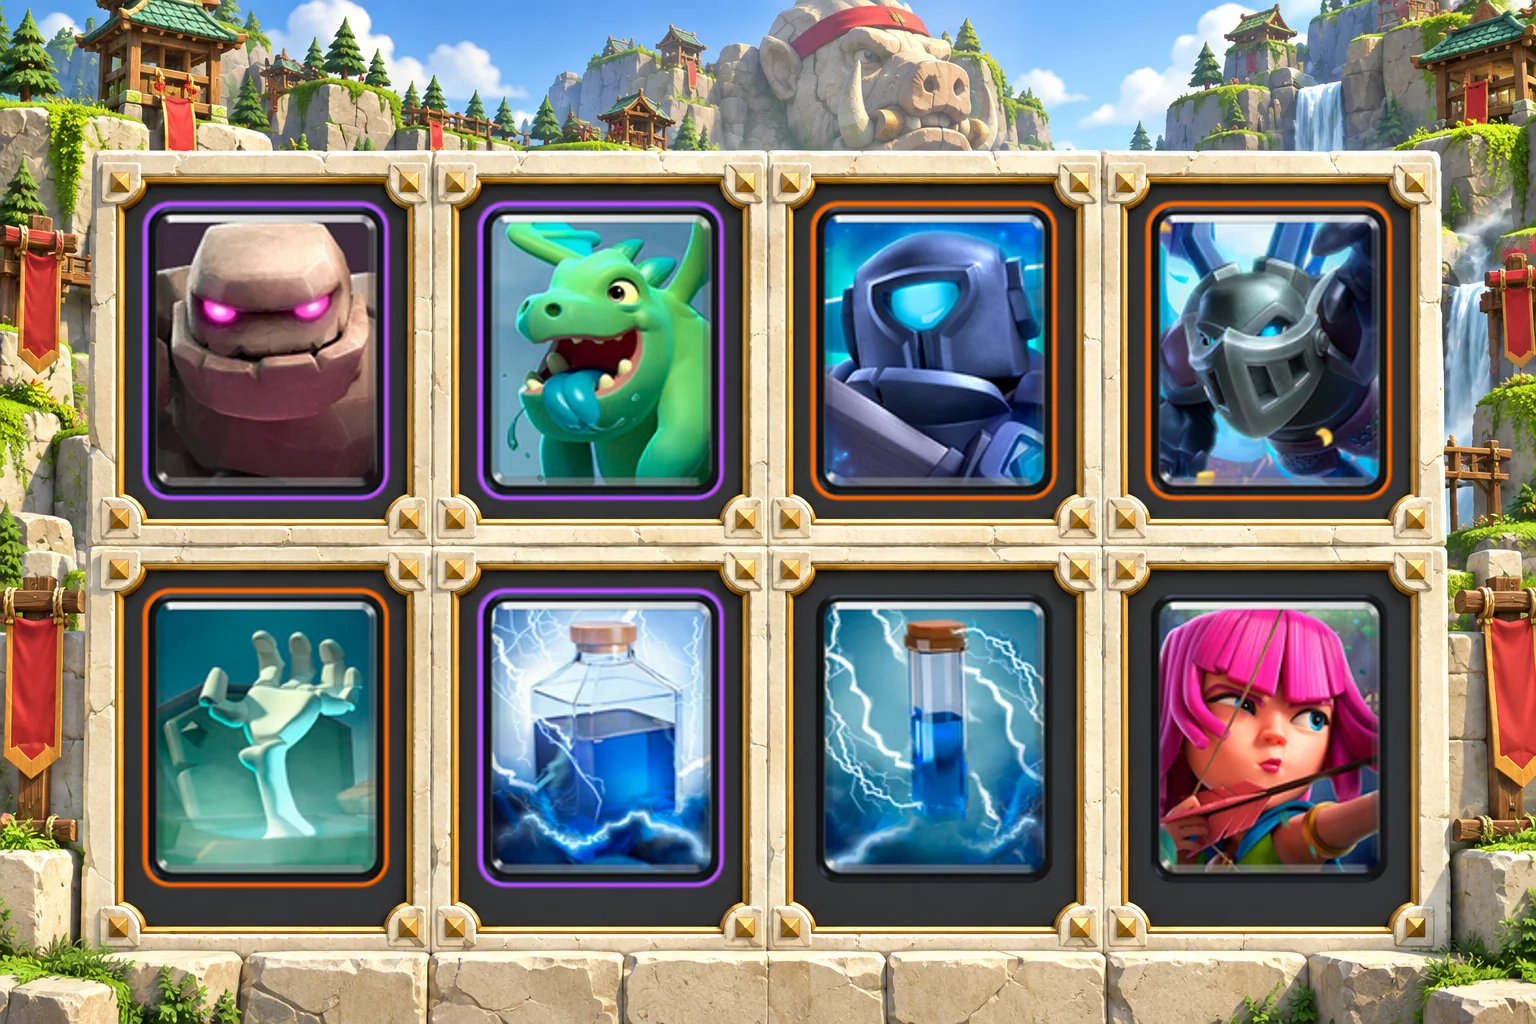
Average elixir: 4.1
Cards and their jobs
- Golem (8 elixir): Expensive primary tank; keep enough elixir to support him and defend the other lane.
- Baby Dragon (4 elixir): Clears groups with flying splash damage against air and ground.
- Mini P.E.K.K.A (4 elixir): Removes high-health ground attackers while a tank or building absorbs pressure.
- Mega Minion (3 elixir): Provides concentrated air or ground damage from a flying defender.
- Tombstone (3 elixir): Pulls building-targeting units and supplies Skeleton distractions on the ground.
- Lightning (6 elixir): Heavy spell for valuable targets, especially a defensive building plus nearby support.
- Zap (2 elixir): Resets an Inferno or other interruptible target and clears fragile distractions.
- Archers (3 elixir): Provides two ranged air defenders that can split to cover separate lanes.
Why this deck works
Tombstone pulls; Mini P.E.K.K.A removes the tank; Archers and Mega Minion protect the air. Baby Dragon clears swarms so Golem's support stays alive. Lightning solves a specific building or ranged defender.
Opening and double elixir
First minute: Open with split Archers or a reactive Tombstone. A Golem behind the King Tower before identifying their win condition is a big invitation to opposite-lane pressure.
Double elixir: Build Golem from the back when elixir is building and the opponent has committed. Add one support troop at a time; Lightning should hit a building plus valuable support, not just tower.
Defense and matchups
Mini P.E.K.K.A is your emergency ground damage. Keep Archers and Mega Minion apart so Fireball cannot remove both air answers.
- Against Hog Rider, Tombstone pulls and Mini P.E.K.K.A finishes. If both were spent, do not start Golem before they cycle back.
- Against Inferno Tower, Zap resets the beam after it ramps. If the Inferno is protected, Lightning becomes useful only when it also clips support or tower.
A decision to watch: When the opponent spends a heavy card in back, decide whether to defend it or race opposite lane. Your hand and tower health decide, not the Golem icon.
Common mistake
Golem plus Baby Dragon plus Lightning before a defense leaves almost no elixir for a surprise Balloon.
Replacements and upgrades
- Musketeer can replace Archers for stronger focused air damage. The cycle gets one elixir heavier.
- Fireball can replace Lightning for lower cost, but does less to a healthy building.
Upgrade focus: Golem, Baby Dragon and Lightning, while keeping Mini P.E.K.K.A playable.
Choose Hog for quick attacks or Giant for a counterpush
A faster deck buys more chances to attack, but it also asks for precise defense. Find the card you cannot afford to cycle away before sending your win condition.
Hog Tesla Cycle
Pick this if you enjoy quick rotations and can place Tesla reliably. It is more precise than the Valkyrie list.

Average elixir: 2.8
Cards and their jobs
- Hog Rider (4 elixir): Main tower attacker; punish an unavailable building or an expensive commitment.
- Knight (3 elixir): Durable ground blocker that protects fragile defenders and can tank a counterattack.
- Archers (3 elixir): Provides two ranged air defenders that can split to cover separate lanes.
- Skeletons (1 elixir): Distracts single-target ground attackers and speeds your rotation at low cost.
- Ice Spirit (1 elixir): Briefly freezes nearby targets after its jump, buying your defenders attack time.
- Tesla (4 elixir): Pulls attackers and supplies building damage against both air and ground.
- Fireball (4 elixir): Hits clustered support immediately; seek useful troop damage alongside the tower.
- Zap (2 elixir): Resets an Inferno or other interruptible target and clears fragile distractions.
Why this deck works
Tesla covers air and ground, Knight blocks support, Archers split to protect both lanes. Skeletons and Ice Spirit rotate back to Hog without forcing a large attack.
Opening and double elixir
First minute: Split Archers or cycle Ice Spirit first. Keep Tesla ready until you know their win condition. A lone Hog tells you which building or troop they rely on.
Double elixir: Defend cheaply and send Hog as soon as their best answer is out of hand. Fireball can clear support beside the tower, but do not spell an empty tower by habit.
Defense and matchups
Tesla is not enough alone against every heavy push; Knight stalls while Archers fire. Air defense depends on Tesla plus Archers staying spaced.
- Against Giant, Tesla pulls centrally and Knight meets support. Skeletons distract a Mini P.E.K.K.A only after splash has been removed.
- Against Balloon, Tesla should activate with enough time to shoot. Split Archers outside a single Fireball line and keep Zap for a reset or final hit.
A decision to watch: If their building comes back before your Hog, use Skeletons and Ice Spirit only when those cards still have a clear defensive job.
Common mistake
Burning Tesla for cycle can leave no answer to the next Balloon or Hog.
Replacements and upgrades
- Cannon can replace Tesla for a cheaper ground pull, but Archers become your only substantial air defense.
- Valkyrie can replace Knight against swarms, with a slower rotation.
Upgrade focus: Hog Rider, Tesla and Archers, then Fireball.
Hog Hunter Control
Use this when a leveled Hunter gives your Hog deck a close-range answer to tanks and Balloon.

Average elixir: 3.1
Cards and their jobs
- Hog Rider (4 elixir): Main tower attacker; punish an unavailable building or an expensive commitment.
- Hunter (4 elixir): Close-range burst against air or ground; shot placement strongly affects damage.
- Valkyrie (4 elixir): Clears ground support and swarms while giving ranged defenders room to work.
- Bats (2 elixir): Adds cheap air-targeting damage once splash and small spells are occupied.
- Tesla (4 elixir): Pulls attackers and supplies building damage against both air and ground.
- Fireball (4 elixir): Hits clustered support immediately; seek useful troop damage alongside the tower.
- Giant Snowball (2 elixir): Knocks back eligible targets and slows them, buying space for attack or defense.
- Ice Spirit (1 elixir): Briefly freezes nearby targets after its jump, buying your defenders attack time.
Why this deck works
Hunter deals huge damage at short range, Tesla draws building-targeting units, and Valkyrie cleans ground support. Snowball can shift a defender just long enough for Hog to connect.
Opening and double elixir
First minute: Open with Ice Spirit or a simple Hog probe. Keep Hunter in hand until you know whether the opponent has Balloon, Giant or another high-health threat.
Double elixir: After a defended push, play Hog into the lane with your surviving Hunter or Valkyrie. Snowball a defender only when the displacement creates a hit; otherwise save it.
Defense and matchups
Hunter needs the right tile. Bats are the second air answer but vanish to a small spell; Tesla gives you time to position both.
- Against Balloon, pull with Tesla and drop Hunter close enough to land all pellets. Snowball buys a final shot if Balloon is about to reach tower.
- Against P.E.K.K.A, Tesla changes her path while Hunter fires from your side. Valkyrie belongs on support, not on P.E.K.K.A herself.
A decision to watch: If Hunter survives with half health, protect him only if a Hog counterpush is affordable. A forced Fireball defense may be better than escorting him.
Common mistake
A distant Hunter placed like Musketeer wastes the reason to use this deck.
Replacements and upgrades
- Musketeer can replace Hunter for safer range, but the tank burst falls and Bats become more important.
- Zap can replace Snowball for reset value, losing the displacement that sometimes buys a Hog hit.
Upgrade focus: Hog Rider, Hunter and Tesla.
Hog Mortar Split Pressure
Choose this only if both Hog and Mortar are already upgraded and you are comfortable switching between a Hog attack and a Mortar lock.

Average elixir: 3.1
Cards and their jobs
- Hog Rider (4 elixir): Main tower attacker; punish an unavailable building or an expensive commitment.
- Mortar (4 elixir): Can pull on defense or threaten tower damage after the opponent commits to stopping Hog.
- Musketeer (4 elixir): Supplies sustained ranged damage, especially against air threats.
- Knight (3 elixir): Durable ground blocker that protects fragile defenders and can tank a counterattack.
- Spear Goblins (2 elixir): Cheap ranged air coverage and cycle; separate them from other fragile defenders.
- Fireball (4 elixir): Hits clustered support immediately; seek useful troop damage alongside the tower.
- Arrows (3 elixir): Removes vulnerable swarms over a wide area, including flying units.
- Ice Spirit (1 elixir): Briefly freezes nearby targets after its jump, buying your defenders attack time.
Why this deck works
Hog provides quick tower pressure; Mortar can force a response or serve as a defensive pull. Knight protects Musketeer on defense, while Spear Goblins and Ice Spirit add cheap damage or delay and help return to the next attack.
Opening and double elixir
First minute: Start with a defensive Mortar only when it answers a real threat. A lone Hog tests their building; split Spear Goblins if you need a low-commitment move.
Double elixir: When their building stops Hog, a Mortar in the other lane can punish the same defensive card being out of cycle. Do not assume both win conditions need to be played together.
Defense and matchups
Musketeer and Spear Goblins cover air but are vulnerable to spells. Knight buys time for Mortar to lock or for Musketeer to finish a defender.
- Against Giant, defensive Mortar can pull while Knight engages support. Keep Musketeer far from the spell line.
- Against Balloon, Musketeer must start early and Spear Goblins join after the small spell appears. Mortar cannot target air.
A decision to watch: If the opponent overspends on Mortar, Hog opposite lane is usually cleaner than adding all your defenders behind Mortar.
Common mistake
Offensive Mortar plus Hog with no defensive reserve can lose to one counterattack.
Replacements and upgrades
- Cannon can replace Mortar if you want a simpler defensive plan. This becomes a more ordinary Hog deck.
- Zap can replace Arrows for faster reset, but Minion Horde becomes harder to clear.
Upgrade focus: Hog Rider and Musketeer first; level Mortar only if you actually use its second win condition.
Giant Witch Support
Choose this when Witch is one of your stronger cards and you can resist stacking every support troop behind Giant.
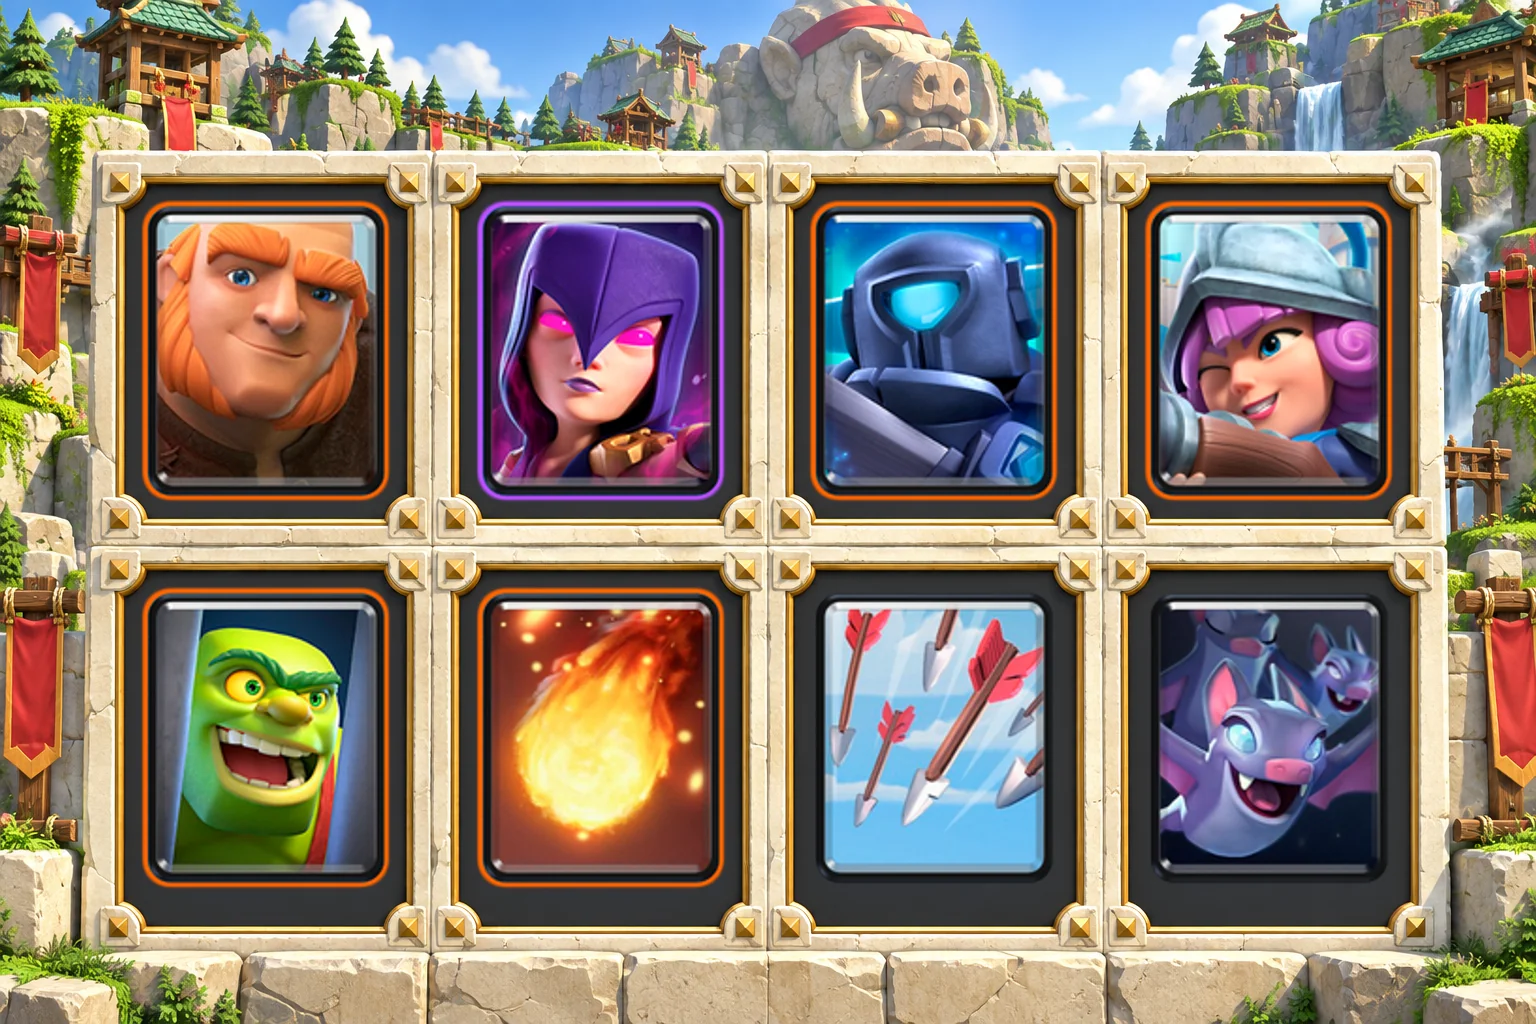
Average elixir: 3.9
Cards and their jobs
- Giant (5 elixir): Tanks tower fire and protects surviving support during the counterattack.
- Witch (5 elixir): Builds Skeleton support and adds ranged splash; protect the expensive investment.
- Mini P.E.K.K.A (4 elixir): Removes high-health ground attackers while a tank or building absorbs pressure.
- Musketeer (4 elixir): Supplies sustained ranged damage, especially against air threats.
- Goblin Cage (4 elixir): Pulls building-targeting attackers centrally, then releases a Brawler for cleanup.
- Fireball (4 elixir): Hits clustered support immediately; seek useful troop damage alongside the tower.
- Arrows (3 elixir): Removes vulnerable swarms over a wide area, including flying units.
- Bats (2 elixir): Adds cheap air-targeting damage once splash and small spells are occupied.
Why this deck works
Witch's skeletons distract single-target defenders while Giant tanks. Mini P.E.K.K.A and Cage provide separate ground answers, and Musketeer keeps the deck from collapsing to air pressure.
Opening and double elixir
First minute: Hold Witch until the opponent shows their spell or ground push. Cage can pull a fast win condition. Bats are a safe early cycle only after you know whether Zap is ready.
Double elixir: Place Giant ahead of a surviving Witch or Musketeer. Fireball the defender that matters, and let the skeletons force awkward targeting without adding every card to the lane.
Defense and matchups
The deck has good ground defense but Witch and Musketeer can both be clipped by the same Fireball. Keep their tiles separated.
- Against P.E.K.K.A, Cage pulls her into the middle and Witch's skeletons distract only if splash support is gone. Mini P.E.K.K.A is for their back line or a second attacker.
- Against Balloon, Musketeer must be kept alive. Bats can help after their small spell is committed, while Arrows clears accompanying Minions.
A decision to watch: If Witch survives after defense, Giant in front is enough to threaten. You can save Mini P.E.K.K.A for the inevitable ground counter.
Common mistake
A blind Witch behind Giant can feed one Valkyrie, Wizard or Poison and leave you down ten elixir.
Replacements and upgrades
- Bomber can replace Witch for cheaper splash. You lose the skeleton distraction and much of the counterpush.
- Tesla can replace Cage if air pressure demands it, but Cage's brawler counterattack disappears.
Upgrade focus: Giant, Musketeer and Witch, with Fireball close behind.
Giant Hunter Zappies
Try this if you have Hunter and Zappies leveled and need more stopping power than the basic Giant list.

Average elixir: 3.6
Cards and their jobs
- Giant (5 elixir): Tanks tower fire and protects surviving support during the counterattack.
- Dark Prince (4 elixir): Clears ground groups and shields the approach of your damage dealers.
- Hunter (4 elixir): Close-range burst against air or ground; shot placement strongly affects damage.
- Zappies (4 elixir): Repeated stuns and ranged support that can be split across lanes.
- Goblin Cage (4 elixir): Pulls building-targeting attackers centrally, then releases a Brawler for cleanup.
- Fireball (4 elixir): Hits clustered support immediately; seek useful troop damage alongside the tower.
- Zap (2 elixir): Resets an Inferno or other interruptible target and clears fragile distractions.
- Bats (2 elixir): Adds cheap air-targeting damage once splash and small spells are occupied.
Why this deck works
Cage pulls, Hunter removes the bulky attacker close up, and Zappies interrupt the support. Dark Prince keeps small troops off Giant so the surviving defense can cross the river.
Opening and double elixir
First minute: Start with Cage or split Zappies only if you can still cover both lanes. Keep Hunter for the first big threat rather than cycling him far behind your tower.
Double elixir: Giant goes in front of the survivor. Add Dark Prince when the opponent relies on a ground swarm; Fireball should hit support and tower together when practical.
Defense and matchups
Hunter and Bats cover air, but the Bats die to a small spell. Zappies are not a substitute for sustained air damage against Balloon.
- Against Royal Giant, Cage pulls and Hunter gets close to it on your side. Avoid playing Zappies where a Fireball also hits tower.
- Against Balloon, Hunter must meet it close and Bats join after spell pressure. Zap can interrupt once but cannot be the full defense.
A decision to watch: A surviving Hunter is valuable on offense only if his path lets him threaten a defender. Sometimes saving him in the middle is better.
Common mistake
Stacking Hunter and Zappies into one spell range wastes two different defensive jobs.
Replacements and upgrades
- Musketeer can replace Hunter for reliable range, trading away the close tank burst.
- Arrows can replace Zap for Minion Horde, but remove your fast reset against Inferno.
Upgrade focus: Giant, Hunter and Dark Prince, then Fireball.
Giant Balloon Double Threat
Choose this when Giant and Balloon are both well leveled. It asks for careful elixir counts because its attack can be expensive.

Average elixir: 3.4
Cards and their jobs
- Giant (5 elixir): Tanks for Balloon only when the elixir and the opponent’s air defense make that attack safe.
- Balloon (5 elixir): Main air win condition; needs enough protection to reach a building or tower.
- Musketeer (4 elixir): Supplies sustained ranged damage, especially against air threats.
- Minions (3 elixir): Provides flying damage against air or ground targets; keep clear of splash.
- Tombstone (3 elixir): Pulls building-targeting units and supplies Skeleton distractions on the ground.
- Arrows (3 elixir): Removes vulnerable swarms over a wide area, including flying units.
- Giant Snowball (2 elixir): Knocks back eligible targets and slows them, buying space for attack or defense.
- Zap (2 elixir): Resets an Inferno or other interruptible target and clears fragile distractions.
Why this deck works
Giant can tank for Balloon, but Balloon also threatens alone after a positive defense. Tombstone buys time and Musketeer gives you a dependable air defender.
Opening and double elixir
First minute: Tombstone on a real attacker or a Musketeer from a protected spot is safer than opening Giant. Learn whether they hold a building before pairing the two win conditions.
Double elixir: Giant plus Balloon works when the opponent spent their air defense or you have a surviving Musketeer. Snowball can move one defender at the decisive moment.
Defense and matchups
Musketeer and Minions are your only air damage. Keep them apart, and let Tombstone pull ground pressure rather than spending Giant defensively by default.
- Against Inferno Tower, Zap after the beam ramps, then use Arrows if small troops are surrounding the push. If Inferno stays protected, pressure with Balloon on a different cycle.
- Against Hog Rider, Tombstone pulls. Musketeer should target supporting air or ranged troops while Minions stay out of splash.
A decision to watch: If the opponent has a strong building and anti-air, send one win condition to reveal the answer. Paying nine elixir before seeing it is wasteful.
Common mistake
Adding Giant, Balloon and both spells to an empty board leaves no response to a counterattack.
Replacements and upgrades
- Baby Dragon can replace Minions for splash and sturdiness, but loses fast single-target air damage.
- Fireball can replace Arrows when Wizard is the recurring problem, though air swarms become harder.
Upgrade focus: Balloon and Musketeer, then Giant and the spell that clears your main counter.
Balloon Freeze Counterpush
Use this as a specialist list when Balloon is leveled and you can wait for a real Freeze opportunity.

Average elixir: 3.3
Cards and their jobs
- Balloon (5 elixir): Main air win condition; needs enough protection to reach a building or tower.
- Baby Dragon (4 elixir): Clears groups with flying splash damage against air and ground.
- Ice Golem (2 elixir): Draws troops away and tanks briefly; its death effect slows nearby enemies.
- Musketeer (4 elixir): Supplies sustained ranged damage, especially against air threats.
- Tombstone (3 elixir): Pulls building-targeting units and supplies Skeleton distractions on the ground.
- Freeze (4 elixir): Temporarily stops affected defenders; does not remove them for the counterpush.
- Giant Snowball (2 elixir): Knocks back eligible targets and slows them, buying space for attack or defense.
- Barbarian Barrel (2 elixir): Clears fragile ground troops along its path and leaves a Barbarian to distract.
Why this deck works
Tombstone and Musketeer handle the ordinary defense. Ice Golem draws fire for Balloon; Baby Dragon clears small troops. Freeze is a finishing tool for a committed defender, not the reason to attack blindly.
Opening and double elixir
First minute: Play Tombstone reactively and keep Freeze hidden. Keep your air defenders far enough apart that one spell cannot hit both. A lone Baby Dragon from the back is fine only if you can answer a fast win condition.
Double elixir: Attack behind a surviving Baby Dragon or Musketeer. Freeze once a defender and tower are both engaged and Balloon is near enough to profit immediately.
Defense and matchups
Baby Dragon gives splash but Musketeer is the sustained air shooter. Tombstone must pull ground attackers while Ice Golem kites support.
- Against Minion Horde, Giant Snowball buys time but does not erase a healthy Horde. Use Baby Dragon in range or choose Arrows as a replacement.
- Against Inferno Tower, Freeze can stop the beam briefly, yet the building remains. Use that spell only when Balloon is about to cross its range.
A decision to watch: Watch their spell cycle. If they spent Fireball on Musketeer, a later Balloon may have room; Freeze still needs a live target.
Common mistake
Freezing a tower while Balloon is far away spends four elixir and advertises your next attack.
Replacements and upgrades
- Arrows can replace Barbarian Barrel if air swarms keep deciding games. Ground chip defense becomes weaker.
- Fireball can replace Freeze for steadier support removal and a less surprising attack.
Upgrade focus: Balloon, Musketeer, then Freeze only if you intend to keep this specialist style.
Royal Giant, Royal Hogs and bridge pressure
These decks punish a defender that was just used elsewhere. Do not upgrade three different win conditions at once just because each composition looks interesting.
Royal Giant Furnace
Choose this if Furnace is already upgraded and you enjoy building pressure while defending calmly.

Average elixir: 3.5
Cards and their jobs
- Royal Giant (6 elixir): Ranged building attacker that turns a surviving defense into tower pressure.
- Furnace (4 elixir): Produces Fire Spirits that pressure small troops and make the opponent respond; it is not a reliable Hog pull by itself.
- Hunter (4 elixir): Close-range burst against air or ground; shot placement strongly affects damage.
- Mega Minion (3 elixir): Provides concentrated air or ground damage from a flying defender.
- Knight (3 elixir): Durable ground blocker that protects fragile defenders and can tank a counterattack.
- Fireball (4 elixir): Hits clustered support immediately; seek useful troop damage alongside the tower.
- Zap (2 elixir): Resets an Inferno or other interruptible target and clears fragile distractions.
- Goblins (2 elixir): Cheap focused ground damage and distraction against an occupied attacker.
Why this deck works
Furnace forces a response over time. Knight and Hunter stop ground threats, Mega Minion handles air, and Royal Giant becomes the clear tower plan after a good exchange.
Opening and double elixir
First minute: Use Furnace where it can support defense without exposing the tower to easy spell value. A Royal Giant placed at the bridge before identifying their building is a costly test.
Double elixir: Royal Giant follows a positive defense. Fireball a defender near the tower only when that clears a meaningful obstacle; keep Zap for a swarm or beam reset.
Defense and matchups
Hunter must meet tanks closely and Mega Minion must stay alive against air. Goblins give cheap distraction but disappear to splash.
- Against Hog Rider, Furnace alone is not a dependable pull. Knight and Hunter must meet the Hog if you have no building in cycle.
- Against Balloon, Mega Minion and Hunter are your air answers. Space them and use Zap to buy one extra attack if needed.
A decision to watch: If their building answers Royal Giant, wait for it to be used on a Furnace lane or spend only after you can support the next push.
Common mistake
Playing Furnace and Royal Giant together with no elixir left makes a fast opposite-lane Hog dangerous.
Replacements and upgrades
- Goblin Cage can replace Furnace for a direct pull. You lose steady Fire Spirit pressure but gain a sturdier defense.
- Musketeer can replace Hunter for easier air range, but loses close tank burst.
Upgrade focus: Royal Giant, Hunter and Fireball, then Furnace if you keep it.
Royal Giant Lightning
Choose this when defensive buildings are consistently stopping a well-leveled Royal Giant.

Average elixir: 3.6
Cards and their jobs
- Royal Giant (6 elixir): Ranged building attacker that turns a surviving defense into tower pressure.
- Hunter (4 elixir): Close-range burst against air or ground; shot placement strongly affects damage.
- Mega Minion (3 elixir): Provides concentrated air or ground damage from a flying defender.
- Goblin Cage (4 elixir): Pulls a win condition into the middle, then its Brawler can support a Royal Giant counterpush.
- Guards (3 elixir): Shielded ground distractions that buy time for ranged or building damage.
- Lightning (6 elixir): Heavy spell for valuable targets, especially a defensive building plus nearby support.
- Giant Snowball (2 elixir): Knocks back eligible targets and slows them, buying space for attack or defense.
- Electro Spirit (1 elixir): Chains a brief stun across nearby targets and helps cycle to a key card.
Why this deck works
Cage pulls pressure to the middle and Hunter deletes close targets. Lightning is expensive, so it must remove a building or support while Royal Giant still has time to shoot.
Opening and double elixir
First minute: Start with Cage or Electro Spirit. Learn their tank and building before committing Royal Giant. Guards can absorb Prince charges while Hunter stays clear.
Double elixir: After defense, place Royal Giant and watch their building location. Lightning when it hits that building with tower or a support card; Snowball buys a shot against a loose defender.
Defense and matchups
Mega Minion and Hunter cover air but can be pulled apart. Cage helps you avoid asking Hunter to tank and shoot at once.
- Against P.E.K.K.A, Cage pulls and Guards slow her. Royal Giant opposite lane is possible only if the P.E.K.K.A commitment leaves enough elixir for defense.
- Against Inferno Tower, Lightning is the answer when it also catches valuable targets. Electro Spirit can interrupt briefly, but the building remains a threat.
A decision to watch: If Lightning only hits one cheap troop, you paid six elixir to save a push that may already be lost. Let it go and reset.
Common mistake
Prediction Lightning before the building appears is easy to punish with a different placement.
Replacements and upgrades
- Zap can replace Snowball for an immediate reset, losing its wider displacement.
- Fireball can replace Lightning for a cheaper rotation. Buildings will take more planning to beat.
Upgrade focus: Royal Giant and Hunter, then Lightning and Cage.
Royal Hogs Zappies
Try this if Recruits are underleveled but Royal Hogs and Zappies are ready.

Average elixir: 3.6
Cards and their jobs
- Royal Hogs (5 elixir): Four building-targeting attackers that can divide pressure between the lanes.
- Zappies (4 elixir): Repeated stuns and ranged support that can be split across lanes.
- Flying Machine (4 elixir): Long-range flying support; keep it away from shared spell value.
- Valkyrie (4 elixir): Clears ground support and swarms while giving ranged defenders room to work.
- Goblin Cage (4 elixir): Pulls building-targeting attackers centrally, then releases a Brawler for cleanup.
- Fireball (4 elixir): Hits clustered support immediately; seek useful troop damage alongside the tower.
- Arrows (3 elixir): Removes vulnerable swarms over a wide area, including flying units.
- Ice Spirit (1 elixir): Briefly freezes nearby targets after its jump, buying your defenders attack time.
Why this deck works
Valkyrie clears close ground troops, Cage pulls the win condition, and Flying Machine with Zappies makes a spaced defensive line. Royal Hogs punish the lane they leave weak.
Opening and double elixir
First minute: Open with Cage on demand or split Zappies. Do not place Flying Machine beside Zappies where one Fireball catches both.
Double elixir: Split Hogs against a single-lane building. Fireball their best splash defender when it also helps a tower push; keep Ice Spirit for a cheap stop.
Defense and matchups
Flying Machine and Zappies are both important air coverage. If Fireball removes one, the other must be preserved for Balloon.
- Against P.E.K.K.A, Cage changes her route and Valkyrie handles support. Hogs in the other lane punish a very heavy deployment.
- Against Balloon, Flying Machine should start shooting early while Zappies interrupt. Arrows handles swarms but not Balloon itself.
A decision to watch: When the opponent has a building, do not keep feeding all four Hogs into it. Split pressure and force a defensive choice.
Common mistake
Grouping Zappies behind Flying Machine gives a spell two of your three best defenders.
Replacements and upgrades
- Musketeer can replace Flying Machine for stronger focused damage, but loses cross-river positioning.
- Royal Recruits can replace Valkyrie for wider defense. The cycle becomes much heavier.
Upgrade focus: Royal Hogs, Flying Machine and Fireball.
P.E.K.K.A Battle Ram
Use this if P.E.K.K.A is already leveled and heavy ground attackers are the thing costing you towers.

Average elixir: 3.8
Cards and their jobs
- P.E.K.K.A (7 elixir): High-damage ground defender that can survive to lead a counterattack.
- Battle Ram (4 elixir): Building-targeting bridge pressure that releases two Barbarians after the ram breaks.
- Dark Prince (4 elixir): Clears ground groups and shields the approach of your damage dealers.
- Musketeer (4 elixir): Supplies sustained ranged damage, especially against air threats.
- Mega Minion (3 elixir): Provides concentrated air or ground damage from a flying defender.
- Poison (4 elixir): Controls a defender area over time; strongest when the opponent must stay inside it.
- Zap (2 elixir): Resets an Inferno or other interruptible target and clears fragile distractions.
- Barbarian Barrel (2 elixir): Clears fragile ground troops along its path and leaves a Barbarian to distract.
Why this deck works
P.E.K.K.A wins a defensive fight, then Battle Ram asks the opponent to spend again. Dark Prince clears ground distractions, while Musketeer and Mega Minion prevent an easy air loss.
Opening and double elixir
First minute: Begin with Battle Ram only as a small probe if your defensive hand is safe. Keep P.E.K.K.A for a real tank or Prince instead of opening her in the back.
Double elixir: After a clean defense, Ram in front of a surviving support troop is enough. Poison groups of defenders when it denies their placement and protects the push.
Defense and matchups
There is no building. P.E.K.K.A handles ground tanks while the two air shooters must remain separated from spells.
- Against Hog Rider, early P.E.K.K.A is costly; Dark Prince plus a well-placed Musketeer may be enough. Use P.E.K.K.A when the support makes her worthwhile.
- Against Balloon, Musketeer and Mega Minion must shoot without sharing one Fireball line. Zap can pause an Inferno Dragon, not replace air damage.
A decision to watch: If the opponent commits Giant in the back, P.E.K.K.A on your side is safer than racing with all eight elixir of support.
Common mistake
P.E.K.K.A behind King Tower in single elixir invites a fast opposite-lane attack.
Replacements and upgrades
- Fireball can replace Poison for immediate knockback, but loses area control.
- Giant Snowball can replace Barbarian Barrel for extra air interaction, though ground cleanup changes.
Upgrade focus: P.E.K.K.A, Battle Ram and Musketeer, then Poison.
P.E.K.K.A Hog Defense
Choose this only if Hog and P.E.K.K.A are both leveled. Hog remains the tower plan; P.E.K.K.A is a defensive answer.

Average elixir: 3.5
Cards and their jobs
- P.E.K.K.A (7 elixir): High-damage ground defender that can survive to lead a counterattack.
- Hog Rider (4 elixir): Main tower attacker; punish an unavailable building or an expensive commitment.
- Musketeer (4 elixir): Supplies sustained ranged damage, especially against air threats.
- Bats (2 elixir): Adds cheap air-targeting damage once splash and small spells are occupied.
- Goblin Cage (4 elixir): Pulls building-targeting attackers centrally, then releases a Brawler for cleanup.
- Fireball (4 elixir): Hits clustered support immediately; seek useful troop damage alongside the tower.
- Zap (2 elixir): Resets an Inferno or other interruptible target and clears fragile distractions.
- Ice Spirit (1 elixir): Briefly freezes nearby targets after its jump, buying your defenders attack time.
Why this deck works
Cage pulls, P.E.K.K.A removes bulky ground troops, and Hog punishes after the defense. Musketeer and Bats keep air coverage in a heavy hand.
Opening and double elixir
First minute: Open Hog alone if Cage and Musketeer are ready. Save P.E.K.K.A until the opponent's ground win condition justifies seven elixir.
Double elixir: Hog into the opposite lane can punish a heavy tank at the back. If P.E.K.K.A survives, Hog ahead of her forces a defender decision without adding every card.
Defense and matchups
Cage and P.E.K.K.A overlap on ground defense, so use the cheaper answer first. Musketeer is the long-range air anchor; Bats are fragile backup.
- Against Giant, pull with Cage and let P.E.K.K.A cut through it on your side. Musketeer should target air or support, not stand beside P.E.K.K.A.
- Against Balloon, Cage can delay its path only if placement works; Musketeer and Bats must provide the damage. Hold Zap for the finishing moment.
A decision to watch: Ask whether the seven-elixir defender actually wins a trade. A low-health Hog push does not justify a P.E.K.K.A behind it.
Common mistake
Using P.E.K.K.A as a second win condition at the bridge leaves no dependable tank defense.
Replacements and upgrades
- Mini P.E.K.K.A can replace P.E.K.K.A for a faster Hog shell, with less single-unit bulk.
- Tesla can replace Cage for stronger air control, at the cost of the brawler after it breaks.
Upgrade focus: Hog Rider, Musketeer, then P.E.K.K.A and Fireball.
Prince Ram Pressure
Choose this if both Princes and Battle Ram are leveled and you can defend without a building.

Average elixir: 3.5
Cards and their jobs
- Prince (5 elixir): Deals focused ground damage, then threatens a charge on the counterattack.
- Battle Ram (4 elixir): Building-targeting bridge pressure that releases two Barbarians after the ram breaks.
- Dark Prince (4 elixir): Clears ground groups and shields the approach of your damage dealers.
- Hunter (4 elixir): Close-range burst against air or ground; shot placement strongly affects damage.
- Mega Minion (3 elixir): Provides concentrated air or ground damage from a flying defender.
- Fireball (4 elixir): Hits clustered support immediately; seek useful troop damage alongside the tower.
- Barbarian Barrel (2 elixir): Clears fragile ground troops along its path and leaves a Barbarian to distract.
- Goblins (2 elixir): Cheap focused ground damage and distraction against an occupied attacker.
Why this deck works
Prince and Hunter stop single bulky targets; Dark Prince and Barrel clear small ground defenders. Battle Ram converts a surviving troop into bridge pressure.
Opening and double elixir
First minute: Split Goblins or play Mega Minion from the back, then wait. Prince at the bridge before knowing their swarm and building is an expensive guess.
Double elixir: Ram in front of a surviving Prince or Hunter makes the defense matter. Fireball the support that stops both, while preserving a unit for their counterpush.
Defense and matchups
Hunter and Mega Minion are your air answers. Prince is excellent on ground but cannot fix a Balloon that reached your tower.
- Against P.E.K.K.A, keep Prince on your side and use Goblins to distract after splash support is gone. Ram opposite lane can punish a seven-elixir commitment.
- Against Minion Horde, Fireball is the reliable answer. Do not spend it on tower chip while your Princes are about to cross.
A decision to watch: If the defender catches Ram, do not pile both Princes into the same lane. Wait for a positive trade before pressing again.
Common mistake
Prince, Dark Prince and Ram together can lose to one well-timed swarm and opposite-lane push.
Replacements and upgrades
- Musketeer can replace Hunter for safer ranged air defense, but less close tank damage.
- Goblin Cage can replace Goblins for a pull, making the deck heavier.
Upgrade focus: Prince, Battle Ram, then your air defenders.
Heavy pushes and specialist control
The final ten demand more patience or more exact timing. Pick one only if its core cards already have useful levels and you enjoy its defensive decisions.
Golem Witch Build-Up
Choose this only if Golem and Witch are already strong in your collection. It wins by defending first, then building one supported attack.

Average elixir: 4.4
Cards and their jobs
- Golem (8 elixir): Expensive primary tank that needs a funded support and defensive plan.
- Witch (5 elixir): Builds Skeleton support and adds ranged splash; protect the expensive investment.
- Baby Dragon (4 elixir): Clears groups with flying splash damage against air and ground.
- Mega Minion (3 elixir): Provides concentrated air or ground damage from a flying defender.
- Mini P.E.K.K.A (4 elixir): Removes high-health ground attackers while a tank or building absorbs pressure.
- Tombstone (3 elixir): Pulls building-targeting units and supplies Skeleton distractions on the ground.
- Lightning (6 elixir): Heavy spell for valuable targets, especially a defensive building plus nearby support.
- Zap (2 elixir): Resets an Inferno or other interruptible target and clears fragile distractions.
Why this deck works
Tombstone and Mini P.E.K.K.A buy the time for a Golem push. Witch adds skeleton distraction and Baby Dragon clears swarms, while Mega Minion handles a high-health air target.
Opening and double elixir
First minute: Start with Tombstone reactively or Mega Minion from the back. Witch may be tempting, but do not place her where Fireball can hit both her and your tower.
Double elixir: Golem in back when the opponent has spent their pressure card. Add Witch or Baby Dragon according to the defense you see. Lightning is for a building and valuable support, not routine tower chip.
Defense and matchups
Mini P.E.K.K.A is essential ground damage; Baby Dragon and Mega Minion split the air work. If all three are in a push, a fast attack can reach your tower.
- Against Hog Rider, Tombstone should pull centrally and Mini P.E.K.K.A can finish it. Keep Golem in hand until those defenses cycle back.
- Against Inferno Tower, Zap after ramp and consider Lightning only when it also hits support or tower. A protected Inferno may call for a different timing.
A decision to watch: If you cannot afford Golem plus an immediate defense, postpone the push. Double elixir helps, but eight elixir is still eight elixir.
Common mistake
Golem, Witch and Baby Dragon stacked behind one lane give Poison or Fireball enormous value.
Replacements and upgrades
- Musketeer can replace Witch for steadier air damage, but loses skeleton distraction.
- Goblin Cage can replace Tombstone for a counterpushing brawler, with one extra elixir cost.
Upgrade focus: Golem, Mini P.E.K.K.A, then Witch and Lightning.
Golem Lightning Support
Use this simpler Golem shell if Witch is low level and you need a more direct air defender.

Average elixir: 3.8
Cards and their jobs
- Golem (8 elixir): Expensive primary tank that needs a funded support and defensive plan.
- Bomber (2 elixir): Clears ground swarms; cannot help against flying attackers.
- Musketeer (4 elixir): Supplies sustained ranged damage, especially against air threats.
- Bats (2 elixir): Adds cheap air-targeting damage once splash and small spells are occupied.
- Goblin Cage (4 elixir): Pulls building-targeting attackers centrally, then releases a Brawler for cleanup.
- Lightning (6 elixir): Heavy spell for valuable targets, especially a defensive building plus nearby support.
- Arrows (3 elixir): Removes vulnerable swarms over a wide area, including flying units.
- Ice Spirit (1 elixir): Briefly freezes nearby targets after its jump, buying your defenders attack time.
Why this deck works
Cage and Musketeer form the defensive core. Bomber clears ground swarms, while Bats and Ice Spirit buy cheap time. Lightning targets the building or high-value defender that actually stops Golem.
Opening and double elixir
First minute: A reactive Cage is the calm opening. Keep Musketeer until you see their air threat; avoid cycling Bats into an unknown small spell.
Double elixir: Start Golem only after a favorable defense or a clear opponent commitment. Put Musketeer behind at a safe distance and add Bomber when ground troops arrive. Hold Lightning for a building plus support.
Defense and matchups
Musketeer is your one durable air shooter. Bats disappear to Zap or Arrows, so space them and do not sacrifice Musketeer to an early attack.
- Against Balloon, Musketeer must start early and Bats should join only after the small spell appears. Ice Spirit can buy a shot but not stop the push alone.
- Against P.E.K.K.A, Cage redirects her and Bomber works on support. A Golem placed into a healthy P.E.K.K.A without an answer is unlikely to reach tower.
A decision to watch: If you defend with Musketeer and she survives, you can build Golem in front. If she dies, keep elixir for the next defense before attacking.
Common mistake
Lightning on an empty tower while Golem is still far away makes the attack much easier to stop.
Replacements and upgrades
- Mega Minion can replace Bats for a tougher air body, at a slower cycle.
- Fireball can replace Lightning if the opponent's support is the problem rather than a durable building.
Upgrade focus: Golem and Musketeer, then Cage and Lightning.
Goblin Giant Double Prince
Pick this if Goblin Giant and both Princes are ready; the deck has a powerful ground counterattack but asks you to protect its air defense.

Average elixir: 3.8
Cards and their jobs
- Goblin Giant (6 elixir): Ground tank with carried Spear Goblins that add ranged support.
- Prince (5 elixir): Deals focused ground damage, then threatens a charge on the counterattack.
- Dark Prince (4 elixir): Clears ground groups and shields the approach of your damage dealers.
- Bats (2 elixir): Adds cheap air-targeting damage once splash and small spells are occupied.
- Mega Minion (3 elixir): Provides concentrated air or ground damage from a flying defender.
- Fireball (4 elixir): Hits clustered support immediately; seek useful troop damage alongside the tower.
- Zap (2 elixir): Resets an Inferno or other interruptible target and clears fragile distractions.
- Goblin Cage (4 elixir): Pulls building-targeting attackers centrally, then releases a Brawler for cleanup.
Why this deck works
Goblin Giant draws fire and its Spear Goblins chip support. Prince brings single-target damage and Dark Prince clears swarm. Cage delays the opposing win condition until your expensive cards can meet it.
Opening and double elixir
First minute: Use Cage or Mega Minion to start. Both Princes can defend; there is no need to commit Goblin Giant into an unknown building on the first move.
Double elixir: Put Goblin Giant in front of the Prince that survived defense. Fireball support troops and hold Zap for an Inferno beam or small swarm. Dark Prince joins only when his splash has a job.
Defense and matchups
Bats and Mega Minion are the main air defense. Fireball can remove ranged support but cannot be the only answer to Balloon.
- Against P.E.K.K.A, Cage pulls and Bats help only when splash support is gone. Goblin Giant opposite lane may punish a backline P.E.K.K.A, but preserve air defense.
- Against Balloon, Mega Minion needs a clear path and Bats join after the small spell. Zap pauses the Balloon briefly but does not supply damage.
A decision to watch: The surviving Prince decides your lane. If he is almost gone, spending six elixir on Goblin Giant may create no counterpush.
Common mistake
Goblin Giant plus both Princes behind one tank is a huge elixir commitment that loses to a fast other-lane attack.
Replacements and upgrades
- Musketeer can replace Bats for stable air damage, though the deck gets heavier.
- Arrows can replace Zap for Minion Horde, but you lose the Inferno reset.
Upgrade focus: Goblin Giant, Prince and Fireball, then Mega Minion.
Goblin Giant Hunter Zappies
Choose this if you have a strong Goblin Giant but need more reliable control than the Double Prince version.

Average elixir: 3.9
Cards and their jobs
- Goblin Giant (6 elixir): Ground tank with carried Spear Goblins that add ranged support.
- Hunter (4 elixir): Close-range burst against air or ground; shot placement strongly affects damage.
- Mini P.E.K.K.A (4 elixir): Removes high-health ground attackers while a tank or building absorbs pressure.
- Flying Machine (4 elixir): Long-range flying support; keep it away from shared spell value.
- Zappies (4 elixir): Repeated stuns and ranged support that can be split across lanes.
- Fireball (4 elixir): Hits clustered support immediately; seek useful troop damage alongside the tower.
- Arrows (3 elixir): Removes vulnerable swarms over a wide area, including flying units.
- Barbarian Barrel (2 elixir): Clears fragile ground troops along its path and leaves a Barbarian to distract.
Why this deck works
Hunter and Mini P.E.K.K.A are two ways to remove a tank. Zappies interrupt, Flying Machine shoots from range, and Goblin Giant turns surviving defense into tower pressure.
Opening and double elixir
First minute: Begin with a defensive Zappies split only when you can cover both lanes. Save Hunter for a close fight; Flying Machine from the back can show you their spell.
Double elixir: Goblin Giant in front of a surviving Flying Machine or Hunter. Fireball a defender when it also hits tower or protects your ranged support. Do not empty the hand adding Mini P.E.K.K.A.
Defense and matchups
Flying Machine and Hunter cover air differently: one from range, one close. Keeping them apart prevents one spell from removing the entire defense.
- Against Balloon, Flying Machine must start firing before it reaches the bridge and Hunter should meet it close. Arrows clears an accompanying air swarm.
- Against Giant, Mini P.E.K.K.A works on the tank while Hunter can catch support. Zappies give both time, provided they are not grouped into a spell.
A decision to watch: If their small spell is out of hand, your Goblin Giant Spear Goblins can force awkward troop placements. You still need enough elixir for the next defense.
Common mistake
Playing all three ranged defenders in one lane lets Fireball or Lightning earn too much.
Replacements and upgrades
- Musketeer can replace Flying Machine for a sturdier air shooter, but cannot attack across the river in the same way.
- Zap can replace Barbarian Barrel for a reset and air hit, but you lose the ground body.
Upgrade focus: Goblin Giant, Hunter, then Fireball and Flying Machine.
Valkyrie Goblin Barrel Bait
Choose this if you enjoy tracking the opponent's small spell. Barrel is the tower plan; Rocket is an expensive late option.
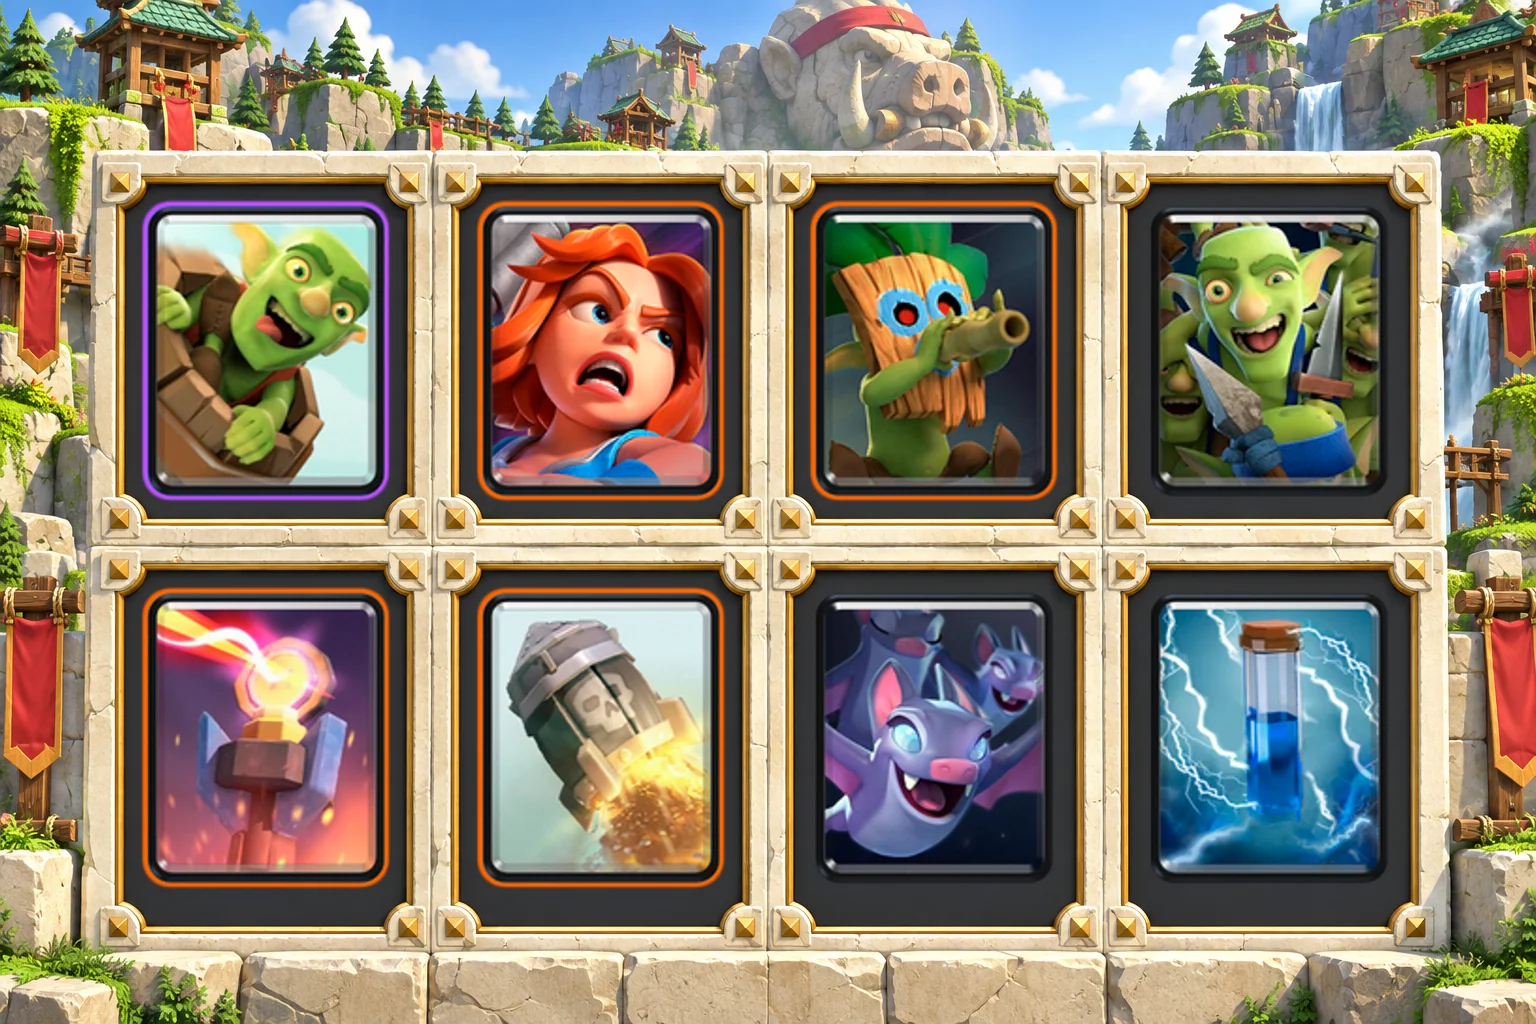
Average elixir: 3.5
Cards and their jobs
- Goblin Barrel (3 elixir): Direct tower pressure; track the opponent's reliable Barrel response.
- Valkyrie (4 elixir): Clears ground support and swarms while giving ranged defenders room to work.
- Dart Goblin (3 elixir): Fast ranged damage and pressure; an important air defender in bait-heavy hands.
- Goblin Gang (3 elixir): Combines ground distractions with Spear Goblins that can help against air.
- Inferno Tower (5 elixir): Pulls and ramps damage against high-health targets; watch for resets and distractions.
- Rocket (6 elixir): Heavy burst damage and a possible finish; verify damage before committing six elixir.
- Bats (2 elixir): Adds cheap air-targeting damage once splash and small spells are occupied.
- Zap (2 elixir): Resets an Inferno or other interruptible target and clears fragile distractions.
Why this deck works
Goblin Gang, Dart Goblin and Bats present different cheap threats. Inferno Tower handles a tank, while Valkyrie removes clustered ground troops that would overrun it.
Opening and double elixir
First minute: Send one Barrel to learn their answer, then defend. Dart Goblin from a safe tile can force a spell without risking Goblin Gang. Keep Inferno for a real tank.
Double elixir: Barrel when their reliable counter is out of hand. Rocket only when its damage matters and your defense can still survive the next attack.
Defense and matchups
Inferno Tower needs protection from reset cards; Dart Goblin and Bats are your air shooters. Once both are spent, Balloon is dangerous.
- Against Giant, Inferno Tower pulls, Valkyrie meets the support, and Goblin Gang distracts after splash is gone.
- Against Balloon, Inferno Tower can draw it, but Dart Goblin and Bats provide much of the damage. Save Zap for a final pause.
A decision to watch: Watch which spell they spend on Gang. If it is the same answer to Barrel, you have your next attack window.
Common mistake
A blind offensive Rocket can leave you down six elixir while your Inferno Tower is out of hand.
Replacements and upgrades
- Skeleton Army can replace Goblin Gang for stronger ground distraction, but removes Spear Goblin air coverage.
- Fireball can replace Rocket for a lighter deck, giving up the big finishing spell.
Upgrade focus: Goblin Barrel and Dart Goblin first, then Inferno Tower and Rocket if needed.
Double Barrel Bait
Try this if one Barrel keeps being stopped by the same small spell and you can defend with Knight and Inferno Tower.
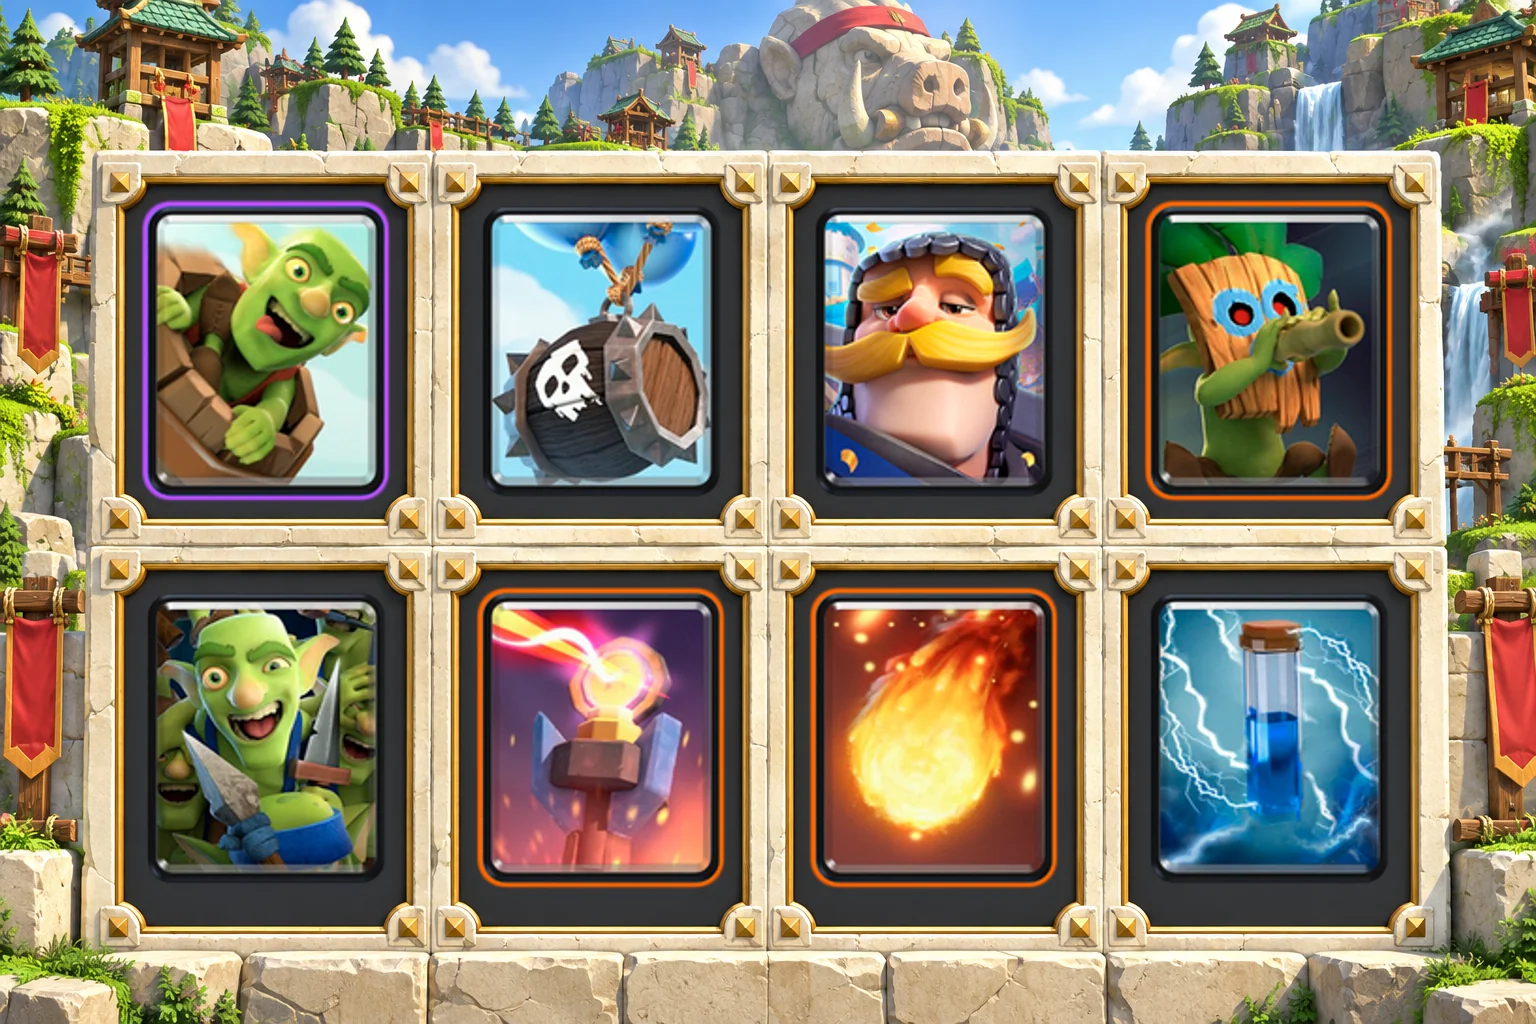
Average elixir: 3.3
Cards and their jobs
- Goblin Barrel (3 elixir): Direct tower pressure; track the opponent's reliable Barrel response.
- Skeleton Barrel (3 elixir): Forces an air response, then releases a ground swarm when the barrel breaks.
- Knight (3 elixir): Durable ground blocker that protects fragile defenders and can tank a counterattack.
- Dart Goblin (3 elixir): Fast ranged damage and pressure; an important air defender in bait-heavy hands.
- Goblin Gang (3 elixir): Combines ground distractions with Spear Goblins that can help against air.
- Inferno Tower (5 elixir): Pulls and ramps damage against high-health targets; watch for resets and distractions.
- Fireball (4 elixir): Hits clustered support immediately; seek useful troop damage alongside the tower.
- Zap (2 elixir): Resets an Inferno or other interruptible target and clears fragile distractions.
Why this deck works
Skeleton Barrel approaches from the air and Goblin Barrel lands on the tower, creating two different timing problems. Dart Goblin and Gang draw answers while Knight protects the defensive line.
Opening and double elixir
First minute: Probe with one Barrel, not both. Save Inferno Tower for their main high-health attacker and let Dart Goblin reveal how they spend their spell.
Double elixir: Alternate Barrels or pressure different lanes after a positive trade. Fireball a splash defender when it also protects the attack or tower, not as routine chip.
Defense and matchups
Dart Goblin and the Gang's Spear Goblins are thin air coverage. Inferno Tower draws Balloon, but a spell can still remove your damage.
- Against Witch support, Knight can absorb the skeletons while Fireball weakens Witch. Do not throw Gang into her splash.
- Against Hog Rider, Inferno Tower pulls if centered correctly. Knight should meet support, leaving your next Barrel ready for their low-elixir moment.
A decision to watch: The best second Barrel is often the one you did not play into their first defense. Count their small spell cycle.
Common mistake
Stacking both Barrels into one splash defender gives away the pressure advantage.
Replacements and upgrades
- Valkyrie can replace Knight if swarms dominate, slowing the cycle but improving splash.
- Arrows can replace Zap for a cleaner Minion Horde answer, losing the fast reset.
Upgrade focus: Goblin Barrel and Skeleton Barrel, then Dart Goblin and Inferno Tower.
Mortar Ground Bait
Choose Mortar when you enjoy choosing between a defensive pull and a careful offensive lock.

Average elixir: 3.0
Cards and their jobs
- Mortar (4 elixir): Ground siege threat that can also defend; respect its close-range blind spot.
- Knight (3 elixir): Durable ground blocker that protects fragile defenders and can tank a counterattack.
- Archers (3 elixir): Provides two ranged air defenders that can split to cover separate lanes.
- Goblin Gang (3 elixir): Combines ground distractions with Spear Goblins that can help against air.
- Bats (2 elixir): Adds cheap air-targeting damage once splash and small spells are occupied.
- Fireball (4 elixir): Hits clustered support immediately; seek useful troop damage alongside the tower.
- Arrows (3 elixir): Removes vulnerable swarms over a wide area, including flying units.
- Spear Goblins (2 elixir): Cheap ranged air coverage and cycle; separate them from other fragile defenders.
Why this deck works
Knight protects the Mortar; Archers and Spear Goblins keep air in check when spaced. Gang and Bats draw small spells, creating a window for the other cheap troop or Mortar.
Opening and double elixir
First minute: Split Archers or Spear Goblins early. A defensive Mortar is sensible if their win condition is already coming. Do not expose Knight and Gang to one spell line.
Double elixir: Offensive Mortar after their heavy tank is out of hand. Knight takes ground contact while Fireball removes an important defender. If the Mortar gets no lock, accept the trade and defend.
Defense and matchups
There is no building besides Mortar and no large tank killer. Use Mortar's pull and cheap distractions in the correct order.
- Against Giant, Mortar centrally pulls while Knight engages support. Archers must stay far from Wizard or Baby Dragon splash.
- Against Balloon, Archers and Spear Goblins must shoot from separate positions. Bats join after their small spell; Mortar cannot hit Balloon.
A decision to watch: If the opponent spends a lot to stop Mortar, Goblin Gang on defense can leave you enough for the next one. Do not force a lock every cycle.
Common mistake
Playing Mortar at the bridge without Knight or an air defender ready can leave you unable to stop the opponent’s counterpush.
Replacements and upgrades
- Tesla can replace Mortar if you want pure defense, but removes the second tower-pressure tool.
- Zap can replace Arrows for a faster cycle and reset, making Minion Horde harder.
Upgrade focus: Mortar, Archers and Knight before the fragile bait cards.
Mortar Skeleton Barrel
Use this if you prefer Mortar pressure but want Skeleton Barrel to punish a defender committed to the ground.

Average elixir: 3.1
Cards and their jobs
- Mortar (4 elixir): Ground siege threat that can also defend; respect its close-range blind spot.
- Skeleton Barrel (3 elixir): Forces an air response, then releases a ground swarm when the barrel breaks.
- Valkyrie (4 elixir): Clears ground support and swarms while giving ranged defenders room to work.
- Dart Goblin (3 elixir): Fast ranged damage and pressure; an important air defender in bait-heavy hands.
- Bats (2 elixir): Adds cheap air-targeting damage once splash and small spells are occupied.
- Cannon (3 elixir): Cheap central pull and ground damage; does not attack air.
- Fireball (4 elixir): Hits clustered support immediately; seek useful troop damage alongside the tower.
- Zap (2 elixir): Resets an Inferno or other interruptible target and clears fragile distractions.
Why this deck works
Mortar forces a lane answer, Skeleton Barrel forces an air answer, and Valkyrie plus Cannon give you dependable ground defense. Dart Goblin provides cheap long-range damage.
Opening and double elixir
First minute: Cannon for an incoming Hog or tank is the simple opening. A Skeleton Barrel alone reveals their small spell without committing your Mortar.
Double elixir: Mortar after a clean defense. If they place ground troops on it, Skeleton Barrel in the other lane may be stronger than adding more troops to the same fight.
Defense and matchups
Dart Goblin and Bats must handle air while Cannon buys time on ground. Fireball can remove a support troop but not replace an air shooter.
- Against P.E.K.K.A, Cannon pulls her and Valkyrie clears support. Mortar pressure only after you have contained that seven-elixir investment.
- Against Balloon, Dart Goblin and Bats need separation and Zap can buy a final shot. Cannon cannot hit the air threat.
A decision to watch: If the opponent keeps their small spell for Barrel, use Mortar to force it onto your ground pressure first.
Common mistake
Mortar plus Skeleton Barrel plus Bats at once invites one spell and leaves no defense.
Replacements and upgrades
- Archers can replace Dart Goblin for steadier air defense, losing some long-range chip.
- Goblin Cage can replace Cannon for a counterpushing brawler, at one extra elixir.
Upgrade focus: Mortar and Skeleton Barrel, then Fireball and Dart Goblin.
X-Bow Tesla Cycle
Choose this only if you want to learn positioning. X-Bow is six elixir and a defensive X-Bow is sometimes the winning play.

Average elixir: 3.0
Cards and their jobs
- X-Bow (6 elixir): Long-range ground siege win condition; also useful as a defensive structure.
- Knight (3 elixir): Durable ground blocker that protects fragile defenders and can tank a counterattack.
- Archers (3 elixir): Provides two ranged air defenders that can split to cover separate lanes.
- Skeletons (1 elixir): Distracts single-target ground attackers and speeds your rotation at low cost.
- Electro Spirit (1 elixir): Chains a brief stun across nearby targets and helps cycle to a key card.
- Tesla (4 elixir): Pulls attackers and supplies building damage against both air and ground.
- Fireball (4 elixir): Hits clustered support immediately; seek useful troop damage alongside the tower.
- Zap (2 elixir): Resets an Inferno or other interruptible target and clears fragile distractions.
Why this deck works
Tesla and Knight protect the X-Bow. Archers handle air and Skeletons buy tiny delays that matter during a lock. Fireball removes a defender when the trade is worthwhile.
Opening and double elixir
First minute: Split Archers and identify their tank before playing an offensive X-Bow. Keep Tesla for a real push; do not spend both buildings without knowing the next threat.
Double elixir: X-Bow when their tank is out of hand or you have an elixir lead. Defend the lock while it is viable, then stop feeding cards once the X-Bow is doomed.
Defense and matchups
Tesla pulls and Archers shoot air. Knight blocks ground support. A heavy tank plus spell can force you into a defensive X-Bow cycle.
- Against Giant, defensive X-Bow or Tesla can pull according to their support. Fireball the support, not the Giant itself.
- Against Balloon, Tesla and split Archers are the core. Electro Spirit and Zap each buy time, but neither deals sustained damage.
A decision to watch: Ask whether this X-Bow can reach tower before you protect it. If not, preserve Knight and Fireball for defense.
Common mistake
Feeding every cheap card into a locked-on tank wastes elixir and leaves your next hand weak.
Replacements and upgrades
- Ice Spirit can replace Electro Spirit for focused freeze, losing chain damage.
- Valkyrie can replace Knight against ground swarms, slowing the cycle.
Upgrade focus: X-Bow, Tesla and Archers, then Fireball.
X-Bow Hunter Defense
Try this if Hunter and Valkyrie are leveled but you still want X-Bow as your deliberate tower plan.

Average elixir: 3.5
Cards and their jobs
- X-Bow (6 elixir): Long-range ground siege win condition; also useful as a defensive structure.
- Hunter (4 elixir): Close-range burst against air or ground; shot placement strongly affects damage.
- Valkyrie (4 elixir): Clears ground support and swarms while giving ranged defenders room to work.
- Ice Spirit (1 elixir): Briefly freezes nearby targets after its jump, buying your defenders attack time.
- Tesla (4 elixir): Pulls attackers and supplies building damage against both air and ground.
- Giant Snowball (2 elixir): Knocks back eligible targets and slows them, buying space for attack or defense.
- Fireball (4 elixir): Hits clustered support immediately; seek useful troop damage alongside the tower.
- Archers (3 elixir): Provides two ranged air defenders that can split to cover separate lanes.
Why this deck works
Hunter is a close-range tank and Balloon answer; Valkyrie clears support, Tesla pulls, and Archers give long-range air coverage. Snowball creates a small lock window or defensive delay.
Opening and double elixir
First minute: Split Archers or cycle Ice Spirit. Keep Hunter for their bulky card before committing six elixir to X-Bow.
Double elixir: After a positive defense, set X-Bow where Hunter and Valkyrie can protect it. Fireball the ranged defender if it also protects a real lock.
Defense and matchups
Tesla and Hunter make a stronger stop than fast cycle, but the hand is heavier. Do not place Archers and Hunter into one spell.
- Against P.E.K.K.A, Tesla redirects while Hunter fires close. Valkyrie belongs on support; X-Bow waits until P.E.K.K.A is gone or out of hand.
- Against Balloon, Tesla pulls and Hunter meets it near your side while Archers shoot from safety. Snowball buys a shot if needed.
A decision to watch: If their tank repeatedly arrives before X-Bow locks, use your buildings defensively until you can force the tank out of cycle.
Common mistake
X-Bow at bridge with Hunter too far away gives the opponent an easy six-elixir trade.
Replacements and upgrades
- Knight can replace Valkyrie for a lighter rotation, losing splash.
- Zap can replace Snowball for an immediate reset, losing displacement.
Upgrade focus: X-Bow and Tesla, then Hunter and Archers.
Fix the loss pattern before switching decks
If the same push beats you three times, pause before swapping a card. Ask which part of the defense failed: the pull, the damage dealer, the support answer or the spell timing. Changing a slot only helps when the new card takes over that missing job.
- Hog Rider keeps connecting: save your central building or high-damage defender for Hog. If the building is out of cycle, count the cheap cards needed to reach it again instead of throwing every troop at the bridge.
- Balloon gets one final hit: start your air defender before Balloon is on top of the tower. Keep a second air targeter apart from the first so one spell cannot remove both. Snowball, Zap and Ice Spirit buy time but rarely replace sustained damage.
- Witch or Wizard sits behind a tank: pull the tank toward the middle, then meet support on your side with Valkyrie, Dark Prince or a spell. Placing every defender in the same splash lane is usually the expensive mistake.
- Inferno Tower stops the win condition: hold a reset until the beam ramps, or attack after the building has been used. Lightning is worthwhile when it catches a building and something valuable, not simply because it is in hand.
- Goblin Barrel keeps chipping: identify one dependable Barrel response and keep its cycle in mind. A spell spent on a low-value troop may be the opening the bait player wants.
Upgrade one working deck
Spend Gold first on the chosen win condition, then on the defender or spell whose level is losing an important interaction. Keep your air answer playable. Do not spread upgrades across Giant, Hog, Balloon and Royal Giant in the same week just because all four appear on this page.
A substitution changes more than average elixir. Knight for Valkyrie removes splash; Cannon for Tesla removes air targeting; Fireball for Lightning changes how you deal with a healthy building. Make one swap, recalculate the deck and play enough games to see whether the original problem is fixed.
Questions before you copy a deck
What is the easiest Arena 10 deck to begin with?
Giant Musketeer Fundamentals is my first recommendation when levels are comparable. Its defender roles are visible and it needs no Epic card. If your Hog and Valkyrie are far stronger, Hog Valkyrie Control may be the more practical start.
Do I need Golem, Hunter or X-Bow because they are available here?
No. A new card should solve a problem in your current deck or fit a style you want to learn. Golem asks for patient elixir management, Hunter needs close placement, and X-Bow needs careful timing. Use them when the supporting cards are ready.
Why might a copied deck look different in my game?
The links specify the eight standard cards. Card levels, Tower Troops, Evolutions, Heroes and special slots can change what you see or how a deck plays. Supercell explains that the Wild Slot unlocks at Arena 10. An Evolution or Hero form still requires the correct unlocked form and slot on your account.
Should I change decks as soon as I enter Arena 11?
Keep a working deck until a new card solves a concrete weakness. You can compare the options in the Arena 11 guide when you reach Electro Valley, but an arena change alone does not reset your upgrade plan.
Review notes
Reviewed September 26, 2026 against the arena registry and card registry. Hog Mountain is Arena 10 at 3,000 trophies. The guide uses permanent standard cards available by that arena, with one ordered eight-card list, matching image and copy link per deck. Temporary event units and later unlocks are excluded. Card availability and balance can change, so your in-game collection is the final check.
Supercell’s Cards and Decks guide explains how special slots work. These 30 decks are editorial recommendations based on card roles and practical tradeoffs. No match-history testing, measured win rate or guaranteed climb is claimed. Browse the other arena guides if your collection fits a different stage.
This is an unofficial fan guide. Clash Royale and its game assets belong to Supercell. This site is not affiliated with or endorsed by Supercell. See the Supercell Fan Content Policy.