
The best Arena 16 deck is one that keeps its defense intact when you add your first Champion. Start with Skeleton King Graveyard Control if your Graveyard support is already leveled, or Golden Knight Drill Executioner if you prefer placed pressure behind a defensive building. If neither Champion improves your collection yet, Miner Phoenix Poison keeps a clear ordinary-card defense and a smaller main attack. Read the air weakness before copying any of them.
Executioner’s Kitchen covers 5,500 to 5,999 trophies, with Royal Crypt starting at 6,000. These 30 distinct decks include 18 first-Champion choices and 12 ordinary-card alternatives. They are editorial recommendations for different collections and decisions, not a measured ranking of 30 equally easy decks. You only need to learn and upgrade the one that fits.
Choose the best Arena 16 deck for your collection
| Starting choice | Avg. | Choose it for this job |
|---|---|---|
| Skeleton King Graveyard | 3.5 | Patient defense with a separate soul-summon decision. Focused air damage is limited, and one area answer can punish crowded Skeleton waves. |
| Golden Knight Drill | 3.5 | Drill pressure behind Bomb Tower and an Executioner line. The Champion must find reachable targets without consuming the next air defense. |
| Miner Phoenix Poison | 3.0 | Ordinary cards with repeatable ground splash and flying damage. Phoenix’s egg still has to survive; rebirth is not guaranteed. |
If the first problem you notice is Balloon, replacing a ground body with Golden Knight may leave that problem untouched. If the problem is surrounding ground troops, Skeleton King’s splash or an ordinary Valkyrie may address it more directly. Start with the defensive failure you can identify, then check what you lose in the replacement.
What Golden Knight and Skeleton King change
Supercell’s Champion rules place Golden Knight and Skeleton King at Arena 16. Both cost four elixir to deploy. Golden Knight offers a conditional dash through ground targets, while Skeleton King combines ground splash with a soul-based summon. Their abilities require additional elixir, which is excluded from the average shown beside each deck.
The August balance update made these abilities single-use for each deployed Champion. Decide whether that use should protect the current defense or create pressure afterward. If more than one copy of the same Champion is active, current support says only the most recently deployed copy can use the ability. Watch its indicator and the charge shown in your game; do not build a plan around an old cooldown or an assumed three-card cycle.
The October changes shortened Golden Knight’s dash reach while changing how target edges are measured. A chain that looks attractive still needs reachable targets. The same update gave Goblin Drill a small Crown Tower arrival hit, but the Goblins still need time to attack. Neither change makes the defense irrelevant.
Executioner unlocks earlier than this arena; the name Executioner’s Kitchen does not make him mandatory. The current arena card list and card cost reference help you compare ordinary unlocks and deployment costs with your own collection. Special events or account history can affect what you personally own.
Check the eight cards after copying
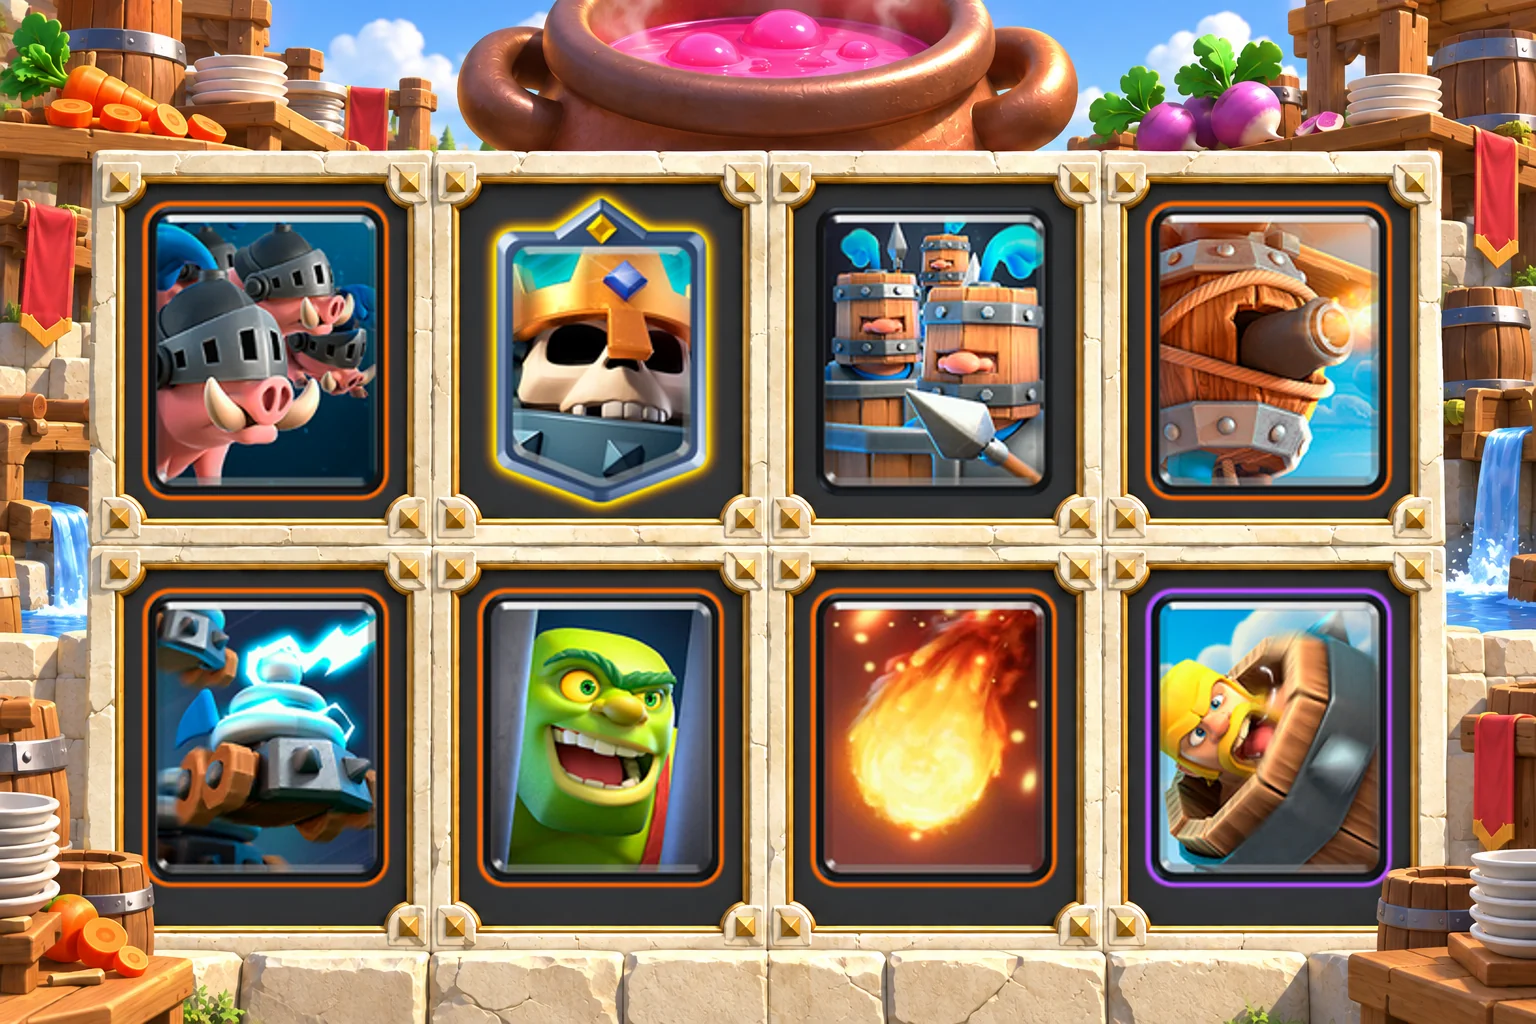
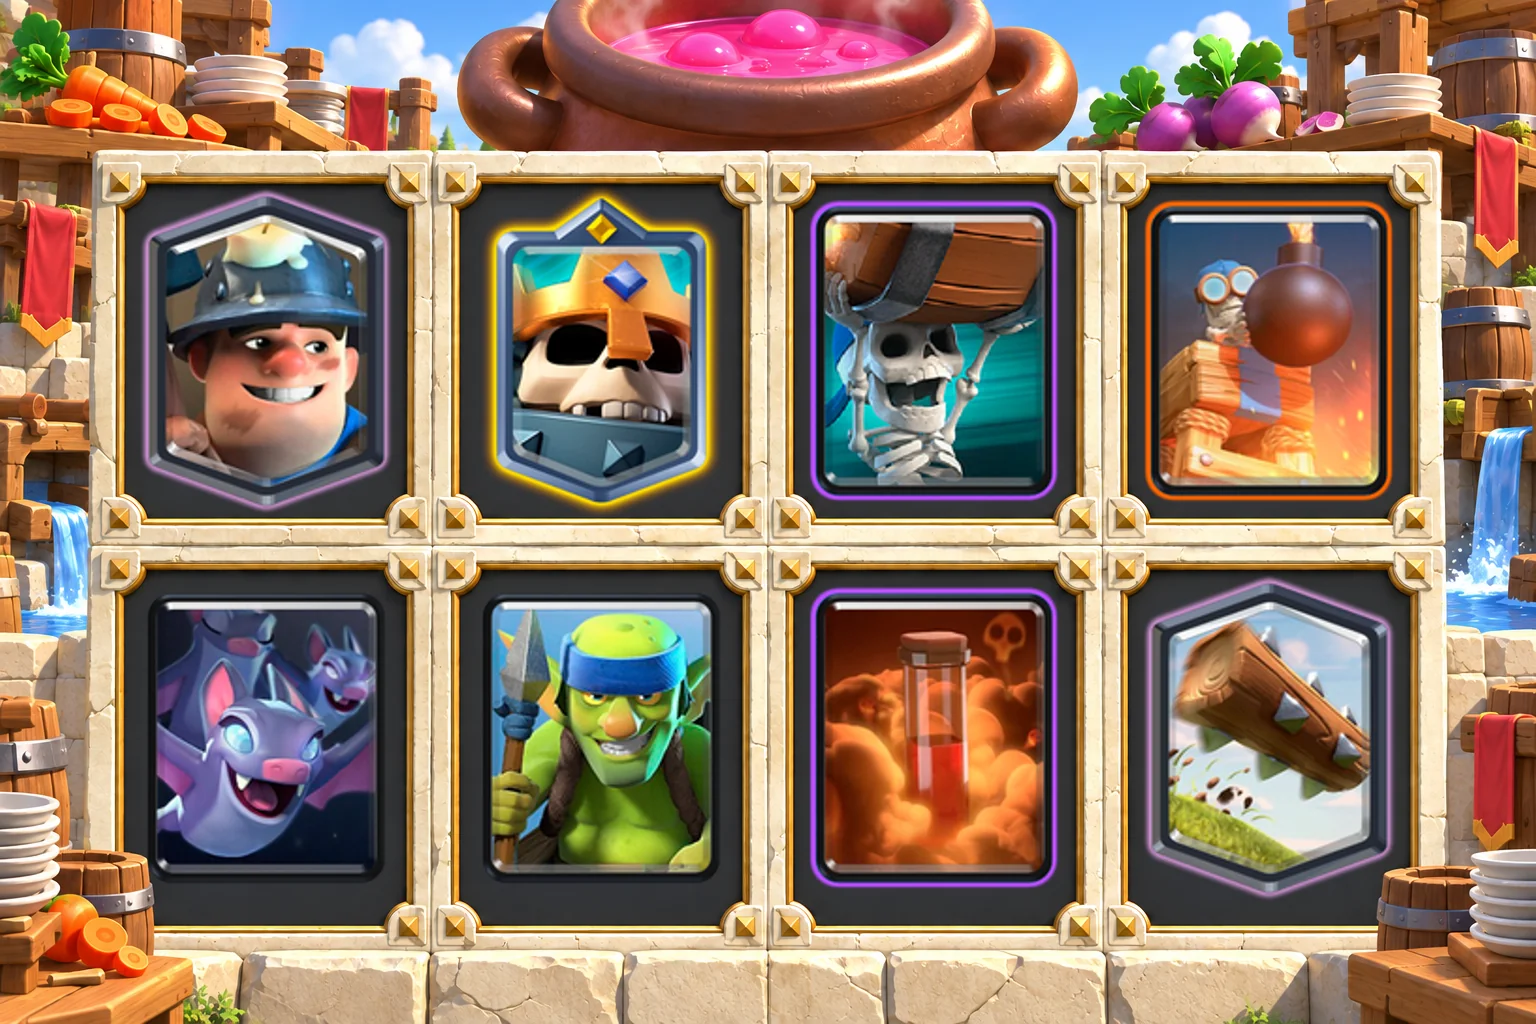
The images and card rows use the same order, read left to right across the top row and then the bottom row. Each main button carries those eight base card IDs and Tower Princess. Champion lists put the Champion in the second position. After copying, confirm the cards, levels, Tower Troop and the Champion’s Hero or Wild slot in the game before battle. The tactical advice assumes ordinary card effects, with no Evolution or separate Hero-form benefit added to a listed base card.
The Hero slot unlocks at Arena 5 and the Wild slot at Arena 10 under the current slot rules. The links follow an observed export pattern, but native import and special-form preservation have not been tested here. The two replacements beneath each profile are separate one-card alternatives; each has its own new average and tradeoff. Combining both creates another configuration that you need to assess again.
Find the Arena 16 deck decision you want to learn
Three ways to approach your first Champion
Choose the kind of defense you can repeat before choosing an ability. Graveyard, Mortar and Drill ask different questions of your reserve, air coverage and surviving ground body.
Skeleton King Graveyard Control
For a first Skeleton King owner who wants defense to fund a second Graveyard pressure option, rather than buying a separate tank every attack.

Average elixir: 3.5
Eight cards and their jobs
- Graveyard (5 elixir): Five-elixir placed Skeleton pressure that needs time from a tank, survivor or occupied defender.
- Skeleton King (4 elixir): Four-elixir ground splash body with a paid collected-soul summon; the ability needs position and surviving health.
- Baby Dragon (4 elixir): Flying splash damage against ground and air; needs time against a healthy single target.
- Ice Wizard (3 elixir): Ranged slowing air and ground support; requires other damage to remove a healthy attacker.
- Tombstone (3 elixir): Low-cost building pull with Skeleton production; buys time but does not shoot air.
- Poison (4 elixir): Area damage over time against real targets that remain in it; does not provide immediate burst or a reset.
- Tornado (3 elixir): Repositions targets for existing damage or tower safety; the pull itself is not sustained damage.
- Barbarian Barrel (2 elixir): Short ground-line clear followed by a Barbarian body; offers no air damage.
Why this version fits
Skeleton King gives the Graveyard defense a second use for the small units dying around it. That is useful only if he survives in a position where a summon matters. Tombstone shapes the approach, Ice Wizard slows it, and Baby Dragon supplies the damage across grouped targets. Unlike a cheaper Knight version, this list spends an extra elixir on the ground body before any activation. Choose it to learn that additional decision, not to put another Skeleton wave into the same ready Poison.
Opening and double elixir
Wait for a useful defense or split the opening responsibility between Tombstone and a support card. A blind Graveyard reveals little if you cannot cover the counterpush. Avoid placing Ice Wizard beside the tower and Baby Dragon where one spell catches both.
A surviving Skeleton King can occupy the tower while Graveyard attacks, but his remaining health determines whether that plan has time. Poison follows a defender that will stay in its area. The summon is another purchase to judge after that, rather than part of a fixed three-button sequence.
Build the defense
Use Tombstone to separate a building-targeting attacker from its support. Baby Dragon and Skeleton King clear different heights of the group; Ice Wizard buys their attacks time. Tornado improves an existing damage line and cannot supply the missing focused air damage by itself.
Against Poison Graveyard: Keep the defending pieces apart and avoid offering your Tombstone, Ice Wizard and tower in one easy area. A useful Baby Dragon position matters more than summoning extra fragile bodies into Poison. If the King survives, assess the counterattack only after the opposing Graveyard has been contained.
Against Balloon: Ice Wizard's slow helps, but Baby Dragon is not a high-burst single-target shooter. Use the building to buy travel time and engage early enough for repeated attacks. Do not send Baby Dragon behind your own Graveyard while the opponent still has an affordable Balloon threat.
A decision that changes the next exchange
Your King survived a crowded defense with collected souls, but the opponent still has a healthy splash defender near the tower. Sending Graveyard and activating immediately lets that defender work on both waves. Use one threat to draw its attention or movement, and keep the other purchase available. If the King's health will not support a useful follow-up, accept the defensive value and rebuild instead.
Avoid this: Treating a filled soul meter as an instruction to activate, regardless of the King's position or the next Tombstone you need.
Two one-card alternatives
- Musketeer for Ice Wizard (3.6 average elixir): One extra deployment elixir buys focused air damage but removes persistent slow and changes the Tornado defense.
- The Log for Barbarian Barrel (3.5 average elixir): Longer ground-line reach and knockback replace the Barbarian body. Keep Skeleton King for the ground occupation that the rolling spell no longer leaves behind.
Where upgrades matter
Graveyard, Baby Dragon and Tombstone establish the repeated exchanges. Keep Skeleton King's level useful for surviving his ground job before investing in a plan that depends on his follow-up.
Skeleton King Mortar Miner
A Mortar/Miner bait player who can protect an active Skeleton King while inexpensive bodies die; Miner provides a route when Mortar is blocked.

Average elixir: 3.0
Eight cards and their jobs
- Mortar (4 elixir): Ranged ground siege or defensive pull with a close blind area; each placement need not become an offensive lock.
- Skeleton King (4 elixir): Four-elixir ground splash body with a paid collected-soul summon; the ability needs position and surviving health.
- Miner (3 elixir): Placed troop for tower attention, chip or a selected support target; an extra purchase, not mandatory push decoration.
- Spear Goblins (2 elixir): Cheap ranged air and ground help with fragile bodies; keep their removal exposure separate from other swarms.
- Bats (2 elixir): Cheap flying damage timed around opposing removal and splash; not a durable air defense.
- Goblin Gang (3 elixir): Mixed ground group with fragile Spear air help; hold it around shared removal and splash.
- Fireball (4 elixir): Immediate area damage and displacement where applicable; judge removals from actual card levels.
- The Log (2 elixir): Ground-line clear and knockback; cannot replace lost air damage.
Why this version fits
Mortar and Miner give this deck two routes to pressure, while Skeleton King changes how its ground defense can become a threat. The cheap groups can help a busy defense produce souls, but they are also the entire sustained air coverage. Replacing Knight with the King does not fix that fragility. This is the Mortar choice for a player who can distinguish a valuable summon from another expense added to an already expensive attempt to protect a lock.
Opening and double elixir
Split Spear Goblins when safe or let Mortar take a defensive position against a real approach. Observe the opponent's small spells before committing both flying and ground swarms. Miner need not visit the tower on his first appearance; a reachable ranged defender may be more relevant.
An offensive Mortar is worthwhile when you can protect its current target and still answer the return. Miner can occupy a shooter while Skeleton King blocks approaching ground units. If both threats have lost their route to damage, do not add an activation simply to prolong the attack.
Build the defense
Mortar pulls large ground threats but has a close blind area. Skeleton King must occupy something useful while the small troops deal damage. Fireball is valuable against a real support overlap; The Log covers a ground line and cannot rescue Bats from an air attacker.
Against Giant: A defensive Mortar can draw Giant, giving small troops time to work from separate positions. Keep the King on support that he can actually damage rather than surrounding the tank with every fragile card. A surviving support troop behind Giant may be a better Miner target than the tower.
Against Arrows and Balloon: The first Arrows does not make the rest of the air defense safe if another removal card is ready. Separate Bats from Spear Goblins and use Mortar's pull to create time. Skeleton King's ground attacks cannot replace either group once they are gone.
A decision that changes the next exchange
Mortar has stopped firing usefully and the King is approaching with souls. Check whether the opponent's splash troop is still free to attack the lane. If it is, a paid summon can disappear without reopening Mortar's target. Let the King finish his ground job and save Miner or Fireball for a later, identifiable support target. Rank 21 replaces this ability decision with Cannon Cart's ranged ground defense and stationary form at 50% health.
Avoid this: Cycling Bats as disposable attack support before discovering which removal the opponent keeps for your air defense.
Two one-card alternatives
- Guards for Goblin Gang (3.0 average elixir): Same cost trades spear air shots for shielded melee distraction; the other air groups become more important.
- Minions for Bats (3.1 average elixir): One extra elixir buys a different flying damage group, but it remains vulnerable to Arrows and shared splash. The hand is less forgiving after an offensive Mortar.
Where upgrades matter
Mortar, Miner and Fireball deserve useful levels alongside the small air defenders. A stronger Champion cannot compensate for every Spear Goblin or Bat being removed together.
Golden Knight Drill Executioner
For Drill control players who need a ground dash threat alongside Executioner line defense, with no promise that dash replaces continuous splash.

Average elixir: 3.5
Eight cards and their jobs
- Goblin Drill (4 elixir): Placed building pressure with a small Crown Tower arrival hit and Goblins that still need an opening.
- Golden Knight (4 elixir): Four-elixir ground body with a paid, finite dash opportunity through reachable targets; no air damage.
- Executioner (5 elixir): Air and ground line splash on the outgoing and returning axe; positioning determines the actual targets hit.
- Bomb Tower (4 elixir): Ground splash building that shapes the approach; cannot shoot air despite buying time against building-targeting flyers.
- Goblins (2 elixir): Low-cost focused ground damage or distraction when their splash and spell answers are occupied.
- Poison (4 elixir): Area damage over time against real targets that remain in it; does not provide immediate burst or a reset.
- Tornado (3 elixir): Repositions targets for existing damage or tower safety; the pull itself is not sustained damage.
- The Log (2 elixir): Ground-line clear and knockback; cannot replace lost air damage.
Why this version fits
Drill attacks a selected location while Executioner and Bomb Tower organize the return. Golden Knight adds a possible movement through reachable ground targets; he does not inherit Valkyrie's continuous surrounding splash. The current dash should be judged from the units and gaps actually on the board. Drill's small Crown Tower arrival hit is helpful, but sustained Goblin damage still needs a defender to be distracted, displaced or punished at the right time.
Opening and double elixir
Make the first Drill a modest information purchase, with Bomb Tower available for what comes back. Hold Poison until the defender gives you a reason to cast it. Avoid opening Executioner where a distant tank can force him into shared spell value beside your tower.
Alternate Drill timing according to their defending hand. Golden Knight can turn a stopped ground attack into pressure if a useful dash chain exists. Tornado still belongs to the defensive Executioner combination when an air push is developing; spending it for an imagined tower dash can remove the deck's next defense.
Build the defense
Executioner is the only sustained air attacker here. Bomb Tower pulls and clears ground groups, Goblins supply cheap concentrated damage, and Golden Knight occupies reachable support. Spread these jobs rather than expecting one activation to replace every ground-splash exchange.
Against Valkyrie: Watch where she catches the Drill Goblins and whether she stays in Poison. If she defends outside its useful area, another automatic Drill plus Poison repeats the same problem. Adjust the next placement or timing while retaining a body and building for her return.
Against Lava Hound: Save Executioner and enough time to establish him away from an easy spell overlap. Tornado is useful when it puts the actual flying support into his outgoing or returning axe. A ground dash cannot rescue the defense after your sole air shooter has been committed elsewhere.
A decision that changes the next exchange
Golden Knight has a ground target near the tower, but the next unit is visibly separated and an air push is starting in the other lane. Do not spend Tornado solely to manufacture the chain. Keep it for Executioner's real firing line, and let Drill be the smaller attack if you can afford one after setting the defense. A possible dash is not tower damage already earned.
Avoid this: Using Golden Knight as if his normal attacks continuously cleared every surrounding troop after the ability has been spent.
Two one-card alternatives
- Guards for Goblins (3.6 average elixir): One extra elixir gives shields against isolated hits but slows the return to Bomb Tower and provides no additional air shots.
- Musketeer for Executioner (3.4 average elixir): One less elixir supplies direct ranged air damage, but removes the returning axe and its line splash. Tornado no longer creates that same grouped clearing sequence.
Where upgrades matter
Drill and Executioner determine the repeated attack and defense. Bomb Tower and Poison follow; the Champion upgrade matters when it preserves his actual ground exchange.
Golden Knight beside expensive attackers
These lists depend on established tank or bridge-pressure levels. Read the missing splash and air jobs before assuming a dash improves the whole defense.
Golden Knight Electro Giant
For Electro Giant owners who want a finite ground dash opportunity after defending, while keeping Phoenix as the main air support.

Average elixir: 3.9
Eight cards and their jobs
- Electro Giant (7 elixir): Expensive building-targeting tank whose retaliation depends on nearby attackers; still needs support and a reserve.
- Golden Knight (4 elixir): Four-elixir ground body with a paid, finite dash opportunity through reachable targets; no air damage.
- Phoenix (4 elixir): Flying air and ground damage with a possible rebirth only if the egg survives.
- Bomber (2 elixir): Low-cost repeated ground splash behind protection; cannot help with air targets.
- Cannon (3 elixir): Low-cost ground-targeting building and pull; needs a separate shooter for an air approach.
- Lightning (6 elixir): Heavy damage and a reset on selected targets; requires actual target value and enough reserve for the return.
- Tornado (3 elixir): Repositions targets for existing damage or tower safety; the pull itself is not sustained damage.
- Barbarian Barrel (2 elixir): Short ground-line clear followed by a Barbarian body; offers no air damage.
Why this version fits
Golden Knight replaces the repeated ground knockback of a Bowler setup with a cheaper body and one useful dash decision. That makes this Electro Giant version a different defense, even when most of the familiar support remains. Phoenix covers air and Bomber clears accessible ground groups. None of them makes a seven-elixir tank inexpensive, and the deck must still earn the time to afford Lightning after deploying it.
Opening and double elixir
Use Cannon or a small defender for the first real attack instead of starting Electro Giant merely because the bar is full. Bomber can work behind a ground body, but he cannot help against a Balloon sent into the other lane. Keep Phoenix for an air job until that threat is known.
Build the Electro Giant push from a useful defensive survivor. Wait to see the building and support before budgeting Lightning. A Golden Knight dash is worthwhile only when the actual targets let it remove or occupy something important; a stopped chain can leave ground support that Bowler would have kept knocking back.
Build the defense
Cannon takes the central pull, with Phoenix damaging air and ground targets from a useful angle. Bomber supplies repeated ground splash. Golden Knight can intercept support, but after his dash is spent you still need the building and damage cards to finish the exchange.
Against Inferno Tower: Lightning can interrupt the beam and damage useful nearby targets, but only a surviving attack can exploit the interruption. If Electro Giant has already lost the relevant health, casting six more elixir may leave you defending a counterpush with too little. Assess the attack before buying the reset.
Against split Royal Hogs: Cannon can shape the approach while Bomber and Golden Knight work different ground tasks. Do not assume the dash will substitute for Bowler's repeated control over the whole exchange. Keep a response for the second lane instead of placing Phoenix behind an Electro Giant you have not yet earned.
A decision that changes the next exchange
At ten elixir, deploying Electro Giant leaves three. Lightning costs six, so a building appearing immediately is not an instruction you can always fund. Let the approach develop while preserving the needed defense, or abandon the extra spell if the tank is no longer a useful investment. Do not spend the remaining three on an attractive support card and then assume the heavy spell will be available too.
Avoid this: Treating the Champion's first dash as a replacement for the continuing knockback lost when Bowler leaves the list.
Two one-card alternatives
- Baby Dragon for Bomber (4.1 average elixir): Two extra elixir buys flying splash and another air targeter but makes the already expensive tank commitment slower.
- Goblin Cage for Cannon (4.0 average elixir): One extra elixir buys a Brawler after the Cage breaks. You lose the Cannon's shooting phase and must time the building around the actual approach.
Where upgrades matter
Electro Giant, Phoenix and the defensive building need to work at your collection levels. Lightning's real damage matters more than a promise that it removes every medium defender.
Golden Knight P.E.K.K.A Ram Rider
For a P.E.K.K.A collection facing heavy ground pressure, using Ram Rider's restraint and a separate King dash window rather than a passive building.

Average elixir: 4.1
Eight cards and their jobs
- Ram Rider (5 elixir): Five-elixir building pressure with a snare on eligible defending targets; not sustained anti-air shooting.
- Golden Knight (4 elixir): Four-elixir ground body with a paid, finite dash opportunity through reachable targets; no air damage.
- P.E.K.K.A (7 elixir): Seven-elixir focused ground damage and a durable body; cannot cover an air approach.
- Bandit (3 elixir): Ground pressure with a distance-based dash; choose a reachable target rather than buying her with every push.
- Electro Wizard (4 elixir): Air and ground shooting with spawn and repeated interruptions; protect his firing position.
- Lightning (6 elixir): Heavy damage and a reset on selected targets; requires actual target value and enough reserve for the return.
- Giant Snowball (2 elixir): Brief air or ground displacement and slow where applicable; does not reset an Inferno beam.
- Barbarian Barrel (2 elixir): Short ground-line clear followed by a Barbarian body; offers no air damage.
Why this version fits
This is an expensive collection choice for players whose P.E.K.K.A and Ram Rider are already established. P.E.K.K.A handles ground health, Ram Rider applies building pressure and a snare, while Golden Knight and Bandit threaten reachable ground openings. The price is narrow sustained air shooting through Electro Wizard and no defensive building. The two mobile ground attackers do not make this an all-purpose first Champion deck.
Opening and double elixir
Wait for a ground target worth the P.E.K.K.A commitment. A lone Bandit can be a small probe when the return is covered, but leading with P.E.K.K.A and then needing Electro Wizard in the opposite lane quickly stretches the hand. Keep Snowball for an actual delay or displacement.
Ram Rider may follow a healthy defensive survivor or pressure the other lane after a genuine advantage. She and a fresh P.E.K.K.A total twelve deployment elixir. Golden Knight's activation and Lightning are separate investments, so choose the support that solves the current obstacle rather than purchasing the whole attack.
Build the defense
P.E.K.K.A should meet the main ground threat while a smaller body prevents support from freely working on her. Electro Wizard must stay useful against air and for interruptions. Snowball and the Rider's snare buy time but do not replace sustained damage on a healthy flyer.
Against Inferno Dragon: Place Electro Wizard where his interruption can reach the beam without being removed immediately by support. Lightning can offer another reset when its targets and cost justify it. Spending every reset at once wastes their different timings, especially if P.E.K.K.A still has ground blockers in front of her.
Against Balloon: Preserve Electro Wizard and use Snowball or Ram Rider's snare to improve his available time. With no building, placement and the attacking support matter greatly. Do not send the only shooter forward because Golden Knight and Bandit make the ground counterpush look attractive.
A decision that changes the next exchange
P.E.K.K.A survives on low health, and both Ram Rider and Lightning are in hand. First decide whether the survivor will reach anything useful before the opponent's next defender stops her. If the answer is no, a five-elixir Rider and six-elixir spell do not turn that weak survivor into a bargain. Keep the air response ready and wait for a counterpush with more than a name to protect.
Avoid this: Choosing this list simply because it contains several high-rarity cards, despite an underleveled Electro Wizard being the only sustained air shooter.
Two one-card alternatives
- Dark Prince for Bandit (4.3 average elixir): One extra elixir buys ground splash and a shield, giving up the cheaper independent dash threat.
- Musketeer for Electro Wizard (4.1 average elixir): The same deployment cost gives focused ranged damage without spawn or repeated stuns. Lightning becomes the only reset spell, so do not treat the swap as an identical Inferno answer.
Where upgrades matter
P.E.K.K.A, Ram Rider and Electro Wizard are the important collection commitments. Keep Lightning relevant to actual target health; Golden Knight cannot replace a failed air exchange.
Golden Knight P.E.K.K.A Battle Ram
For bridge-pressure players who want King's finite chain to contest clustered ground defense while Magic Archer attacks an actual line.

Average elixir: 4.0
Eight cards and their jobs
- Battle Ram (4 elixir): Building pressure that releases Barbarians after the Ram breaks; demands a covered return defense.
- Golden Knight (4 elixir): Four-elixir ground body with a paid, finite dash opportunity through reachable targets; no air damage.
- P.E.K.K.A (7 elixir): Seven-elixir focused ground damage and a durable body; cannot cover an air approach.
- Bandit (3 elixir): Ground pressure with a distance-based dash; choose a reachable target rather than buying her with every push.
- Electro Wizard (4 elixir): Air and ground shooting with spawn and repeated interruptions; protect his firing position.
- Magic Archer (4 elixir): Ranged air and ground piercing shots; valuable alignment must exist rather than be assumed.
- Poison (4 elixir): Area damage over time against real targets that remain in it; does not provide immediate burst or a reset.
- Zap (2 elixir): Brief interruption and reset with small area damage; one cast does not solve repeated stuns permanently.
Why this version fits
The familiar P.E.K.K.A and Battle Ram shell gains Golden Knight in the ground slot that Royal Ghost can occupy. You pay one more to deploy him and lose Ghost's invisibility and repeating area attacks. A useful chain can change a counterpush, but it must reach real targets. Magic Archer instead earns value through an actual line, and Electro Wizard remains the reset and air defender whose safety the ground pressure must not consume.
Opening and double elixir
Hold P.E.K.K.A for an approaching health target or a defense that genuinely needs her. Bandit can test a lane cheaply when the other side is covered. Do not put Magic Archer and Electro Wizard together beside the tower simply to assemble the full deck behind one opening tank.
Battle Ram can make a defender choose between a surviving P.E.K.K.A lane and a second threat. Poison belongs on support that stays relevant to that choice. With Golden Knight, judge the next target before activating; after a failed or finished chain, the ordinary ground attacks still have to be covered by the rest of the list.
Build the defense
Separate P.E.K.K.A's main target from the small units wasting her hits. Poison and Zap can help with specific groups, while Magic Archer needs an angle that stays useful. The two ranged defenders also carry air coverage, so neither is disposable bridge decoration.
Against Goblin Gang: Zap or Poison should be chosen for the actual group and current levels, not a guaranteed clear. Magic Archer can hit through aligned units, but he still needs protection. Do not pay for a dash into a line that the opponent has already broken with spacing.
Against Lava Hound: Keep Electro Wizard and Magic Archer in separate useful positions, with enough time to engage the support. P.E.K.K.A is not an air answer. A Ram in the other lane is only affordable if the two shooters can still be deployed and protected.
A decision that changes the next exchange
Golden Knight has finished his dash and small troops surround the remaining ground push. The Royal Ghost version would continue supplying area attacks; this one does not preserve that job automatically. Choose a useful Poison area, Zap interaction or Magic Archer line, and stop adding pressure if none creates a path. Recognizing the missing repeated splash is more valuable than activating as soon as the button becomes available.
Avoid this: Stacking both ranged defenders into the same removal while expecting the Champion to repair the resulting air weakness.
Two one-card alternatives
- Dark Prince for Bandit (4.1 average elixir): Adds one elixir and repeating ground splash but loses the cheaper separate bridge threat.
- Musketeer for Magic Archer (4.0 average elixir): The same deployment cost gives more straightforward ranged defense without piercing through a target to the tower. Stop spending Poison to protect an alignment the replacement cannot use.
Where upgrades matter
P.E.K.K.A, Battle Ram and the two ranged defenders should justify the list at your levels. Upgrade Poison for real damage over its duration rather than assumed instant removals.
Skeleton King in heavier pushes
The King adds a ground and soul decision to existing Giant, split-lane or Lava investments. None of those investments makes his ability or the next air defender free.
Skeleton King Giant Graveyard
For Giant Graveyard players who want Skeleton King's ground defense and collected-soul option, instead of making every attack a fresh Giant commitment.

Average elixir: 3.5
Eight cards and their jobs
- Giant (5 elixir): Five-elixir building-targeting tank for a worthwhile survivor; does not supply the support damage itself.
- Skeleton King (4 elixir): Four-elixir ground splash body with a paid collected-soul summon; the ability needs position and surviving health.
- Graveyard (5 elixir): Five-elixir placed Skeleton pressure that needs time from a tank, survivor or occupied defender.
- Musketeer (4 elixir): Sustained direct ranged air and ground damage; preserve her when the rest of the deck cannot cover air.
- Bats (2 elixir): Cheap flying damage timed around opposing removal and splash; not a durable air defense.
- Tombstone (3 elixir): Low-cost building pull with Skeleton production; buys time but does not shoot air.
- Arrows (3 elixir): Wide removal for fragile ground or air groups; not a universal answer to healthier support.
- Giant Snowball (2 elixir): Brief air or ground displacement and slow where applicable; does not reset an Inferno beam.
Why this version fits
Giant, Graveyard and Skeleton King are three ways to invest after a defense, not three purchases every attack should include. Giant can take tower fire, Graveyard places pressure near the target, and the King's collected souls offer another ground wave. Musketeer supplies the focused air shooting that the swarms cannot guarantee. Without Poison or a large area-damage defender, the deck must spread those demands in time instead of filling one ready splash attack.
Opening and double elixir
Use Tombstone to shape an actual approach and keep Musketeer away from shared spell value. Hold Bats until they can damage something without immediately entering the same removal as the rest of the defense. An opening Giant plus Graveyard spends ten deployment elixir before any rescue card.
Choose the surviving unit that can occupy the tower or a defender. Graveyard can exploit that window without a fresh Giant when the survivor is healthy enough. If Giant is needed, allow time to rebuild the reserve before buying more pressure; the summon still has its own activation cost.
Build the defense
Tombstone buys travel time, Skeleton King clears reachable ground groups, and Musketeer handles air or health from range. Bats are a fragile damage option around opposing removal. Arrows and Snowball create different openings and should not be thrown together at every small group.
Against Poison: Do not pile Graveyard and the King's summon into the same useful Poison area. A Giant does not stop the area damage from clearing fragile attackers beside him. Make the opponent reveal the spell's timing, then decide whether a different attack window is worth the remaining reserve.
Against Lava Hound: Keep Musketeer and Bats available with separate exposure to removal. Tombstone may alter the path of a building-targeting attacker, but supplies no air shots. Giant in the other lane is a luxury when it delays the only reliable ranged defender.
A decision that changes the next exchange
The King has survived, Giant is in hand, and Graveyard is ready. Ask which card actually makes the opponent's tower or splash defender occupied. If the King already supplies that time, five more elixir on Giant may accomplish less than preserving Musketeer for the return. If the King is nearly defeated, neither an immediate Graveyard nor a hasty summon is automatically a good purchase.
Avoid this: Assuming the list's three pressure options are a single combo and spending them together into one area answer.
Two one-card alternatives
- Mega Minion for Bats (3.6 average elixir): Adds one elixir for a sturdier flying attacker, reducing cheap bodies and slowing the next defensive cycle.
- Zap for Giant Snowball (3.5 average elixir): An immediate stun and reset replace Snowball's displacement and slow. Zap may help against an Inferno beam but creates a different opening for Graveyard Skeletons.
Where upgrades matter
Graveyard and Musketeer are central to the attack and air defense. Giant and Skeleton King need useful survivability, while Tombstone must remain available rather than being cycled aimlessly.
Skeleton King Recruits Hogs
For a Recruits/Hogs player who can convert an existing defensive swarm exchange into King's finite summon pressure.
Average elixir: 4.3
Eight cards and their jobs
- Royal Hogs (5 elixir): Five-elixir building-targeting group that can split; a central defense may still affect both groups.
- Skeleton King (4 elixir): Four-elixir ground splash body with a paid collected-soul summon; the ability needs position and surviving health.
- Royal Recruits (7 elixir): Seven-elixir shielded ground bodies across two lanes; their deployment needs a reason and ranged support.
- Flying Machine (4 elixir): Long-range air and ground damage; keep it from sharing easy spell value with the other ranged group.
- Zappies (4 elixir): Ranged air and ground interruptions from separate bodies; need time and protection to supply repeated stuns.
- Goblin Cage (4 elixir): Defensive pull that releases a ground Brawler after destruction; needs separate damage against air.
- Fireball (4 elixir): Immediate area damage and displacement where applicable; judge removals from actual card levels.
- Barbarian Barrel (2 elixir): Short ground-line clear followed by a Barbarian body; offers no air damage.
Why this version fits
This is the heavier split-lane Skeleton King option. Recruits establish ground bodies across both sides, Hogs threaten buildings, and Zappies interrupt attackers while Flying Machine supplies range. The King offers a collected-soul decision, but he cannot shoot air. Compared with versions using Bats, Arrows or Mother Witch in this slot, you lose a different form of air support or removal. The 4.3 deployment average makes that missing job important before every additional attack.
Opening and double elixir
Answer a real approach with Cage or a suitable defender rather than committing seven-elixir Recruits blindly. If Recruits are used, consider which side needs more help before placing Flying Machine. Do not hide all three Zappies beside it where the same spell hits both defensive resources.
Split Hogs only when the revealed defenses make two demands worth buying. The King can accompany a useful surviving group, but paying for Hogs and then a summon must leave the other lane covered. There is no Arrows here to instantly clear every fragile air defender on the opponent's side.
Build the defense
Cage provides the initial pull and a ground survivor. Recruits and Skeleton King cover ground bodies, while Flying Machine and Zappies must handle the air work from sensible spacing. Fireball supplies burst, not the wide cheap removal of an Arrows version.
Against Fireball: Avoid offering Flying Machine and clustered Zappies together merely to support one recruit lane. When Fireball is used, check the second spell and surviving defender before calling that lane safe. The King is a ground body, so losing both ranged groups cannot be repaired by his summon.
Against Valkyrie and a building: A single building and splash defender may cover more of the Hogs than a split suggests. Let the actual placement determine the next lane. Do not fill the Valkyrie's surrounding attack with summoned Skeletons while sending Hogs directly through the same defended route.
A decision that changes the next exchange
You defended one side with Recruits, but Flying Machine is gone and the next air attacker is available to the opponent. Skeleton King has souls and the Hogs are tempting. Keep Zappies and Cage funded first; replacing Bats or Mother Witch with a ground Champion reduced the spare air damage, and replacing Arrows removed instant wide clear. The summon does not restore any of those lost roles.
Avoid this: Reading a split deployment as two guaranteed attacking lanes when the opponent's central building and remaining splash can still cover both.
Two one-card alternatives
- Skeleton Dragons for Flying Machine (4.3 average elixir): Same deployment cost gives flying splash in two bodies but loses the long focused firing position.
- Arrows for Fireball (4.1 average elixir): One less elixir gives wider swarm removal, including air, but loses Fireball's burst against medium-health support. Royal Hogs cannot assume their ranged defender has been removed.
Where upgrades matter
Royal Hogs, Recruits and the ranged defenders need balanced levels. This is a specialist commitment for that collection, not a reason to abandon a cheaper defense just to use the new Champion.
Skeleton King Lava Miner
For Lava Miner players who need a ground defender that can turn deaths into a separate pressure decision while the air attack develops.

Average elixir: 3.8
Eight cards and their jobs
- Lava Hound (7 elixir): Seven-elixir air tank targeting buildings; leaves a narrow immediate ground-defense budget.
- Skeleton King (4 elixir): Four-elixir ground splash body with a paid collected-soul summon; the ability needs position and surviving health.
- Miner (3 elixir): Placed troop for tower attention, chip or a selected support target; an extra purchase, not mandatory push decoration.
- Skeleton Dragons (4 elixir): A pair of flying splash attackers; spread their exposure to removal while preserving the air job.
- Mega Minion (3 elixir): Focused flying damage against air or ground; preserve its time on target around removal.
- Tombstone (3 elixir): Low-cost building pull with Skeleton production; buys time but does not shoot air.
- Fireball (4 elixir): Immediate area damage and displacement where applicable; judge removals from actual card levels.
- Zap (2 elixir): Brief interruption and reset with small area damage; one cast does not solve repeated stuns permanently.
Why this version fits
Skeleton King gives Lava Miner a ground defender and a possible follow-up from deaths around him. He does not join the air-defense job. Mega Minion and Skeleton Dragons still have to survive long enough to protect a seven-elixir Lava Hound commitment. Miner reaches a chosen defender or takes tower attention, so he should solve a real obstruction rather than accompany every Hound automatically. The deck is best considered by an existing Lava player learning a ground Champion role.
Opening and double elixir
Keep Tombstone available and learn the opposing ground win condition before placing Hound behind the King Tower. Skeleton Dragons can split their pressure, but do not expose the entire air reserve for an opening attack. A supported ground rush can arrive while the seven-elixir investment is still crossing your side.
Lava Hound is easier to justify after a useful defense leaves air damage available. Miner can occupy a ranged defender while the surviving flyers work. Decide separately whether Skeleton King's health and souls justify another ground purchase; an impressive airborne push does not make the other lane disappear.
Build the defense
Tombstone pulls ground pressure and creates time for the appropriate damage card. The King covers reachable ground groups while Mega Minion and Skeleton Dragons supply air hits. Zap interrupts or clears a specific small target; Fireball needs damage or displacement that materially helps the defense.
Against P.E.K.K.A bridge pressure: Tombstone's position and the King's access to supporting ground units matter before another Hound. Use flying damage where it can work without being removed with the whole group. If the ground approach remains active, a Miner on the tower adds pressure but no local defender.
Against Inferno Tower: Miner may occupy support while Zap interrupts the beam, but neither guarantees Hound or its supporting flyers will reach the tower. Check whether the air damage is still present to use the delay. Do not empty the hand chasing a reset after the attacking support has already been removed.
A decision that changes the next exchange
At a full bar, Hound leaves three deployment elixir. If the opposing ground threat needs Tombstone immediately, those three have a job already. Skeleton King cannot be added for four at that instant, and an activation on a previous survivor is another expense. Delay the Hound until the ground response is credible instead of assuming a Champion will always be available to rescue the commitment.
Avoid this: Using Skeleton King's rarity as evidence that the deck now has stronger air defense, even though his normal attacks and summon are ground-only.
Two one-card alternatives
- Baby Dragon for Skeleton Dragons (3.8 average elixir): Same cost consolidates splash into one tougher body, losing separated twin coverage.
- Arrows for Zap (3.9 average elixir): One extra elixir clears a wider fragile air group but removes the immediate reset. An Inferno defense must be addressed by a real surviving attacker or Miner placement instead.
Where upgrades matter
Lava Hound and the two flying damage cards determine the main investment. Tombstone and Miner should remain effective enough to protect that investment on both sides of the arena.
Tank pressure after a specific defense
Protect the shot, the close-range defender or the conditional swarm value that actually earned the attack. A new Champion is only one part of that sequence.
Golden Knight Goblin Giant Sparky
For Goblin Giant/Sparky players whose key problem is ground support screening the charged shot, with King available for a real dash route.

Average elixir: 3.6
Eight cards and their jobs
- Goblin Giant (6 elixir): Building-targeting tank with carried Spear support; does not replace a preserved dedicated air defender.
- Golden Knight (4 elixir): Four-elixir ground body with a paid, finite dash opportunity through reachable targets; no air damage.
- Sparky (6 elixir): Large charged ground shot that is vulnerable to interruption and distraction; cannot damage air.
- Mega Minion (3 elixir): Focused flying damage against air or ground; preserve its time on target around removal.
- Goblins (2 elixir): Low-cost focused ground damage or distraction when their splash and spell answers are occupied.
- Fireball (4 elixir): Immediate area damage and displacement where applicable; judge removals from actual card levels.
- Zap (2 elixir): Brief interruption and reset with small area damage; one cast does not solve repeated stuns permanently.
- Rage (2 elixir): Acceleration and a small area-damage effect for a surviving attack; grants no immunity to interruption.
Why this version fits
Golden Knight offers a ground route toward support that prevents Sparky from firing, while Goblin Giant can protect a useful shot. That route is conditional. Rage increases the pace of surviving attackers but cannot remove every reset or make Sparky immune to interruption. Mega Minion is the only dedicated flying damage card, with the carried Spear Goblins offering limited help. Keep this choice for a leveled Sparky collection that can manage those narrow defensive responsibilities.
Opening and double elixir
Defend with the smaller card that actually solves the first approach instead of placing Goblin Giant and hoping Sparky becomes affordable in time. Goblins can help against isolated ground health when splash is occupied. Keep Mega Minion for the first meaningful air exchange.
Build behind a Sparky that survives and still has a useful shot. Goblin Giant plus a fresh Sparky costs twelve, so the attack needs time or a survivor. Golden Knight can address reachable ground support, and Rage is a final acceleration purchase only if the attack's firing opportunity is intact.
Build the defense
Goblins and Golden Knight handle ground work while Sparky supplies powerful but interruptible shots. Protect Mega Minion rather than sending it routinely behind the tank. Fireball can damage useful support overlaps; Zap supplies a brief interruption, not a permanent solution to repeated stuns.
Against Electro Wizard: Look for a reachable ground route to the reset source before spending Rage. Golden Knight may help if the actual targets permit the dash, but a separated Electro Wizard can remain out of that chain. If you cannot remove or occupy him, hold more support instead of speeding a repeatedly interrupted Sparky.
Against Balloon: Mega Minion needs time to engage and should not share an easy removal position with every supporting unit. Goblin Giant's carried Spears are not a substitute for a preserved air defender in any position. Stop the counterpush when it would leave no sustained answer to the approaching health.
A decision that changes the next exchange
Sparky is charged, but a reset troop remains behind a blocker and Golden Knight has no useful chain to it. Casting Rage does not solve the obstruction. Use Fireball only if its actual damage or target overlap changes that problem; otherwise defend the return and accept that this attack has ended. A six-elixir card already played is not a reason to keep paying for it.
Avoid this: Adding Rage because the push looks large while ignoring the defender that will prevent Sparky's next shot.
Two one-card alternatives
- Guards for Goblins (3.8 average elixir): Adds one elixir for shields against isolated heavy hits but does not solve air coverage or reset support.
- Arrows for Rage (3.8 average elixir): One extra elixir supplies wider removal instead of acceleration. The push moves and attacks at its normal pace, so leave time for Sparky to acquire a useful shot.
Where upgrades matter
Sparky and Goblin Giant are costly collection commitments. Keep Mega Minion and the spells useful at their actual jobs before concentrating all upgrades on the visible tank pair.
Golden Knight Royal Giant Hunter
For Royal Giant players who can use Fisherman and Hunter defensively while King's finite dash creates a different ground response.

Average elixir: 3.5
Eight cards and their jobs
- Royal Giant (6 elixir): Six-elixir ranged building pressure that can use a productive defensive survivor.
- Golden Knight (4 elixir): Four-elixir ground body with a paid, finite dash opportunity through reachable targets; no air damage.
- Fisherman (3 elixir): Relocates a reachable ground target; cannot hook a flying attacker.
- Hunter (4 elixir): Concentrated air and ground damage at useful close range; distance changes how much of the shot connects.
- Goblins (2 elixir): Low-cost focused ground damage or distraction when their splash and spell answers are occupied.
- Electro Spirit (1 elixir): Brief chaining interruption when targets are within reach; no assumed lone tower connection.
- Lightning (6 elixir): Heavy damage and a reset on selected targets; requires actual target value and enough reserve for the return.
- The Log (2 elixir): Ground-line clear and knockback; cannot replace lost air damage.
Why this version fits
Fisherman changes a ground attack's position so Hunter can make useful close-range shots. Golden Knight occupies reachable support and may find a dash after that defense. Royal Giant is the building threat that converts a healthy survivor into pressure. The important distinction is that the hook and Hunter's damage do the defensive work; the Champion does not make an inaccurate pull or distant Hunter deployment effective merely by joining them.
Opening and double elixir
Use Goblins or a patient wait while discovering the opponent's main approach. Keep Fisherman for a ground target worth relocating and place Hunter with the resulting distance in mind. Electro Spirit can buy a short interruption, but an unsupported Spirit is not guaranteed tower chip.
Royal Giant can follow a useful defense while Golden Knight checks an actual path through support. Lightning needs a meaningful combination of targets and enough attacking life left to use the result. Six elixir on Royal Giant and six on Lightning cannot be an instant full-bar opening.
Build the defense
Fisherman's hook does not target flying units. Hunter is therefore the important concentrated air damage, with Electro Spirit offering a short timing tool. Goblins can add ground damage while Golden Knight occupies support; The Log clears a ground line, not the air above it.
Against Giant: A useful Fisherman pull changes where Giant and its support can work. Hunter should be close enough to deal meaningful damage without giving the supporting troop a free removal. Golden Knight belongs on a reachable support job, rather than being spent at the bridge while the tank remains active.
Against Balloon: Save Hunter and position him for useful damage before the attacker is on the tower. Electro Spirit can interrupt when it reaches, but Fisherman cannot hook Balloon away. Lightning may damage supporting targets at considerable cost; do not make it the default replacement for a missing Hunter.
A decision that changes the next exchange
Hunter has defended, but he is nearly defeated and Royal Giant is now affordable. If the opponent still holds Balloon, putting the only concentrated air shooter behind a six-elixir attack may leave the next lane uncovered. Let the weakened survivor go when necessary, rebuild Hunter's availability and make the next Royal Giant attack from a defense you can actually repeat.
Avoid this: Pulling a ground tank into a position that exposes Hunter to its support, then blaming Golden Knight for a defense whose geometry was already wrong.
Two one-card alternatives
- Skeletons for Goblins (3.4 average elixir): Saves one elixir and speeds rotation but loses the Goblins' greater continuing ground damage and durability.
- Ice Spirit for Electro Spirit (3.5 average elixir): The same cost trades chaining interruption for a localized freeze. It can still interrupt a target, but will not touch several separated defenders through a chain.
Where upgrades matter
Royal Giant and Hunter are central. Fisherman's survival and the spells' real damage matter; the Champion's level should support his ground job rather than substitute for it.
Skeleton King Royal Giant Bait
For a Royal Giant collection that wants Skeleton King and Mother Witch to punish different swarm responses while still controlling a tank route.

Average elixir: 3.8
Eight cards and their jobs
- Royal Giant (6 elixir): Six-elixir ranged building pressure that can use a productive defensive survivor.
- Skeleton King (4 elixir): Four-elixir ground splash body with a paid collected-soul summon; the ability needs position and surviving health.
- Fisherman (3 elixir): Relocates a reachable ground target; cannot hook a flying attacker.
- Mother Witch (4 elixir): Ranged air and ground shooting with conditional curse conversion from eligible enemy deaths.
- Zappies (4 elixir): Ranged air and ground interruptions from separate bodies; need time and protection to supply repeated stuns.
- Skeleton Army (3 elixir): Many fragile ground attackers that need an opposing removal or splash opening.
- Fireball (4 elixir): Immediate area damage and displacement where applicable; judge removals from actual card levels.
- The Log (2 elixir): Ground-line clear and knockback; cannot replace lost air damage.
Why this version fits
Mother Witch and Skeleton King benefit from small units in different ways. Mother Witch must curse eligible enemies before they die to create her pressure, while the King needs a useful collected-soul and activation opportunity. Neither reward is automatic. Fisherman and Zappies manage the ground approach, and Royal Giant can lead a worthwhile survivor. This setup is for a collection comfortable with conditional swarm value and a relatively narrow air defense.
Opening and double elixir
Wait for a target worth cursing or a ground approach worth pulling. Skeleton Army is a defense to time around removal, not a cheap way to fill the board before the matchup is known. Keep Mother Witch and Zappies separated enough that one spell does not erase both ranged groups.
Use Royal Giant after the defense has left something useful, then decide which conditional pressure remains credible. A summon and a Skeleton Army in the same splash area do not create two independent problems. If the opponent supplies few curse targets, play Mother Witch as a supporting shooter instead of overspending to manufacture value.
Build the defense
Fisherman draws a reachable ground threat into a position your damage can use. Skeleton Army works when its removal is accounted for, and Zappies interrupt rather than instantly erase health. Mother Witch contributes air shots, but the list lacks a dedicated high-burst flying-target defender.
Against Graveyard: Mother Witch can punish suitable Skeleton deaths when she is protected and able to apply curses. Poison or direct pressure may deny that position, so do not assume the matchup solves itself. Skeleton King's ground splash and the correct small spell must still contain the immediate damage.
Against Baby Dragon: Keep the swarm defenses from entering the same splash attacks. Zappies and Mother Witch need space and time to damage the flyer while ground bodies occupy other threats. Skeleton King's summon cannot attack it, so activating simply creates more potential victims if no shooter is working safely.
A decision that changes the next exchange
The opponent is using large units with little swarm support, and their area spell is still ready. Mother Witch is not receiving many curse opportunities, while a charged King stands in front of healthy splash. Do not build a Royal Giant attack around both rewards as if they were guaranteed. Use the survivor that actually contributes and keep the next defense funded; the Hunter alternative changes this conditional air-damage job directly.
Avoid this: Counting every small unit death as immediate attacking value without checking curses, collected souls, position and the opponent's remaining removal.
Two one-card alternatives
- Guards for Skeleton Army (3.8 average elixir): Same cost gives shielded smaller ground support but reduces the number of disposable bodies and sustained swarm damage.
- Hunter for Mother Witch (3.8 average elixir): The same deployment cost replaces conditional curse pressure with close-range damage against air or ground. Hunter needs useful proximity and no longer converts an enemy swarm into an attack.
Where upgrades matter
Royal Giant and Zappies must remain dependable even when the conditional rewards are poor. Improve Mother Witch or Skeleton King for the actual exchanges you can create, not imagined full-board value.
Bait and specialist Champion choices
These options add demands on spell tracking, expensive hands or narrow defensive coverage. Choose one because its named problem matches your collection, rather than trying every pressure card at once.
Golden Knight Barrel Dart Goblin
For Barrel bait players who prefer King's ground body plus a conditional dash over continuous Valkyrie splash, while keeping two long-range bait units.

Average elixir: 3.6
Eight cards and their jobs
- Goblin Barrel (3 elixir): Placed Goblin pressure whose timing and position should reflect the revealed spell or troop answer.
- Golden Knight (4 elixir): Four-elixir ground body with a paid, finite dash opportunity through reachable targets; no air damage.
- Princess (3 elixir): Long-range ground and air splash that also asks a removal question; preserve her when ranged defense is thin.
- Dart Goblin (3 elixir): Fast ranged air and ground shooting; keep him away from easy removal when he is the remaining air answer.
- Goblin Gang (3 elixir): Mixed ground group with fragile Spear air help; hold it around shared removal and splash.
- Inferno Tower (5 elixir): Defensive pull and ramping air or ground damage; its target and uninterrupted beam need protection.
- Rocket (6 elixir): Six-elixir heavy area damage for worthwhile support or a verified finish; check the next defensive budget.
- The Log (2 elixir): Ground-line clear and knockback; cannot replace lost air damage.
Why this version fits
Goblin Barrel, Princess, Dart Goblin and Gang present several different small-removal decisions. Golden Knight gives the ground defense a possible chain, but does not turn every bait card into guaranteed tower access. Inferno Tower handles large health when it gets time to ramp. This list has more ranged pressure than a cheap Spirit version and a heavier hand, so it needs careful air preservation and a real defensive reserve before Rocket.
Opening and double elixir
Probe with Barrel only while the returning pressure is covered. Note whether the opponent uses a spell, a troop or both. Princess and Dart Goblin should not both be fed into the same lane merely to make the next Barrel feel safer; they also form the sustained ranged defense.
Alternate the threats according to the answer you actually drew. Golden Knight may cross useful ground targets after defense, but a separated defender can stop the expected chain. Rocket is a six-elixir decision requiring actual target damage or worthwhile support value, not an automatic endgame because the deck contains bait cards.
Build the defense
Inferno Tower needs protection against interruptions and swarms that interfere with its useful target. Gang supplies ground damage and fragile Spear support, while the two long-range attackers must be spaced. Golden Knight's spent ability does not leave Princess-style ranged splash behind.
Against two small spells: Drawing The Log does not mean Barrel is unopposed if Arrows, Snowball or a troop answer remains available. Track the second answer through the next exchange. A conservative Barrel with defense ready can teach more than adding every bait card to test a supposed opening at once.
Against Royal Giant and Lightning: Keep Inferno Tower and the ranged defenders from becoming a single valuable Lightning group when positioning permits. The reset matters only alongside the resulting damage race. Golden Knight can occupy reachable support, but cannot stop a ranged win condition merely by dashing somewhere near it.
A decision that changes the next exchange
The opponent Logs Princess, then catches Barrel with a troop without using their second spell. The first exchange did not exhaust the defense. Keep Dart Goblin for air and use the next Barrel placement to test that troop's reach or timing. Paying for an imagined Golden Knight chain at the same time can leave Inferno Tower unavailable without changing the defender that already solved Barrel.
Avoid this: Treating the opponent's first small spell as their only Barrel answer and stacking all the ranged bait cards behind that assumption.
Two one-card alternatives
- Archers for Dart Goblin (3.6 average elixir): Same cost offers two separable ranged bodies but gives up Dart Goblin's speed and long firing position.
- Ice Spirit for Princess (3.4 average elixir): Two less elixir makes the hand cheaper while removing long-range splash and a separate bait demand. Dart Goblin becomes even more important against air and distant support.
Where upgrades matter
Goblin Barrel and Inferno Tower determine the main attack and tank defense. Princess and Dart Goblin need useful levels; Rocket finishing calculations must use its current in-game damage.
Skeleton King Double Barrel
For double-Barrel players whose two tower routes can make a Skeleton King defense valuable without stacking every threat at once.

Average elixir: 3.3
Eight cards and their jobs
- Goblin Barrel (3 elixir): Placed Goblin pressure whose timing and position should reflect the revealed spell or troop answer.
- Skeleton King (4 elixir): Four-elixir ground splash body with a paid collected-soul summon; the ability needs position and surviving health.
- Skeleton Barrel (3 elixir): Airborne building pressure that releases ground Skeletons after it breaks; stagger its arrival with other swarms.
- Dart Goblin (3 elixir): Fast ranged air and ground shooting; keep him away from easy removal when he is the remaining air answer.
- Bats (2 elixir): Cheap flying damage timed around opposing removal and splash; not a durable air defense.
- Inferno Tower (5 elixir): Defensive pull and ramping air or ground damage; its target and uninterrupted beam need protection.
- Fireball (4 elixir): Immediate area damage and displacement where applicable; judge removals from actual card levels.
- The Log (2 elixir): Ground-line clear and knockback; cannot replace lost air damage.
Why this version fits
The two Barrels arrive differently, letting you ask separate questions of the defense. Skeleton King adds a ground body and another possible Skeleton wave, but all three pressures can still run into the same well-timed area damage if you crowd them together. Dart Goblin and Bats carry fragile air damage while Inferno Tower handles health targets. Choose this for staggered bait decisions, not the visual size of a simultaneous swarm.
Opening and double elixir
Let Skeleton Barrel reveal whether the opponent prefers a building, ranged troop or spell. Keep Dart Goblin in a position where he can defend afterward. A Goblin Barrel sent immediately after a Skeleton Barrel that never drew a useful answer may gain nothing from the sequence.
Change the order and lane of the Barrel demands when their responses justify it. The King can occupy a ground defender while another threat arrives, but activating in the same area and timing may help that defender clear everything. Fireball follows a valuable actual target rather than prepaying every attack.
Build the defense
Inferno Tower must be preserved for large health, with the King or small spell clearing relevant ground distractions. Dart Goblin needs protection from easy removal; Bats should use a different angle when they are the remaining air damage. Skeleton Barrel's travel does not make it a dependable defensive shooter.
Against Arrows: Separate the timing of Bats, the falling Skeletons and the Barrel Goblins instead of allowing one cast to collect the whole investment. A revealed Arrows still leaves the opponent's troops available. Keep a useful next threat, rather than assuming the spell alone was the full defense.
Against Electro Giant: Inferno Tower needs a useful distance and protection from the supporting reset or spell. Dart Goblin can shoot from a safer range while Skeleton King addresses reachable support. A swarm placed directly into the tank's effective retaliation is not a substitute for managing the support and building.
A decision that changes the next exchange
Skeleton Barrel is stopped by a building and a splash defender, leaving the opponent's small spell unused. The King has collected souls, but activating beside that same defender only adds another group for it to clear. Hold the summon and make Goblin Barrel ask a different placement or timing question. If the defensive reserve is low, finish the exchange without adding either pressure.
Avoid this: Landing both Barrels and the summon together because more bodies appear threatening, while giving one area answer a cleaner target.
Two one-card alternatives
- Mega Minion for Bats (3.4 average elixir): Adds one elixir for a sturdier flying attacker but reduces the cheap swarm pressure that supports King.
- Poison for Fireball (3.3 average elixir): The same cost trades immediate damage and knockback for damage over an area. Judge where the defender will stay instead of expecting an instant Barrel opening.
Where upgrades matter
Both Barrels and Dart Goblin are the repeated pressure and air investments. Keep Inferno Tower effective against real health targets before chasing an extra Champion level.
Golden Knight Three Musketeers
For an existing Three Musketeers collection that wants King as a ground escort and a finite dash decision in split-lane pressure.

Average elixir: 3.9
Eight cards and their jobs
- Three Musketeers (9 elixir): Nine-elixir sustained air and ground damage that can split; one large deployment creates a reserve problem.
- Golden Knight (4 elixir): Four-elixir ground body with a paid, finite dash opportunity through reachable targets; no air damage.
- Battle Ram (4 elixir): Building pressure that releases Barbarians after the Ram breaks; demands a covered return defense.
- Bandit (3 elixir): Ground pressure with a distance-based dash; choose a reachable target rather than buying her with every push.
- Elixir Collector (6 elixir): Delayed elixir investment that must survive and leave an affordable response to immediate pressure.
- Goblins (2 elixir): Low-cost focused ground damage or distraction when their splash and spell answers are occupied.
- Barbarian Barrel (2 elixir): Short ground-line clear followed by a Barbarian body; offers no air damage.
- Heal Spirit (1 elixir): A timed support action that can heal surviving troops; cannot restore units already defeated.
Why this version fits
Three Musketeers and Elixir Collector make you judge whether another ground purchase is affordable at all. Golden Knight can escort a split group and reach ground support, while Ram and Bandit offer independent pressure. The list has no large damage spell or low-cost defensive building. A nine-elixir deployment can be punished before a planned attack forms, so this is a specialist collection choice with a substantial reserve problem.
Opening and double elixir
Do not place Collector just because it is in the opening hand. Learn whether the opponent can punish the investment with immediate lane pressure or a useful spell. Goblins and Barbarian Barrel can solve modest ground jobs, but cannot cover every attack while six elixir is sitting in a building.
Split Three Musketeers to limit one shared removal and decide which side deserves an escort. Golden Knight is one possible escort, not a mandatory addition to both a Ram and Bandit. Heal Spirit helps surviving troops when it reaches an appropriate interaction; it does not restore a group already removed.
Build the defense
The Musketeers are the sustained air and ground damage. Ground bodies and Barrel buy them time, while Goblins provide a cheaper response if their removal is accounted for. Collector can affect a building-targeting approach, but its six-elixir investment is not a substitute for a cheap, repeatable defensive pull.
Against Fireball: Avoid stacking the split Musketeers back into the same spell area with support. A damaged survivor may benefit from Heal Spirit only when the Spirit can complete the necessary action. If the opponent retains another removal, rebuilding the same cluster can repeat the loss.
Against opposite-lane pressure: A nine-elixir Musketeer deployment leaves little immediate room for another body from a full bar. Use the split and existing defenders thoughtfully rather than assuming Golden Knight can appear in time. Sometimes the right attack is no added attack until the exposed lane has been secured.
A decision that changes the next exchange
Collector has just been played and the opponent starts an immediate attack. Buying Three Musketeers and then Golden Knight is not a ready defensive combination simply because both cards are in hand. Use the cheapest real response available and accept that the Collector may not support an immediate offensive cycle. On the next rotation, choose the Collector timing from the opponent's pressure instead of repeating it at six elixir.
Avoid this: Treating future Collector production as elixir already available for a nine-elixir defense and several bridge attackers.
Two one-card alternatives
- Knight for Bandit (3.9 average elixir): The same three-elixir cost gives a steady ground body to occupy attackers while the split Musketeers fire. You lose Bandit's independent dash pressure, so the swap changes the escort's job without making the nine-elixir deployment cheaper.
- Guards for Goblins (4.0 average elixir): One extra elixir adds shields to the ground defense, but lengthens an already expensive hand. The shields do not turn Guards into air defense.
Where upgrades matter
Three Musketeers are the largest commitment, with Ram and the cheap defensive cards needing useful levels too. Choose this only when that collection is stronger than a simpler core.
Golden Knight Ram Inferno Dragon
For Battle Ram pressure that uses Inferno Dragon as its heavy-target answer, leaving King and Dark Prince to contest ground support.

Average elixir: 3.6
Eight cards and their jobs
- Battle Ram (4 elixir): Building pressure that releases Barbarians after the Ram breaks; demands a covered return defense.
- Golden Knight (4 elixir): Four-elixir ground body with a paid, finite dash opportunity through reachable targets; no air damage.
- Dark Prince (4 elixir): Repeated ground splash and a shielded body; clears groups that would distract focused attackers.
- Bandit (3 elixir): Ground pressure with a distance-based dash; choose a reachable target rather than buying her with every push.
- Electro Wizard (4 elixir): Air and ground shooting with spawn and repeated interruptions; protect his firing position.
- Inferno Dragon (4 elixir): Flying focused damage that ramps on a target; protect its uninterrupted firing time from resets and distractions.
- Poison (4 elixir): Area damage over time against real targets that remain in it; does not provide immediate burst or a reset.
- Zap (2 elixir): Brief interruption and reset with small area damage; one cast does not solve repeated stuns permanently.
Why this version fits
Removing P.E.K.K.A makes room for Inferno Dragon and several mobile ground threats, but it also removes an immediate high-damage ground body. Inferno Dragon must ramp while Dark Prince, Golden Knight or Bandit occupy the correct support. Battle Ram turns a defense into building pressure. The deck can produce several attack choices, yet no fixed defensive building is available to make every tank approach predictable.
Opening and double elixir
Use Dark Prince or Bandit for a useful small ground exchange and save Inferno Dragon until its large-target job is known. A bridge Ram can be a probe when the return is covered, but do not reveal all the mobile ground cards while the opponent's reset and air pressure remain unseen.
Counterattack from the survivor that still does work. Golden Knight may reach support, Dark Prince can clear a ground group, and Ram asks for a building answer. Buying all three usually obscures which obstacle you meant to solve. Poison is valuable only where its damage can keep affecting the real defender.
Build the defense
Inferno Dragon supplies ramping damage against health while Electro Wizard interrupts and shoots air. Keep them apart from the same easy spell overlap. Dark Prince's repeated splash remains useful after Golden Knight's finite ability, especially when surrounding ground units would distract the dragon.
Against Electro Wizard: Protect Inferno Dragon's target and look for a reachable route to the repeated reset source. A Golden Knight dash may help when the actual chain works, but cannot be assumed through separated targets. Poison damages over time, so it does not instantly turn a disrupted beam into full damage.
Against Royal Hogs: Dark Prince can clear a useful group while the remaining ground body covers the other approach. With no central building, a split asks separate placement questions. Do not place Inferno Dragon as routine Ram support and leave it traveling away when the defense needs its focused damage.
A decision that changes the next exchange
Inferno Dragon is defending a tank and the opposing reset support is still approaching. A Ram in the other lane looks tempting because Golden Knight survived, but spending it may prevent the ground interception that keeps the beam working. Address the reset source first. If the dragon loses its ramp repeatedly, this deck has no P.E.K.K.A waiting to replace that missing damage immediately.
Avoid this: Playing the list like the P.E.K.K.A Ram version while relying on a reset-vulnerable flyer to supply the missing tank damage.
Two one-card alternatives
- Knight for Bandit (3.6 average elixir): At the same three-elixir cost, Knight occupies reachable ground support while Inferno Dragon ramps. You lose Bandit's quick dash threat in the other lane; the swap changes the defensive body without freeing any elixir for Ram or the dragon.
- Musketeer for Electro Wizard (3.6 average elixir): The same cost gives sustained direct shooting without repeated resets. Preserve Zap for a beam interruption and do not expect Musketeer to stop a charge by arriving.
Where upgrades matter
Inferno Dragon, Battle Ram and Electro Wizard define the changed defense and attack. Dark Prince's useful repeated ground splash should not be neglected in favor of every mobile attacker.
Skeleton King Miner Wall Breakers
For Miner/Wall Breakers players who want King's ground splash and a reserve summon option without losing Bomb Tower's pull.
Average elixir: 2.9
Eight cards and their jobs
- Miner (3 elixir): Placed troop for tower attention, chip or a selected support target; an extra purchase, not mandatory push decoration.
- Skeleton King (4 elixir): Four-elixir ground splash body with a paid collected-soul summon; the ability needs position and surviving health.
- Wall Breakers (2 elixir): Small building-pressure pair whose route and timing must avoid a ready splash answer.
- Bomb Tower (4 elixir): Ground splash building that shapes the approach; cannot shoot air despite buying time against building-targeting flyers.
- Bats (2 elixir): Cheap flying damage timed around opposing removal and splash; not a durable air defense.
- Spear Goblins (2 elixir): Cheap ranged air and ground help with fragile bodies; keep their removal exposure separate from other swarms.
- Poison (4 elixir): Area damage over time against real targets that remain in it; does not provide immediate burst or a reset.
- The Log (2 elixir): Ground-line clear and knockback; cannot replace lost air damage.
Why this version fits
Miner and Wall Breakers provide compact pressure while Bomb Tower organizes the return. Skeleton King replaces the cheaper Knight body with ground splash and a paid collected-soul option. The change adds a decision and deployment cost; it does not strengthen Bats and Spear Goblins against removal. Use this version when the King has a real defensive job and his surviving position can create a separate demand from the Wall Breakers.
Opening and double elixir
Split Wall Breakers or Spear Goblins only when a safe defensive hand remains. Miner can identify their catch or occupy a useful ranged defender. Hold the King for a ground exchange instead of deploying him behind the tower just to force an ability opportunity later.
Miner can take attention while Wall Breakers approach, but adding Poison and a summon changes the size of that supposedly small attack. Wait for a defender that gives Poison useful time on target. Stagger the Skeleton wave and Wall Breakers when a single splash unit can otherwise cover both.
Build the defense
Bomb Tower shapes ground approaches and the King handles nearby groups. Bats and Spear Goblins are fragile air damage from different positions, not two guaranteed independent defenses against several spells. The Log keeps a ground line clear but cannot recover lost air shooting.
Against Valkyrie: Do not feed the summon into the same surrounding attacks that stop the Wall Breakers. Miner placement can occupy another defender, but does not switch off Valkyrie's area damage. Let one demand reveal her timing and keep the next attack small until you have a meaningful different route.
Against Balloon with Snowball: Use Bomb Tower's pull to buy time and avoid giving one Snowball the same Bats-and-Spears group. Recheck which damage survives before paying Miner for opposite-lane chip. The ground Champion cannot attack the approaching flyer if both cheap air groups are displaced or removed.
A decision that changes the next exchange
The opponent uses a small spell on your Spear Goblins and the King survives with souls. Before buying Miner and Wall Breakers, check whether Bats are now needed against the next air threat. The spell opening can be a defensive opportunity rather than an invitation to spend everything offensively. Keep the summon for a distinct ground problem if adding it now only overlaps the Wall Breakers' splash counter.
Avoid this: Calling every Miner attack cheap after adding Wall Breakers, Poison and a Champion activation to the same exchange.
Two one-card alternatives
- Archers for Spear Goblins (3.0 average elixir): Adds one elixir and sturdier split ranged bodies but slows cheap pressure and the return to Bomb Tower.
- Minions for Bats (3.0 average elixir): One extra elixir changes the flying damage group and makes repeated small attacks more expensive. Keep the group separate from Spear Goblins against shared splash and removal.
Where upgrades matter
Miner, Wall Breakers and Bomb Tower need to keep their jobs at your levels. Preserve useful cheap air damage; the new Champion does not erase that collection requirement.
Golden Knight Hog Executioner
For Hog/Executioner control players who need a dash threat against separated ground support while keeping Tornado for line defense.

Average elixir: 3.5
Eight cards and their jobs
- Hog Rider (4 elixir): Four-elixir building pressure; use it without consuming the defender needed for the return.
- Golden Knight (4 elixir): Four-elixir ground body with a paid, finite dash opportunity through reachable targets; no air damage.
- Executioner (5 elixir): Air and ground line splash on the outgoing and returning axe; positioning determines the actual targets hit.
- Cannon (3 elixir): Low-cost ground-targeting building and pull; needs a separate shooter for an air approach.
- Skeletons (1 elixir): One-elixir ground distraction that buys a short interval when splash is not freely clearing it.
- Tornado (3 elixir): Repositions targets for existing damage or tower safety; the pull itself is not sustained damage.
- Rocket (6 elixir): Six-elixir heavy area damage for worthwhile support or a verified finish; check the next defensive budget.
- The Log (2 elixir): Ground-line clear and knockback; cannot replace lost air damage.
Why this version fits
Executioner and Tornado give Hog a defensive package that rewards an actual line through attackers. Golden Knight takes the ground slot at Valkyrie's deployment cost, but loses her repeated surrounding splash after his one useful dash. Cannon supplies the pull and Skeletons buy small amounts of time. Choose this variant to evaluate a reachable dash opportunity while keeping the eight-elixir Executioner and Tornado defense intact.
Opening and double elixir
Split Skeletons when safe or wait for the first meaningful approach. A Hog can reveal the building while leaving the relevant defense in hand. Do not start Executioner and Golden Knight together merely to show both expensive cards before the opponent has committed anything.
Use Hog after a defense when another attack does not delay the needed shooter or building. Golden Knight can move through actual ground targets, but Tornado should not be borrowed from an imminent air defense to create a speculative chain. Rocket is a separate six-elixir choice based on real damage and the remaining board.
Build the defense
Cannon creates time while Executioner damages air or ground along the axe's path. Golden Knight occupies support and Skeletons distract selectively. Once the Champion's ability is used, crowded ground defense still needs the axe, building and body placements; there is no Valkyrie-style continuous surrounding attack.
Against Lava Hound: Establish Executioner early enough to take a useful line through the supporting air. Tornado helps only where the resulting position is reachable by actual damage. Cannon can change a building-targeting approach but cannot shoot the flyer, so preserve the shooter rather than paying for an extra Hog.
Against Royal Giant: Cannon and Executioner need time while Golden Knight occupies reachable ground support. A dash toward the tower may leave that support free to damage your defense. Keep the Champion on the local job until the health threat is controlled.
A decision that changes the next exchange
At ten elixir, Hog plus Rocket uses the full bar. Unless Rocket genuinely finishes the match, that leaves no immediate Cannon or Executioner purchase for the return. The fact that Golden Knight is still walking on the board does not mean his spent ability can replace those defenses. Choose the Hog pressure, the valuable spell or the defensive setup according to the actual health and hand, rather than combining them automatically.
Avoid this: Using Tornado to suggest a tower dash while Executioner is waiting for that same pull to contain a real air push.
Two one-card alternatives
- Goblins for Skeletons (3.6 average elixir): Adds one elixir for more continuing ground damage but slows the defensive rotation.
- Fireball for Rocket (3.3 average elixir): Two less elixir reduces the spell commitment but removes Rocket's heavier damage option. Reassess the tower finish using the actual spell level rather than the old health threshold.
Where upgrades matter
Hog, Executioner and Cannon form the repeatable exchanges. Verify Rocket damage at its current level, and judge Golden Knight by his ground job rather than a promised tower connection.
Ordinary decks with clear defensive jobs
You can keep playing without either new Champion. These lists make the structural choice explicit, from Mortar control and Phoenix defense to split Hogs or Double Prince support.
Mortar Rocket Control
A non-Champion option for a first-unlock player who wants cheap defensive cycling and siege without spending resources on an underleveled Champion.

Average elixir: 2.9
Eight cards and their jobs
- Mortar (4 elixir): Ranged ground siege or defensive pull with a close blind area; each placement need not become an offensive lock.
- Knight (3 elixir): Affordable ground body that occupies a threat while ranged damage or a structure works.
- Archers (3 elixir): Sustained air and ground shooting that can split; preserve them when they are the only ranged air pair.
- Skeletons (1 elixir): One-elixir ground distraction that buys a short interval when splash is not freely clearing it.
- Ice Spirit (1 elixir): Cheap localized freeze when it reaches; buys time rather than sustained damage or guaranteed tower chip.
- Rocket (6 elixir): Six-elixir heavy area damage for worthwhile support or a verified finish; check the next defensive budget.
- Tornado (3 elixir): Repositions targets for existing damage or tower safety; the pull itself is not sustained damage.
- The Log (2 elixir): Ground-line clear and knockback; cannot replace lost air damage.
Why this version fits
This ordinary-card Mortar deck commits to siege defense and a heavy spell rather than Miner chip or a Champion ability. Knight protects a position, Archers supply the only sustained air shooting, and the cheap cards help you reach the needed response. Rocket can remove worthwhile support or finish verified health, but it competes directly with the defense. Choose it when you enjoy protecting a useful Mortar angle and can abandon an unproductive one.
Opening and double elixir
Split Archers safely or wait for a ground approach that makes a defensive Mortar worthwhile. Knight should block troops entering its blind area. Ice Spirit and Skeletons buy timing; they do not make an unsupported offensive Mortar safe against every opening hand.
Place an offensive Mortar when its supporting defense is affordable and its target can remain useful. Without Miner, you cannot simply send a body onto a distant shooter or take cheap placed chip. Sometimes Rocket on a worthwhile support group is the alternative pressure, but the next defensive hand must survive the spending.
Build the defense
Mortar pulls and deals area damage at range, with a blind area close to it. Knight and Skeletons address what enters that area. Archers must retain safe firing time against air, and Tornado is valuable only when the new position is useful to those actual attacks or the towers.
Against Giant: Use defensive Mortar to change the approach, then put Knight or Skeletons on a useful support or distraction task. If Giant reaches the blind area, protecting that Mortar at any cost can become expensive. Let it finish its defensive purpose and prepare the next exchange rather than demanding a tower lock from every placement.
Against Lava Hound: Keep Archers available and separated from a profitable removal when possible. Tornado can collect reachable support, but it does not add sustained air damage. Rocket needs meaningful targets; using it on the tower while the air push develops can remove the reserve needed to keep Archers working.
A decision that changes the next exchange
The opponent places a tank inside Mortar's blind area and keeps a ranged defender behind it. You have no Miner to remove that shooter. Stop funding the abandoned offensive lock, use Knight and the appropriate cheap card for defense, and consider Rocket only if the support value and remaining reserve justify it. A four-elixir Mortar already placed does not require six more elixir of spell spending.
Avoid this: Cycling Rocket at the tower because Mortar cannot connect, without checking whether Archers and the next building can still be deployed.
Two one-card alternatives
- Electro Spirit for Ice Spirit (2.9 average elixir): Same cost changes local freeze to conditional chain stun with different King-activation risks.
- Fireball for Tornado (3.0 average elixir): One extra elixir buys direct burst while giving up repositioning. Protect Mortar's blind area with a body because the replacement cannot pull a tank out of it.
Where upgrades matter
Mortar, Archers and Knight need reliable defensive exchanges. Rocket's real damage matters for a finish; keep its level in mind rather than following an old tower-health threshold.
Miner Phoenix Poison
A non-Champion Miner control option where a protected flying attacker and repeated Valkyrie splash are more useful than a new Champion's finite ability.

Average elixir: 3.0
Eight cards and their jobs
- Miner (3 elixir): Placed troop for tower attention, chip or a selected support target; an extra purchase, not mandatory push decoration.
- Phoenix (4 elixir): Flying air and ground damage with a possible rebirth only if the egg survives.
- Valkyrie (4 elixir): Repeated surrounding ground splash and a body for support control; cannot attack air.
- Bomb Tower (4 elixir): Ground splash building that shapes the approach; cannot shoot air despite buying time against building-targeting flyers.
- Goblins (2 elixir): Low-cost focused ground damage or distraction when their splash and spell answers are occupied.
- Ice Spirit (1 elixir): Cheap localized freeze when it reaches; buys time rather than sustained damage or guaranteed tower chip.
- Poison (4 elixir): Area damage over time against real targets that remain in it; does not provide immediate burst or a reset.
- The Log (2 elixir): Ground-line clear and knockback; cannot replace lost air damage.
Why this version fits
Miner creates small placed pressure while Phoenix supplies air and ground damage that may return only if its egg survives. Valkyrie supplies repeated ground splash without an activation decision. Bomb Tower shapes the approach so those defenders can work separately. This is an ordinary-card option for players who prefer to spend on a clear defensive job instead of forcing a newly unlocked Champion into the same cost slot.
Opening and double elixir
Wait or use a cheap distraction when it has a safe purpose. The first Miner can reveal a catch, but does not need automatic Poison. Keep Phoenix available until the opponent's air plan is clearer instead of flying it into a lane where the egg will have no realistic protection.
A healthy Phoenix survivor may justify Miner to occupy a defender or take tower attention. Poison follows a troop likely to stay in its area. Valkyrie and Bomb Tower should remain part of the next defense, not both be committed forward simply because the first Miner found some damage.
Build the defense
Bomb Tower pulls and clears ground groups, Valkyrie handles nearby support, and Phoenix supplies the sustained air damage. Goblins help with isolated ground health when splash is occupied. Ice Spirit buys a short interval rather than guaranteeing its own tower connection.
Against Graveyard: Use Valkyrie's repeated ground splash and the appropriate small responses while preserving useful tower coverage. Poison can defend a meaningful area when needed, but that means it is unavailable for a routine Miner attack. Do not replace a safe defense with optimism about Phoenix's egg.
Against Balloon: Phoenix needs to engage early while Bomb Tower buys travel time. If Phoenix is defeated, assess whether the egg can realistically survive the support and spells. Miner on the enemy tower is a lower priority than keeping actual damage available on your side.
A decision that changes the next exchange
Phoenix falls after defending and its egg is exposed to a healthy ranged troop. Sending Miner offensively does not protect that egg. If a local defense can save it at a worthwhile cost, choose that deliberately; otherwise accept the loss and prepare the next air response. Do not count rebirth as damage already purchased by the original four-elixir deployment.
Avoid this: Using Phoenix as if every defeat guarantees another defender, then spending the rest of the hand while the exposed egg is still vulnerable.
Two one-card alternatives
- Guards for Goblins (3.1 average elixir): Adds one elixir for shielded distraction but delays the next control spell and still adds no air shooting.
- Electro Spirit for Ice Spirit (3.0 average elixir): The same cost changes a localized freeze to chaining interruption. Use it where the current chain can reach, rather than assuming every spaced air unit will be touched.
Where upgrades matter
Miner, Phoenix and Bomb Tower determine the repeated exchanges. Valkyrie's levels matter against the ground support she must clear without a Champion ability helping her.
Mortar Miner Cannon Cart
For a non-Champion Mortar/Miner player who needs sustained ranged ground damage and Cart's second-stage defensive position instead of King's summon.
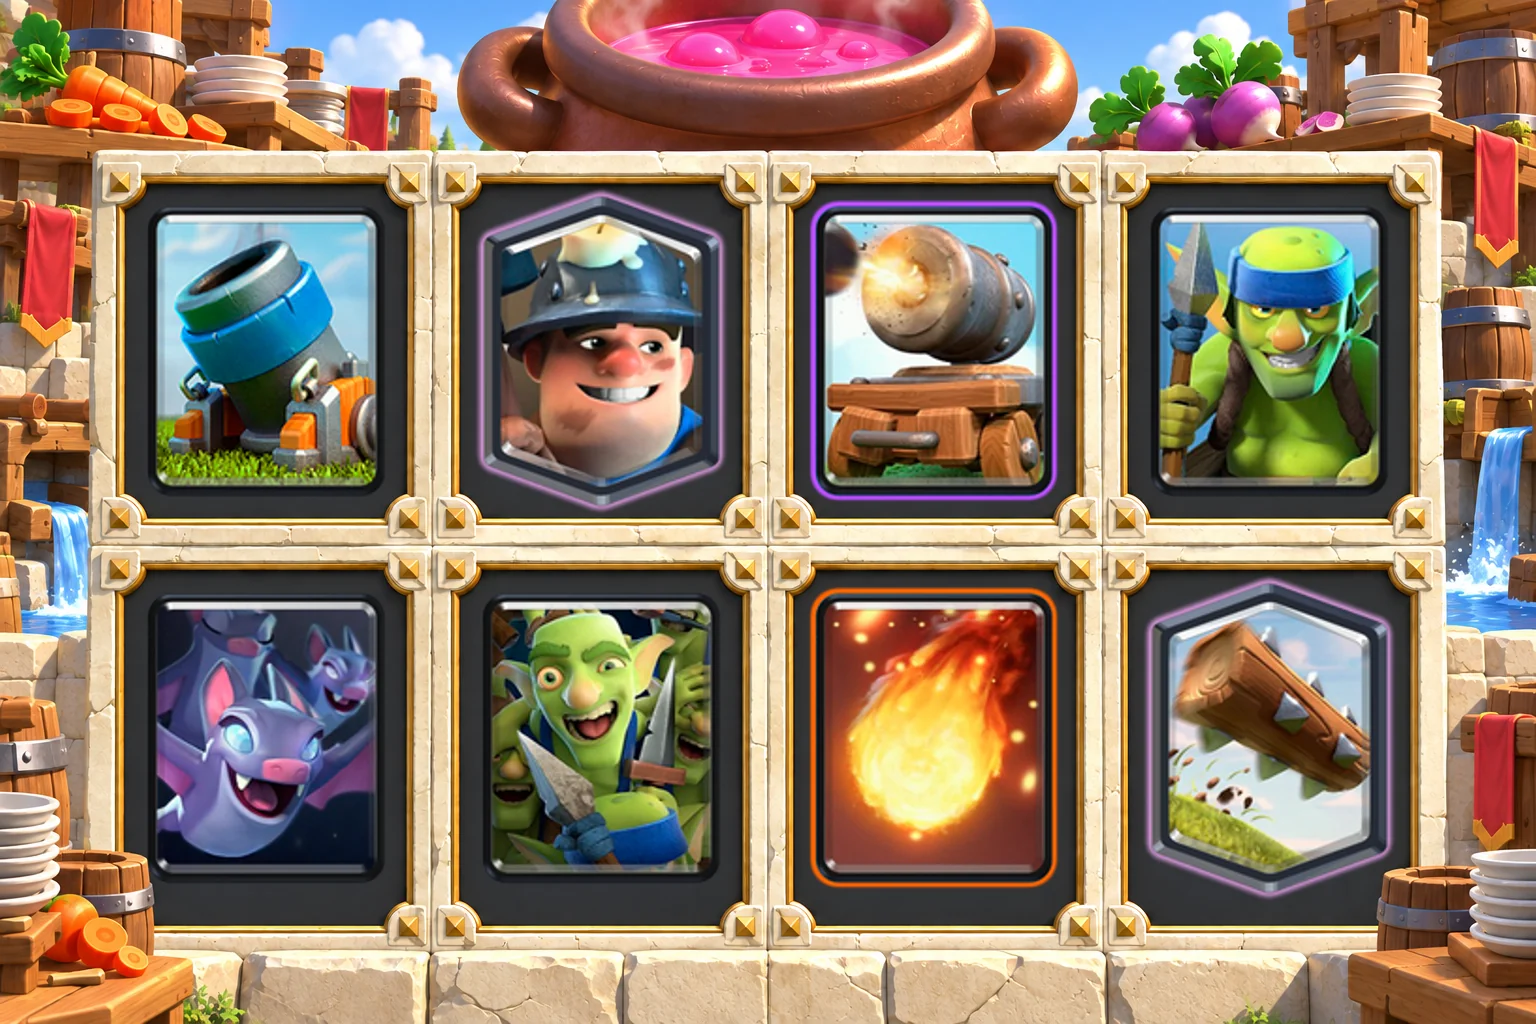
Average elixir: 3.1
Eight cards and their jobs
- Mortar (4 elixir): Ranged ground siege or defensive pull with a close blind area; each placement need not become an offensive lock.
- Miner (3 elixir): Placed troop for tower attention, chip or a selected support target; an extra purchase, not mandatory push decoration.
- Cannon Cart (5 elixir): Ranged ground damage while moving, then a stationary cannon at 50% health; neither form shoots air.
- Spear Goblins (2 elixir): Cheap ranged air and ground help with fragile bodies; keep their removal exposure separate from other swarms.
- Bats (2 elixir): Cheap flying damage timed around opposing removal and splash; not a durable air defense.
- Goblin Gang (3 elixir): Mixed ground group with fragile Spear air help; hold it around shared removal and splash.
- Fireball (4 elixir): Immediate area damage and displacement where applicable; judge removals from actual card levels.
- The Log (2 elixir): Ground-line clear and knockback; cannot replace lost air damage.
Why this version fits
Cannon Cart gives Mortar Miner a ranged ground defender that becomes a stationary building at 50% health. While moving, it can support a counterattack; once stationary, it cannot escort the next Miner or cross the river. That makes it a different ordinary-card choice from rank 2's Skeleton King and paid soul decision. The Cart costs more to deploy and still cannot shoot air, leaving the cheap flying and Spear groups responsible for that weakness.
Opening and double elixir
A defensive Mortar can establish a useful first exchange while Spear Goblins or Bats deal damage from separate positions. Keep Cart for a ground target that lets its range work. Miner can occupy a distant shooter, but should not be added to an opening Mortar merely because both win conditions are in hand.
Use a moving Cart survivor when its remaining shield and position make a counterpush credible. If it has become a stationary cannon, judge the lane from its actual reach instead. Mortar can still be defensive while Miner supplies the smaller pressure; there is no need to make both structures attack every rotation.
Build the defense
Mortar pulls the main approach and Cart damages ground targets from range. Gang and the cheap air groups can add damage around opposing removal. Fireball is the meaningful burst spell, while The Log helps a ground line and cannot replace a missing Bats or Spear defense.
Against P.E.K.K.A: Use Mortar's pull and the small troops to create time for Cart's shots without feeding every fragile body into the same splash support. If P.E.K.K.A reaches the Cart, its form and remaining health determine what survives. Miner on the tower is optional while that local ground job is unfinished.
Against Balloon: Preserve the cheap air groups and separate their removal exposure. Mortar can buy travel time, but Cart cannot damage Balloon in either form. Fireball may help a specific health or support interaction at its actual level; it is not a substitute for keeping sustained air damage alive.
A decision that changes the next exchange
Cart has survived as a stationary cannon on your side. Sending Miner to tank for it as though it were still walking wastes the reason for that placement. Either use Miner for a separate support target, or save him while the cannon completes its local defense. Choose rank 2 instead if you want a ground body with a collected-soul decision; choose this version for useful ground range and the form transition you can manage.
Avoid this: Calling every surviving Cart a counterpush unit without checking whether its shield has already been lost.
Two one-card alternatives
- Guards for Goblin Gang (3.1 average elixir): Same cost gains shielded melee distraction but removes the Gang Spears' extra air shots.
- Archers for Spear Goblins (3.3 average elixir): One extra elixir buys a different pair of ranged air defenders that can split lanes. It slows the cheap bait rotation and removes the three-Spear distraction pattern.
Where upgrades matter
Mortar, Miner and Cannon Cart form the main commitment. The cheaper air cards need useful levels too, because Cart's extra cost buys no air targeting.
Giant Double Prince Miner
For Giant double-Prince players who need Electro Wizard's interruption plus a separate Miner route when a full Giant push is too expensive.

Average elixir: 3.8
Eight cards and their jobs
- Giant (5 elixir): Five-elixir building-targeting tank for a worthwhile survivor; does not supply the support damage itself.
- Prince (5 elixir): Concentrated ground damage with a charge opportunity; small distractions can consume important hits.
- Dark Prince (4 elixir): Repeated ground splash and a shielded body; clears groups that would distract focused attackers.
- Miner (3 elixir): Placed troop for tower attention, chip or a selected support target; an extra purchase, not mandatory push decoration.
- Mega Minion (3 elixir): Focused flying damage against air or ground; preserve its time on target around removal.
- Electro Wizard (4 elixir): Air and ground shooting with spawn and repeated interruptions; protect his firing position.
- Fireball (4 elixir): Immediate area damage and displacement where applicable; judge removals from actual card levels.
- Zap (2 elixir): Brief interruption and reset with small area damage; one cast does not solve repeated stuns permanently.
Why this version fits
Prince supplies concentrated ground damage while Dark Prince clears the small bodies that would waste his hits. Giant can lead a worthwhile survivor, and Miner reaches a chosen support troop instead of repositioning the whole defense. Electro Wizard adds repeated interruptions and ground-based air shooting where the cheaper Bats can otherwise sit. This is an ordinary collection option for players with both Princes leveled, not a new Champion requirement.
Opening and double elixir
Wait for a ground target that gives Prince a real job, or use Mega Minion cautiously with the next defense still available. Do not open with Giant and both Princes; their fourteen deployment elixir require time and leave several other jobs uncovered. Keep Electro Wizard for an interruption that matters.
Giant can take tower fire ahead of a healthy Prince. Miner is worth buying when the actual support target is preventing useful damage, rather than as an automatic tower visit. Fireball follows a worthwhile overlap and Zap should remain available when Electro Wizard is already supplying the first reset.
Build the defense
Prince handles ground health, Dark Prince deals repeated ground splash, and the two air-capable defenders should be kept apart from easy shared removal. Unlike the Tornado configuration, Miner cannot regroup split troops or pull a target into that splash. His chosen arrival trades positioning control for access to a particular defender.
Against Inferno Dragon: Electro Wizard can interrupt the beam while Mega Minion supplies damage. Watch whether the shooter remains safe enough to stun again before spending Zap as well. If both interruptions are used at once, the next beam may start while the expensive ground attackers are still blocked.
Against Lava Hound: Keep Mega Minion and Electro Wizard for the actual flying support rather than adding both behind Giant. Prince and Dark Prince can threaten another lane, but their ground damage cannot cover the air job you just spent. Miner on a dangerous ranged support may be useful only after that reserve is secured.
A decision that changes the next exchange
Electro Wizard has just interrupted Inferno Dragon and still has a safe shot at it. Keep Zap until another interruption is genuinely needed. Miner can reach a separate support troop if the spending is affordable, but cannot pull the dragon or a split group into a better position. This is the distinction from the Tornado version: target access replaces regrouping, while reset timing still belongs to the two existing tools.
Avoid this: Adding Giant, Miner and both spells after any Prince survives, without checking the survivor's health and the next air-defense cost.
Two one-card alternatives
- Knight for Miner (3.8 average elixir): Same cost trades a selected-location pressure route for a conventional defending body and stronger local support.
- Poison for Fireball (3.8 average elixir): The same cost trades burst and knockback for damage over time. Miner can occupy support inside the area, but an escaping defender may no longer be removed in time.
Where upgrades matter
Giant, Prince and the air defenders need to work at your levels. Dark Prince's repeated splash is a different job from Prince's focused hits, so do not neglect it as a decorative second attacker.
Royal Hogs Musketeer Earthquake
For players whose Hogs are better leveled than Hog Rider and who need real split-lane pressure with a familiar Musketeer defensive core.

Average elixir: 2.9
Eight cards and their jobs
- Royal Hogs (5 elixir): Five-elixir building-targeting group that can split; a central defense may still affect both groups.
- Valkyrie (4 elixir): Repeated surrounding ground splash and a body for support control; cannot attack air.
- Musketeer (4 elixir): Sustained direct ranged air and ground damage; preserve her when the rest of the deck cannot cover air.
- Cannon (3 elixir): Low-cost ground-targeting building and pull; needs a separate shooter for an air approach.
- Skeletons (1 elixir): One-elixir ground distraction that buys a short interval when splash is not freely clearing it.
- Ice Spirit (1 elixir): Cheap localized freeze when it reaches; buys time rather than sustained damage or guaranteed tower chip.
- Earthquake (3 elixir): Area damage to ground targets with a strong building role; cannot remove flying defenders.
- The Log (2 elixir): Ground-line clear and knockback; cannot replace lost air damage.
Why this version fits
Royal Hogs replace the single Hog Rider threat with a five-elixir group that can split. That changes the attack choice while leaving a straightforward Valkyrie, Musketeer and Cannon defense. Earthquake damages the actual ground building; it does not grant either half of a split automatic tower access. This ordinary deck suits a player who wants to learn split-versus-concentrated pressure without adding a Champion ability to the same hand.
Opening and double elixir
Use Skeletons or a patient wait until you understand the first defensive task. A small Hogs probe can reveal whether the opponent relies on a building or troop splash, but keep Musketeer available. Do not buy Earthquake before a target appears merely to repeat the familiar Hog Rider sequence.
Choose a split when the actual defending placements make two lanes useful. Concentrating Hogs can be better when a revealed response is unavailable and your reserve remains sound. The extra elixir compared with Hog Rider matters when Cannon or Musketeer is needed immediately afterward.
Build the defense
Cannon pulls ground threats while Valkyrie clears reachable supporting groups. Musketeer is the only sustained air shooter, with Ice Spirit buying brief time. Skeletons distract when splash is occupied. Earthquake and The Log cannot clear a flying support group above this defense.
Against Bomb Tower: Check how its central position affects the Hogs before assuming a split bypasses it. Earthquake helps damage the building, but surviving splash troops can still handle the group. If the building is the only revealed target and the defense remains expensive, save the next attack rather than repeatedly buying both cards.
Against Balloon: Use Cannon's pull to create time for Musketeer and keep her outside unnecessary shared spell value. Ice Spirit can improve the interval if it reaches, but does not replace her shots. An opposite-lane five-elixir Hogs attack may be too much while she is still unavailable.
A decision that changes the next exchange
The opponent places a central building that attracts useful parts of both Hogs groups and keeps a splash troop on one side. Splitting again has not created two independent attacks. Change the timing or concentrate only when the revealed response and your defense justify it. Earthquake should target the real building problem, not certify every split as successful before the Hogs have even crossed.
Avoid this: Using the old four-elixir Hog Rider budget after changing the win condition to five-elixir Royal Hogs.
Two one-card alternatives
- Goblins for Skeletons (3.0 average elixir): Adds one elixir for sturdier ground damage, reducing the budget for five-elixir Hogs and Earthquake.
- Knight for Valkyrie (2.8 average elixir): One less elixir retains a ground body while giving up repeated surrounding splash. Cannon and The Log must cover more of the grouped ground defense.
Where upgrades matter
Royal Hogs, Musketeer and Cannon establish the attack and return defense. Keep Earthquake's real building damage useful while preserving Valkyrie's ability to clear supporting ground groups.
Royal Giant Phoenix Electro Wizard
For Royal Giant players who value separate Phoenix and Electro Wizard air jobs plus Cage insurance, without requiring a first Champion.

Average elixir: 3.8
Eight cards and their jobs
- Royal Giant (6 elixir): Six-elixir ranged building pressure that can use a productive defensive survivor.
- Phoenix (4 elixir): Flying air and ground damage with a possible rebirth only if the egg survives.
- Electro Wizard (4 elixir): Air and ground shooting with spawn and repeated interruptions; protect his firing position.
- Fisherman (3 elixir): Relocates a reachable ground target; cannot hook a flying attacker.
- Skeletons (1 elixir): One-elixir ground distraction that buys a short interval when splash is not freely clearing it.
- Goblin Cage (4 elixir): Defensive pull that releases a ground Brawler after destruction; needs separate damage against air.
- Lightning (6 elixir): Heavy damage and a reset on selected targets; requires actual target value and enough reserve for the return.
- Barbarian Barrel (2 elixir): Short ground-line clear followed by a Barbarian body; offers no air damage.
Why this version fits
Phoenix and Electro Wizard provide two different air-capable defenders: one supplies flying damage with conditional egg recovery, while the other interrupts from a ground position. Cage and Fisherman shape ground approaches so Royal Giant can counterattack with something useful. There is no Champion ability to fund, but the six-elixir win condition and Lightning still create a heavy spell-budget decision. This is a collection choice for a player who values separate air and reset jobs.
Opening and double elixir
Wait or split Skeletons safely while keeping the relevant defender available. Use Cage for a real pull rather than cycling away its useful lifetime. Phoenix should not be placed where its egg will be exposed just to create the appearance of a surviving attacker before Royal Giant is ready.
Let a productive defense decide whether Royal Giant has support worth leading. Lightning can damage and reset useful targets, but its six-elixir cost requires a surviving attack or a defensive reason. Electro Wizard may already be providing the interruption, so check whether the extra spell actually changes the exchange.
Build the defense
Cage draws the building-targeting threat and Fisherman relocates reachable ground units. Phoenix and Electro Wizard must maintain different positions against shared removal. Skeletons can distract ground attackers briefly, but cannot cover a missing air response after both larger defenders are sent forward.
Against Inferno Tower: A reset can help Royal Giant only while he or the supporting damage can still use the time. If Electro Wizard has reached a safe firing position, reserve Lightning unless its damage and other targets justify it. Casting both tools automatically makes the next defense harder without necessarily gaining a shot.
Against Balloon: Cage can alter the approach while the two air-capable defenders do the damage. Fisherman's hook does not target Balloon. Keep Phoenix's egg recovery conditional and space Electro Wizard so the attacker or its support does not remove the whole defense together.
A decision that changes the next exchange
Royal Giant is nearly defeated and an isolated Inferno Tower remains. Lightning may damage and reset it while producing no extra attack, especially if the supporting Phoenix has already become an exposed egg. Stop the investment. Preserve Electro Wizard or Cage for what returns, then build the next Royal Giant push from defenders whose damage is actually still present.
Avoid this: Counting Phoenix's possible rebirth as a second guaranteed air defender and using Electro Wizard offensively before the egg has survived.
Two one-card alternatives
- Goblins for Skeletons (3.9 average elixir): Adds one elixir for more ground contact damage while slowing the expensive support rotation.
- Tombstone for Goblin Cage (3.6 average elixir): One less elixir gives Skeleton production and a different ground distraction, but removes the Brawler's surviving damage. Keep a real air shooter for a Balloon pulled by the building.
Where upgrades matter
Royal Giant, Phoenix and Electro Wizard are the central collection commitments. Cage's defensive value and Lightning's actual damage should guide later upgrades rather than automatic heavy-spell spending.
Ordinary attackers for established collections
Drill, Ram, Lava, Giant and split Hogs each need a different surviving damage source. The final profiles explain when to fund that source and when to let a spent attack end.
Drill Inferno Dragon Firecracker
For Drill players whose recurring problem is a high-health attacker, using Inferno Dragon ramping alongside Firecracker rather than paying for a ground Champion.

Average elixir: 3.3
Eight cards and their jobs
- Goblin Drill (4 elixir): Placed building pressure with a small Crown Tower arrival hit and Goblins that still need an opening.
- Valkyrie (4 elixir): Repeated surrounding ground splash and a body for support control; cannot attack air.
- Inferno Dragon (4 elixir): Flying focused damage that ramps on a target; protect its uninterrupted firing time from resets and distractions.
- Firecracker (3 elixir): Ranged projectile splash with recoil and possible King activation geometry; placement is part of her defensive value.
- Bomb Tower (4 elixir): Ground splash building that shapes the approach; cannot shoot air despite buying time against building-targeting flyers.
- Skeletons (1 elixir): One-elixir ground distraction that buys a short interval when splash is not freely clearing it.
- Poison (4 elixir): Area damage over time against real targets that remain in it; does not provide immediate burst or a reset.
- The Log (2 elixir): Ground-line clear and knockback; cannot replace lost air damage.
Why this version fits
Drill pressures a chosen location while Inferno Dragon supplies focused ramping damage and Firecracker covers a line with projectile splash. Valkyrie and Bomb Tower give the ground defense structure. This is an ordinary alternative for a player who needs a dedicated health-target answer alongside Drill, but it has no Zap or Electro Wizard to interrupt an opposing reset setup. Firecracker's geometry and the dragon's beam both need protection rather than an automatic attack routine.
Opening and double elixir
Use the first Drill to learn their ground response while keeping the building and appropriate defender ready. Skeletons can buy time, but do not expose Inferno Dragon before its target is known. Firecracker should be placed with her firing line and potential King activation in mind, rather than always behind the same tower.
Drill can exploit a defender committed elsewhere, with Poison following a meaningful area. A surviving Firecracker may create pressure through a useful line, but do not pay to protect an alignment that activates the King for little return. Inferno Dragon belongs in reserve when the next tank is the more important task.
Build the defense
Bomb Tower shapes the ground approach, Valkyrie occupies supporting groups, and Inferno Dragon needs time to ramp on a useful target. Firecracker adds air and ground splash from range. Keep her and the dragon out of a single easy removal position when possible; neither makes the other invulnerable to interruption.
Against Electro Giant: Give Inferno Dragon useful range and keep the supporting reset from freely reaching it. The exact position matters more than merely having an Inferno card in the deck. Valkyrie can address reachable ground support while Bomb Tower changes the approach, but a repeatedly reset beam is not full damage.
Against Tornado: Firecracker can give the opponent a King activation opportunity through her target and projectile path. Do not stack a Drill attack onto that risk as though every shot is free pressure. The Musketeer alternative removes this particular geometry but trades away splash and costs more to deploy.
A decision that changes the next exchange
Inferno Dragon is ramping on a tank and a reset support troop is approaching behind it. There is no Zap here to stop that support briefly on demand. Use Valkyrie only if she can actually reach the ground target, or Poison when its area and time help; otherwise prepare a second layer instead of sending Drill and hoping the beam keeps working. A named tank answer still needs its conditions protected.
Avoid this: Leaving Inferno Dragon alone against repeated resets while using every supporting card for Drill pressure.
Two one-card alternatives
- Goblins for Skeletons (3.4 average elixir): Adds one elixir for ground durability but does not repair air coverage or provide interruption.
- Musketeer for Firecracker (3.4 average elixir): One extra elixir gives direct ranged shooting without Firecracker's projectile geometry or recoil. It removes that source of King activation risk but does not provide area splash.
Where upgrades matter
Drill, Inferno Dragon and Bomb Tower need useful levels. Firecracker's placement and survival matter as much as her damage; upgrade her only with a clear understanding of the geometry you are choosing.
Battle Ram Cannon Cart Hunter
For Battle Ram collections that need Cart's ground range and Hunter's close air damage rather than expensive P.E.K.K.A defense.
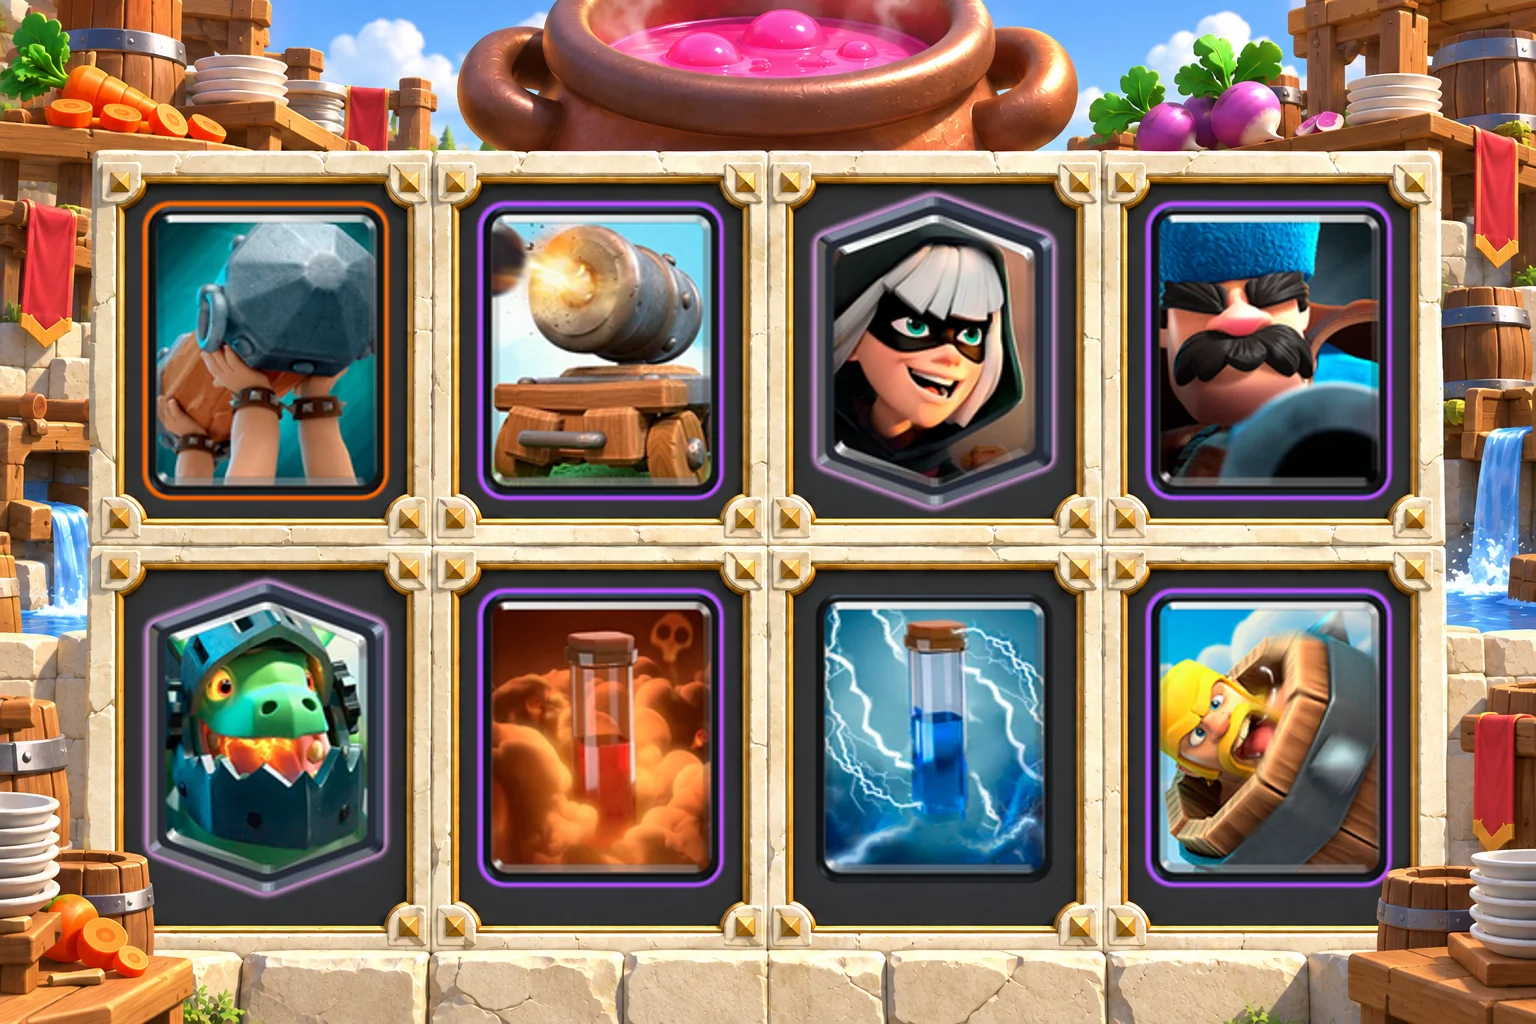
Average elixir: 3.5
Eight cards and their jobs
- Battle Ram (4 elixir): Building pressure that releases Barbarians after the Ram breaks; demands a covered return defense.
- Cannon Cart (5 elixir): Ranged ground damage while moving, then a stationary cannon at 50% health; neither form shoots air.
- Bandit (3 elixir): Ground pressure with a distance-based dash; choose a reachable target rather than buying her with every push.
- Hunter (4 elixir): Concentrated air and ground damage at useful close range; distance changes how much of the shot connects.
- Inferno Dragon (4 elixir): Flying focused damage that ramps on a target; protect its uninterrupted firing time from resets and distractions.
- Poison (4 elixir): Area damage over time against real targets that remain in it; does not provide immediate burst or a reset.
- Zap (2 elixir): Brief interruption and reset with small area damage; one cast does not solve repeated stuns permanently.
- Barbarian Barrel (2 elixir): Short ground-line clear followed by a Barbarian body; offers no air damage.
Why this version fits
Cannon Cart supplies ground range while Hunter and Inferno Dragon divide concentrated damage duties. Battle Ram and Bandit create the counterattack without a Champion or P.E.K.K.A. The list has no fixed defensive building at the start of an exchange; Cart becomes stationary when its health reaches 50%. Hunter's close-range damage and the dragon's ramp must therefore be positioned deliberately, rather than treating every surviving card as interchangeable bridge support.
Opening and double elixir
Wait for a useful local defense or use Bandit as a modest probe when the return is covered. Hold Inferno Dragon until a health target gives it a job. A five-elixir Cart opening should be a considered commitment, because the opponent can choose air pressure that Cart cannot shoot.
A moving Cart survivor can support Ram while Hunter remains available for the next air exchange. Once Cart becomes a stationary cannon, its role changes to the area it can currently reach. Poison follows a defender that stays relevant, and Zap should preserve a useful interruption rather than accompany every charge.
Build the defense
Hunter needs an effective distance for his burst, while Inferno Dragon requires time on target. Cart damages ground threats from range and Barrel leaves a small ground body. Separate Hunter and the dragon against removal so one spell does not erase both ways to handle a large flyer.
Against Balloon: Hunter must meet the approach early enough and from a useful distance; Inferno Dragon can contribute when its beam is not repeatedly interrupted. Do not assume a shielded moving Cart will pull like an already-stationary building. Preserve the actual air defenders instead of spending them as routine Ram support.
Against Electro Wizard: The reset source can repeatedly disrupt Inferno Dragon, so use a reachable Bandit or Cart angle to help address the support when possible. Poison takes time and Zap is brief. If no useful route exists, hold additional attack spending and layer the defense rather than trusting the interrupted beam.
A decision that changes the next exchange
Cart has just lost its shield on your side while Hunter survives nearby. Battle Ram is ready, but the opponent's Balloon remains a threat. The stationary Cart will not walk with the Ram, and spending Hunter forward would remove the concentrated air defender. Keep Hunter local and let Cart finish its current ground job; a lone Ram later may be a better purchase than trying to turn every survivor into one push.
Avoid this: Assuming Cannon Cart is always either a mobile attacker or a pulling building, without checking its current form before planning the next placement.
Two one-card alternatives
- Knight for Bandit (3.5 average elixir): The same three-elixir cost gives a ground body to occupy attackers while Hunter or Cannon Cart deals damage. You lose Bandit's quick opposite-lane dash pressure, so choose the simpler local defense rather than expecting a cheaper hand.
- Musketeer for Hunter (3.5 average elixir): The same deployment cost trades close-range burst for longer direct shooting. Inferno Dragon has more responsibility against a large tank that Hunter previously helped damage at close range.
Where upgrades matter
Battle Ram, Hunter and Cannon Cart deserve useful levels, with Inferno Dragon protected for the health targets the deck otherwise handles less directly. Avoid spreading upgrades across every bridge attacker at once.
Lava Miner Poison
For Lava Miner players who prefer persistent Poison control and two different air damage jobs over a Balloon all-in.

Average elixir: 3.8
Eight cards and their jobs
- Lava Hound (7 elixir): Seven-elixir air tank targeting buildings; leaves a narrow immediate ground-defense budget.
- Miner (3 elixir): Placed troop for tower attention, chip or a selected support target; an extra purchase, not mandatory push decoration.
- Phoenix (4 elixir): Flying air and ground damage with a possible rebirth only if the egg survives.
- Inferno Dragon (4 elixir): Flying focused damage that ramps on a target; protect its uninterrupted firing time from resets and distractions.
- Guards (3 elixir): Shielded ground defense for distraction and damage; cannot attack air.
- Tombstone (3 elixir): Low-cost building pull with Skeleton production; buys time but does not shoot air.
- Poison (4 elixir): Area damage over time against real targets that remain in it; does not provide immediate burst or a reset.
- Zap (2 elixir): Brief interruption and reset with small area damage; one cast does not solve repeated stuns permanently.
Why this version fits
Lava Hound and Miner create the attack while Phoenix and Inferno Dragon supply two different flying damage jobs. Poison controls an area over time instead of giving Fireball's immediate burst. Guards and Tombstone keep the ground approach from becoming an unaffordable emergency. This is the ordinary Lava option for a player who wants concentrated tank damage and can manage poison timing, reset exposure and an egg that may not survive.
Opening and double elixir
Learn the opposing ground pressure before starting a seven-elixir Hound. Tombstone and Guards need to remain available for the route the opponent can punish. Phoenix is a useful air defender first; do not spend it in an opening lane where its egg will simply be removed without doing a meaningful job.
Hound can lead a useful surviving flyer, then Miner can occupy the defender that matters. Poison belongs where that defender will stay long enough for its damage to help. If the defender moves or the attacking damage disappears, another spell does not make the original tank investment valuable again.
Build the defense
Tombstone pulls and Guards provide shielded ground defense around splash. Inferno Dragon ramps on a health target while Phoenix supplies more immediate flying attacks. Zap can interrupt a beam or small group briefly, but repeated resets and shared removal still require a plan for protecting those two flyers.
Against Inferno Tower: Use Miner for a real support or attention job and Zap for an interruption that surviving damage can exploit. Poison will not deliver an instant Fireball-style hit. Decide whether the defending troops are staying in its area and whether the attack remains healthy enough to benefit.
Against a ground rush: Preserve Tombstone and Guards before Hound, then use Phoenix or the dragon according to the support and removal. With no fast ground-splash troop, an occupied shield group may need careful help. Opposite-lane Miner is lower priority than preventing the ground defense from collapsing.
A decision that changes the next exchange
A ranged defender is placed outside the area you expected to Poison, and the Hound's supporting flyer is already under removal. Do not cast into empty space simply because the original plan was Hound, Miner and Poison. Reassess the defender's actual position and protect a surviving damage source first. The Fireball alternative changes this timing problem, but it still requires worthwhile targets at the current levels.
Avoid this: Using Poison as an immediate burst spell or counting Phoenix's exposed egg as guaranteed support for the rest of the attack.
Two one-card alternatives
- Knight for Guards (3.8 average elixir): Same cost trades shielded multi-body distraction for a single tougher ground body, changing surrounds and splash exposure.
- Fireball for Poison (3.8 average elixir): The same cost gives immediate burst and knockback instead of lasting area control. Follow the actual defender and avoid assuming Fireball will remove it at the current levels.
Where upgrades matter
Lava Hound, Phoenix and Inferno Dragon define the larger investment. Guards and Tombstone still need useful defensive exchanges; a higher-level tank does not pay for a missing ground response.
Giant Graveyard Dark Prince
For Giant Graveyard players needing immediate focused ground damage and mobile ground splash without relying on Skeleton King ownership.

Average elixir: 3.6
Eight cards and their jobs
- Giant (5 elixir): Five-elixir building-targeting tank for a worthwhile survivor; does not supply the support damage itself.
- Graveyard (5 elixir): Five-elixir placed Skeleton pressure that needs time from a tank, survivor or occupied defender.
- Dark Prince (4 elixir): Repeated ground splash and a shielded body; clears groups that would distract focused attackers.
- Mini P.E.K.K.A (4 elixir): Concentrated ground damage for health targets; keep a route through distractions and supporting splash.
- Musketeer (4 elixir): Sustained direct ranged air and ground damage; preserve her when the rest of the deck cannot cover air.
- Bats (2 elixir): Cheap flying damage timed around opposing removal and splash; not a durable air defense.
- Arrows (3 elixir): Wide removal for fragile ground or air groups; not a universal answer to healthier support.
- Giant Snowball (2 elixir): Brief air or ground displacement and slow where applicable; does not reset an Inferno beam.
Why this version fits
This Giant Graveyard version uses Dark Prince for repeated ground splash and Mini P.E.K.K.A for concentrated ground damage. It makes that division without a Champion activation, Poison or a defensive building. Musketeer and Bats supply air damage, and the two small spells improve particular Graveyard openings. Choose it when those ordinary defenders are already stronger in your collection and you can keep the tank answer available instead of adding it to every attack.
Opening and double elixir
Let Mini P.E.K.K.A answer a meaningful ground health target while Dark Prince handles the reachable smaller support. Keep Musketeer separate from easy shared removal. An opening Giant plus Graveyard consumes the full ten-elixir bar before the next defense, so earn the attacking window first.
A healthy Dark Prince or Musketeer survivor may justify Giant ahead of it, with Graveyard added only when the tower or key defender is genuinely occupied. Arrows clears an exposed group and Snowball offers displacement and slow. Neither spell makes simultaneous swarms immune to a ready splash troop.
Build the defense
Mini P.E.K.K.A supplies the direct ground damage that a building would otherwise help organize. Dark Prince clears small ground bodies, and Musketeer with Bats covers air from different positions. There is no pull to repair a poor approach automatically, so interception timing matters.
Against Giant: Keep Mini P.E.K.K.A for the health target and use Dark Prince on accessible support rather than placing both in one splash path. Musketeer can contribute from range. If the defender survives, only then decide whether Giant in front is worth more than preserving the next tank answer.
Against Baby Dragon: Musketeer needs safe shooting time while Bats wait for a useful angle and removal window. Graveyard Skeletons and Bats can disappear to the same splash if crowded. Arrows does not remove the healthy Baby Dragon, so do not pretend the attack's small-spell package solves every air defender.
A decision that changes the next exchange
Mini P.E.K.K.A survives a defense, but the opponent is about to reach another ground tank and your hand has no building. Sending him behind Giant may use your only immediate focused answer in the wrong lane. Keep the next approach covered before buying Graveyard, or build the attack around a different survivor. A defended tower matters more than converting every surviving troop into pressure.
Avoid this: Putting Giant, Graveyard and the remaining tank defender into one lane because the first defense left a body alive.
Two one-card alternatives
- Mega Minion for Bats (3.8 average elixir): Adds one elixir for a sturdier flying attacker but slows the hand and loses a cheap multi-body response.
- Zap for Giant Snowball (3.6 average elixir): The same cost adds a brief stun and reset while losing displacement and slow. Use it for a specific interruption, not as if it made every swarm defense identical to Snowball.
Where upgrades matter
Giant, Graveyard, Musketeer and Mini P.E.K.K.A are the main collection requirements. Dark Prince's repeated splash deserves useful levels when it is the reason you selected this ordinary version.
Giant Sparky Musketeer
For Giant/Sparky players who need Musketeer's predictable ranged air job and shielded Guards instead of stretching the first Champion into another expensive support slot.

Average elixir: 3.8
Eight cards and their jobs
- Giant (5 elixir): Five-elixir building-targeting tank for a worthwhile survivor; does not supply the support damage itself.
- Sparky (6 elixir): Large charged ground shot that is vulnerable to interruption and distraction; cannot damage air.
- Mini P.E.K.K.A (4 elixir): Concentrated ground damage for health targets; keep a route through distractions and supporting splash.
- Musketeer (4 elixir): Sustained direct ranged air and ground damage; preserve her when the rest of the deck cannot cover air.
- Bats (2 elixir): Cheap flying damage timed around opposing removal and splash; not a durable air defense.
- Guards (3 elixir): Shielded ground defense for distraction and damage; cannot attack air.
- Fireball (4 elixir): Immediate area damage and displacement where applicable; judge removals from actual card levels.
- Zap (2 elixir): Brief interruption and reset with small area damage; one cast does not solve repeated stuns permanently.
Why this version fits
Sparky supplies a powerful ground shot, but Mini P.E.K.K.A remains available for health targets when that shot is interrupted or distracted. Musketeer and Bats provide air damage while Guards buy ground time. Giant can lead the surviving damage once it has a route to work. This ordinary Sparky option trades the Golden Knight chain decision for a clearer local damage body, without gaining a defensive building or automatic answer to repeated resets.
Opening and double elixir
Use the smaller defender that actually solves the first approach and hold Sparky for a meaningful shot. A Giant placed before its damage support is ready can become an expensive request for more spending. Keep Musketeer available until the opponent's air plan is known.
Giant can protect a useful Sparky survivor, but the pair costs eleven when both are freshly deployed. Fireball follows real support value and Zap supplies a brief interruption. If the opponent's reset or distraction still prevents the shot, adding another support card may simply lengthen a failed attack.
Build the defense
Mini P.E.K.K.A handles ground health directly while Sparky needs a clear enough target and charge. Guards can occupy dangerous ground hits, and the two air options should not share unnecessary removal. A cheap swarm is useful only when its own counter is not freely clearing it.
Against Electro Wizard: Do not ask Sparky to be the sole answer to a unit that repeatedly interrupts it. Mini P.E.K.K.A can deal with a reachable ground target while Fireball helps only through actual damage or useful overlap. If the reset source is still safe, stop buying Giant support just to defend the original six-elixir investment.
Against Balloon: Musketeer must engage early and Bats should come from a useful removal window. Sparky cannot shoot air, and Guards cannot replace either defender above the ground. A tempting Giant counterpush is secondary when it delays the only sustained shooter.
A decision that changes the next exchange
Sparky has been interrupted twice and is about to lose its useful firing position. Giant is now affordable, but placing him in front does not remove the reset source. Let the attack end if the support cannot be addressed at a sensible cost, then use Mini P.E.K.K.A and the appropriate air defender for the return. Money already spent on a large card is not elixir available for the next defense.
Avoid this: Treating Giant as the answer to every failed Sparky shot instead of identifying the reset or distraction that prevented it.
Two one-card alternatives
- Mega Minion for Bats (3.9 average elixir): Adds one elixir for durable flying damage but makes the already expensive cycle slower.
- Goblin Gang for Guards (3.8 average elixir): The same cost trades shielded ground bodies for a mixed group with fragile Spear Goblins. That adds limited air help but makes the ground defense respond differently to spells.
Where upgrades matter
Sparky, Giant, Musketeer and Mini P.E.K.K.A each have a separate important job. Keep the defensive levels balanced enough that Sparky does not have to rescue every exchange.
Royal Hogs Recruits Inferno Dragon
For Recruits/Hogs owners whose missing job is concentrated anti-tank ramping, choosing Inferno Dragon instead of Zappies interruption.
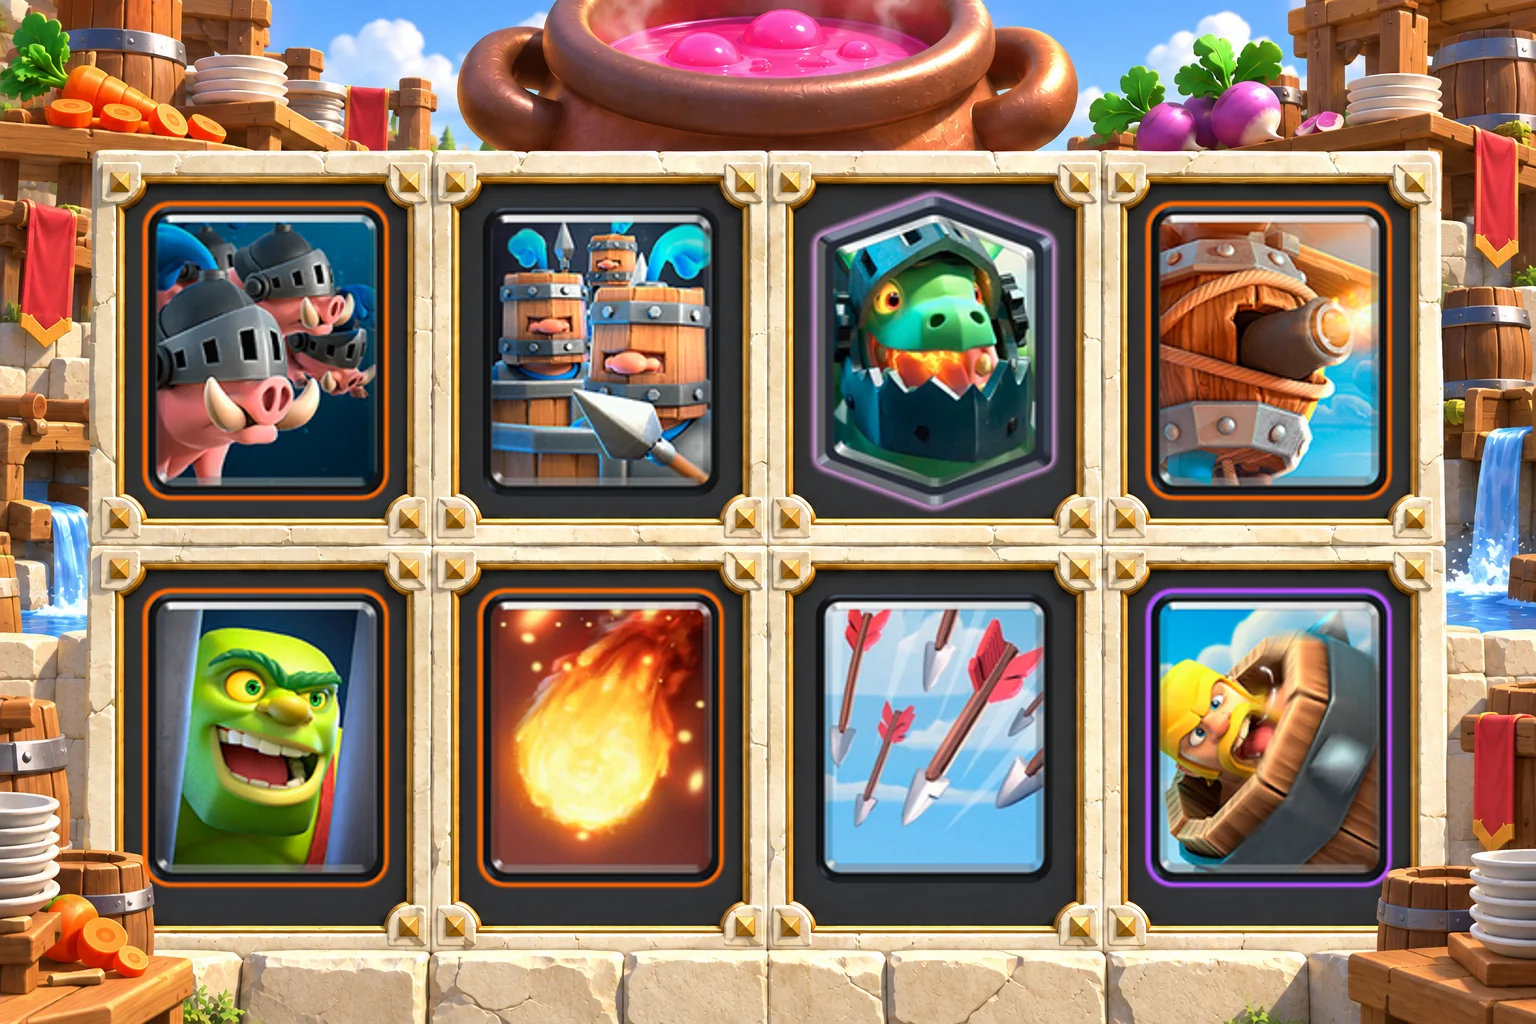
Average elixir: 4.1
Eight cards and their jobs
- Royal Hogs (5 elixir): Five-elixir building-targeting group that can split; a central defense may still affect both groups.
- Royal Recruits (7 elixir): Seven-elixir shielded ground bodies across two lanes; their deployment needs a reason and ranged support.
- Inferno Dragon (4 elixir): Flying focused damage that ramps on a target; protect its uninterrupted firing time from resets and distractions.
- Flying Machine (4 elixir): Long-range air and ground damage; keep it from sharing easy spell value with the other ranged group.
- Goblin Cage (4 elixir): Defensive pull that releases a ground Brawler after destruction; needs separate damage against air.
- Fireball (4 elixir): Immediate area damage and displacement where applicable; judge removals from actual card levels.
- Arrows (3 elixir): Wide removal for fragile ground or air groups; not a universal answer to healthier support.
- Barbarian Barrel (2 elixir): Short ground-line clear followed by a Barbarian body; offers no air damage.
Why this version fits
Inferno Dragon replaces Zappies in this Recruits and Hogs structure. The deployment cost stays the same, but ramping focused damage replaces repeated stuns. Flying Machine supplies range while Cage shapes the approach, and the three spells provide different removal choices. The result fits a collection that needs more concentrated damage against large health targets and can protect the beam from resets without expecting the lost Zappies interruptions.
Opening and double elixir
Use Cage for a useful pull or wait for the first committed approach. Recruits cost seven and should establish a defense or a credible split rather than appear automatically at a full bar. Keep Flying Machine separate from the Inferno Dragon's likely spell exposure.
Royal Hogs follow the lane or split that the revealed defense makes worthwhile. Arrows can clear a fragile group on the opponent's side, while Fireball handles a different health or displacement problem. If Inferno Dragon is still needed to stop the return, do not make it routine support for every five-elixir Hogs attack.
Build the defense
Recruits and Cage occupy ground attackers while Inferno Dragon ramps and Flying Machine keeps firing from range. Unlike Zappies, the dragon does not repeatedly stun the target or split into several separate defenders. The beam's uninterrupted time now matters more than the number of units on your side.
Against Electro Giant: Give the dragon a useful position and address the supporting reset before assuming the tank answer is secure. Cage and Recruits can shape the ground approach while Flying Machine contributes from range. If the beam is repeatedly interrupted, the equal deployment cost does not preserve Zappies' old defensive behavior.
Against Fireball and a building: Avoid giving one Fireball both ranged air defenders in a profitable group. The building may still affect a split Hogs attack, so choose the lane from its actual placement and remaining support. Arrows clears fragile targets but cannot remove every building or medium defender at once.
A decision that changes the next exchange
Inferno Dragon starts ramping, but the opponent sends a reset support troop toward it. Buying Hogs immediately can prevent the ground interception or spell that keeps the beam useful. Finish the tank exchange first. In the Zappies version, repeated interruption was part of the defense; this version deliberately chose focused ramping damage instead, and must protect the time that makes it effective.
Avoid this: Treating the Inferno Dragon swap as an equal-cost visual change while relying on stuns and split defensive bodies that are no longer in the deck.
Two one-card alternatives
- Skeleton Dragons for Flying Machine (4.1 average elixir): Same cost trades long focused range for two flying splash bodies, with different shared-removal exposure.
- Royal Delivery for Arrows (4.1 average elixir): The same cost provides a delayed defensive impact and Recruit on your own side. You lose immediate removal on the opponent's side, so Royal Hogs cannot rely on it to clear their attack.
Where upgrades matter
Royal Hogs, Inferno Dragon and Flying Machine determine the attack and focused defense. Recruits and Cage still need useful levels to create the time the beam requires.
Choose between a Champion and an ordinary defender
The closest lists are useful only when you understand their different jobs. Skeleton King Mortar Miner uses a ground splash body and a paid soul-summon decision. Mortar Miner Cannon Cart uses five-elixir ground range and a unit that becomes stationary at 50% health. Both retain fragile air coverage; neither choice solves that weakness merely by costing more than Knight.
The same reasoning separates Golden Knight from Valkyrie, Bowler or Royal Ghost. A finite dash can reach a particular target, but it does not preserve repeated surrounding splash, continuing knockback or invisibility. If one of those ordinary mechanics was the reason your defense survived, keep it until you have a specific replacement plan.
For an earlier ordinary-card comparison, the Arena 12 deck guide includes the Mortar bait and Miner Wall Breakers structures discussed here. Compare the changed defensive job rather than upgrading a Champion simply because Executioner’s Kitchen makes it available.
Questions before leaving Executioner’s Kitchen
Do I need a Champion to reach Arena 17?
No. The last twelve profiles use ordinary cards without a Champion. A leveled defense with a clear answer to air and ground pressure can be the more practical choice. Reaching 5,500 trophies opens the first Champion options; it does not invalidate cards that already do their jobs.
Should I put Golden Knight and Skeleton King in the same deck?
Current Supercell rules allow two Champions when both the Hero and Wild slots are used. Every Champion list here uses only one, so the eight card roles and defensive budget can be evaluated around that particular addition. Replacing another defender with a second Champion would create a different deck, with another lost job to assess.
Why is the ability cost missing from the deck average?
The average is the sum of the eight deployment costs divided by eight. An ability is an additional decision during battle, not a ninth deployment card. Check the activation charge in your current game and preserve the next defensive card before paying it. A low printed average is not proof that a Miner, spell and summon attack is cheap.
Can I finish the tower by cycling Fireball or Rocket?
Check the current damage at your spell level and the tower’s remaining health first. The September balance notes changed Fireball’s Crown Tower damage, so an older finish count may be wrong. If the spell is not lethal, retain enough defense for the opponent’s next attack before choosing another cycle.
Why did my copied deck have the wrong special form?
Inspect the selected deck slots in the game. These recommendations use base card effects and Tower Princess; they do not rely on an Evolution or separate Hero-form ability. Confirm the Champion’s slot and the remaining card forms before battle rather than assuming an exported link makes every account’s configuration identical.
Keep one defense you can repeat on the way to 6,000
Choose the collection you can support, then learn the first two defensive exchanges before upgrading another list. With Skeleton King, decide what the collected souls and surviving health can actually buy. With Golden Knight, check the reachable targets and the job left behind after the dash. With an ordinary deck, protect the specific shooting, splash or interruption that made it your choice.
Browse the arena deck guides if your strongest cards still belong to an earlier core. The next useful change is the one that repairs an identifiable defensive problem without making the rest of the deck harder to play.
Clash Royale Decks is an independent fan site and is not affiliated with, endorsed by, sponsored by or approved by Supercell.